Solution types
One Studio runs both Bin Picking Studio (BPS) and Locator Studio (LS). When you create a solution, you choose one of five solution types, and the type decides whether the solution belongs to BPS or LS. This page explains the difference between BPS and LS, helps you choose a type, and shows which setup steps and software modules each type uses.
Bin Picking Studio and Locator Studio
The difference is what the Studio reports to the robot:
Locator Studio reports the Cartesian pose of the localized object (for Layer Localization, the Cartesian pose of the top layer). The robot program plans the motion to the object itself.
Bin Picking Studio reports a collision-free trajectory for the robot, together with the gripper commands. To plan the path, the Studio needs models of the robot, the gripper and the robotic cell.
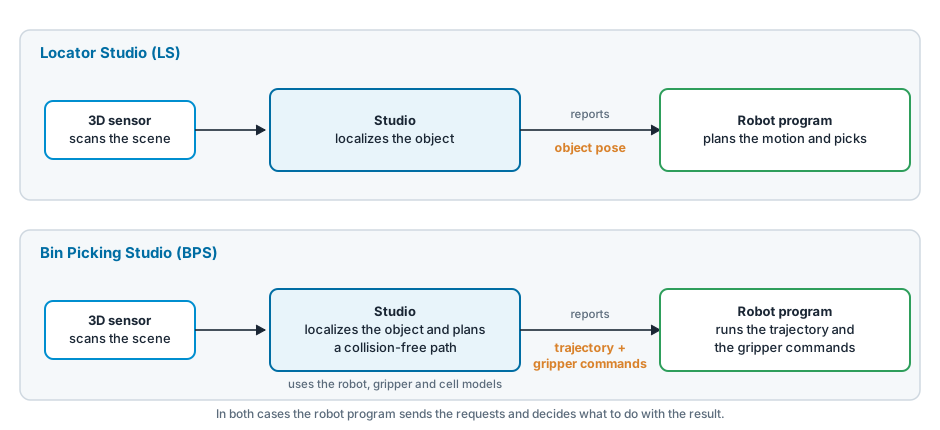
What the Studio does and reports in Locator Studio and in Bin Picking Studio.
Locator Studio (LS) |
Bin Picking Studio (BPS) |
|
|---|---|---|
The Studio reports |
The Cartesian pose of the object (or of the top layer) |
A collision-free trajectory and the gripper commands |
The robot motion is planned by |
The robot program |
The Studio |
Models of the robot, gripper and cell |
Not needed |
Needed: Robot, Gripper and Environment setup steps |
Robot State Communication Channel |
Optional |
Needed |
Robot side |
Robot module, or your own Action Request Client (TCP/IP client) on any compatible robot controller or PLC |
Robot module |
In both cases the Studio never takes control over the robot. It only answers the action requests that the robot program sends. The robot programmer decides when to send a request and what to do with the result. For BPS, the robot programmer also implements the gripper commands and sets the motion parameters (speed, acceleration, accuracy). See Full operator control and Robot communication overview.
The five solution types
You choose the solution type in the Create a new solution dialog. The dialog describes each type by how it recognizes the object, what it reports and what it is ideal for:
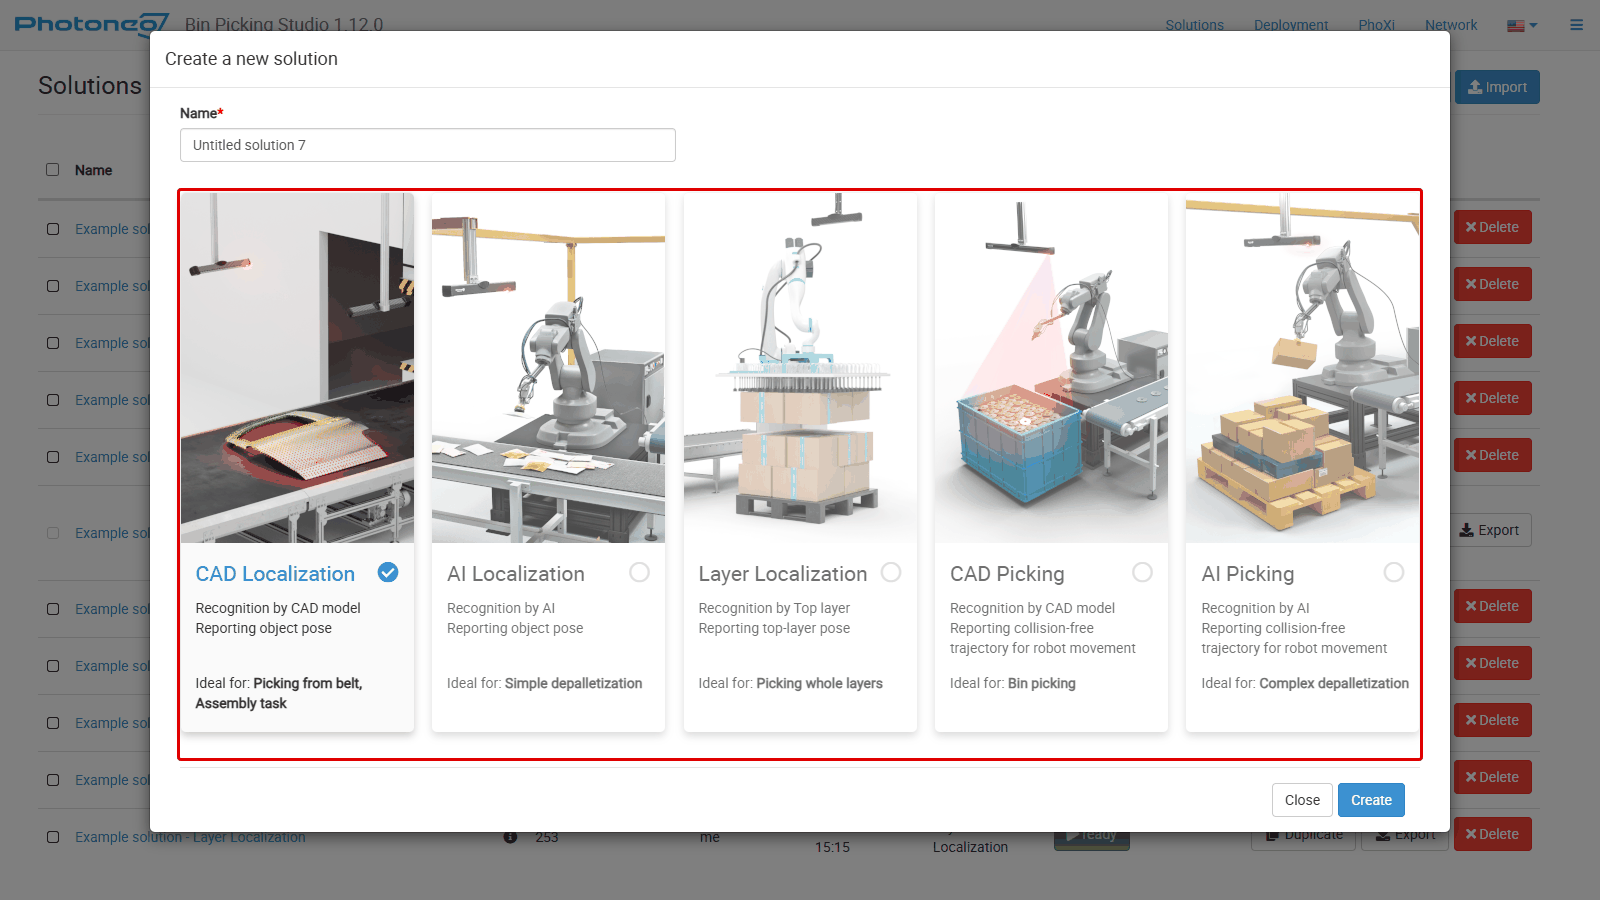
The Create a new solution dialog. The red frame marks the five solution types.
Solution type |
Product |
Recognition by |
Reporting |
Ideal for |
|---|---|---|---|---|
CAD Localization |
LS |
CAD model |
Object pose |
Picking from belt, assembly task |
AI Localization |
LS |
AI |
Object pose |
Simple depalletization |
Layer Localization |
LS |
Top layer |
Top-layer pose |
Picking whole layers |
CAD Picking |
BPS |
CAD model |
Collision-free trajectory |
Bin picking |
AI Picking |
BPS |
AI |
Collision-free trajectory |
Complex depalletization |
Which type to choose
Two questions lead to the right type:
Should the Studio plan a collision-free path for the robot? Yes – a Bin Picking Studio type (CAD Picking or AI Picking). No – a Locator Studio type.
How should the object be recognized? By its CAD model, by AI, or as a whole top layer (Layer Localization, Locator Studio only).
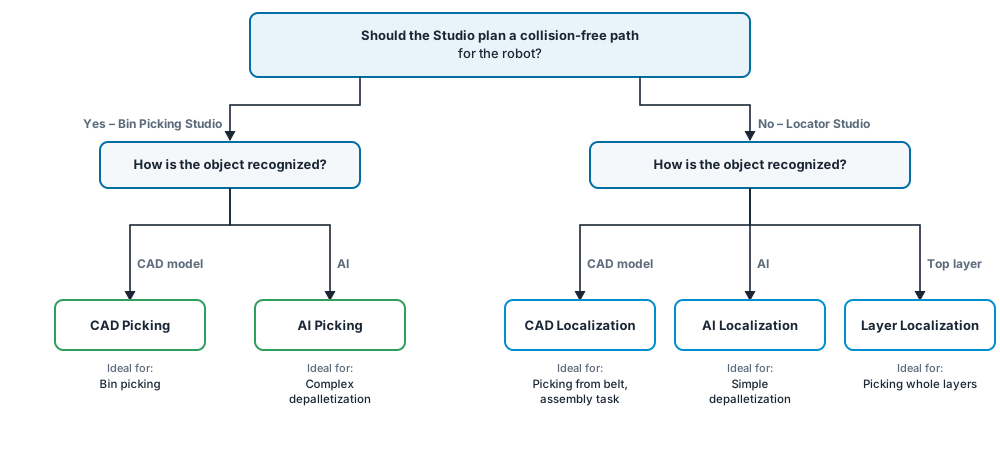
From the two questions to the solution type.
Setup steps of each solution type
The menu of a solution shows only the setup steps that its type needs, in this order:
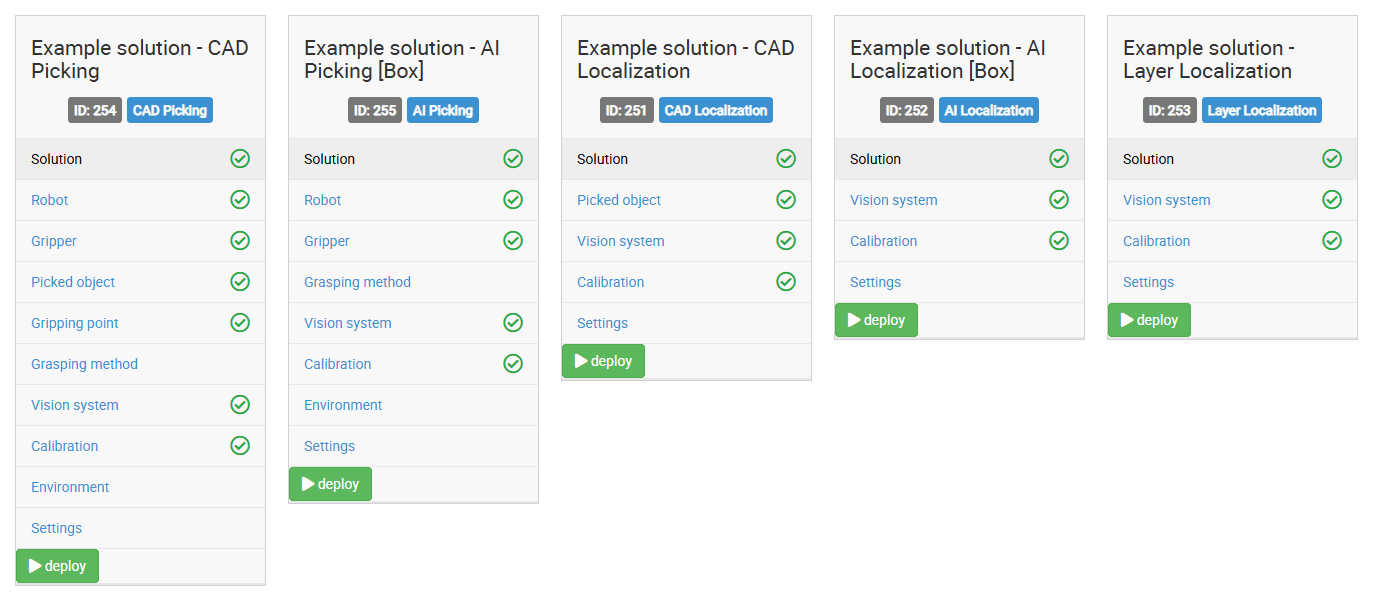
The solution menu of each type, from left to right: CAD Picking, AI Picking, CAD Localization, AI Localization and Layer Localization.
Setup step |
CAD Picking |
AI Picking |
CAD Localization |
AI Localization |
Layer Localization |
|---|---|---|---|---|---|
✓ |
✓ |
– |
– |
– |
|
✓ |
✓ |
– |
– |
– |
|
Picked object (Mesh tools, Reported pose) |
✓ |
– |
✓ |
– |
– |
✓ |
– |
– |
– |
– |
|
✓ |
✓ |
– |
– |
– |
|
✓ |
✓ |
✓ |
✓ |
✓ |
|
✓ |
✓ |
✓ |
✓ |
✓ |
|
✓ |
✓ |
– |
– |
– |
|
✓ |
✓ |
✓ |
✓ |
✓ |
Notes:
AI types have no Picked object step, and AI Picking has no Gripping point step. The gripping point of AI solutions is placed with the gripping point settings of AI localization.
For the Layer Localization type, see Layer Localization.
Besides the setup steps, every solution has the Solution page with the Detail, Attachments and Activity log tabs. See Solutions page.
Software modules
Which solution types you can create depends on the software modules of your installation. The Software modules page of the Studio lists them, grouped as in this table. The descriptions are the tooltips of the Studio.
Software module |
Enables |
Used by |
|---|---|---|
CAD Localization |
The CAD-based localization engine |
CAD Localization, CAD Picking |
MultiView Module |
Multi-viewpoint scan acquisition for the CAD-based localization engine. See MultiView Localization. |
CAD Localization, CAD Picking |
AI Localization |
The neural network-based localization engine |
AI Localization, AI Picking |
AnyPick Module for Boxes (Depalletization) |
Neural networks for detecting boxes |
AI types |
AnyPick Module for Totes (Depalletization) |
Neural networks for detecting totes |
AI types |
AnyPick Module for Slipsheets |
Neural networks for detecting slipsheets |
AI types |
AnyPick Module (Custom) |
Neural networks for detecting custom objects |
AI types |
Layer Localization |
The layer-based localization engine. Only available for the Locator solution type. |
Layer Localization |
Path Planning & Collision Avoidance |
Navigation of the robot using collision-free trajectories |
CAD Picking, AI Picking |
The indented modules are listed under their localization engine on the Software modules page. To unlock more modules, contact your sales representative. See also Software modules.
Creating a solution
Open the Solutions page and click Create new.
Enter the Name of the solution.
Choose the solution type (see the dialog above).
Click Create.
If your installation has no license for the chosen type, the Create button is disabled and the dialog shows “No valid license found for this solution type”. Check the Software modules page.
Instead of starting from scratch, you can Duplicate an existing solution, for example one of the example solutions such as “Example solution - CAD Picking”. Solutions marked factory default cannot be edited or deleted; duplicate them first.
For importing, exporting and deleting solutions, see Solutions page.