Integration Guide KUKA (LBR iiwa)
Note: It is strongly recommended to read the Robot communication overview prior to this integration guide.
Contents
1 Prerequisites
The Robot module prerequisites:
The Robot module was originally developed using Sunrise Cabinet with firmware version V2.0.3-0 and Sunrise.OS software version . It should be compatible with all versions of the Sunrise.OS.
To check your software version go to Station -> Information.
2 Robot controller setup
2.1 Controller configuration
2.1.1 Network configuration
Ensure that the IP address of the Sunrise Cabinet meets your network configuration requirements.
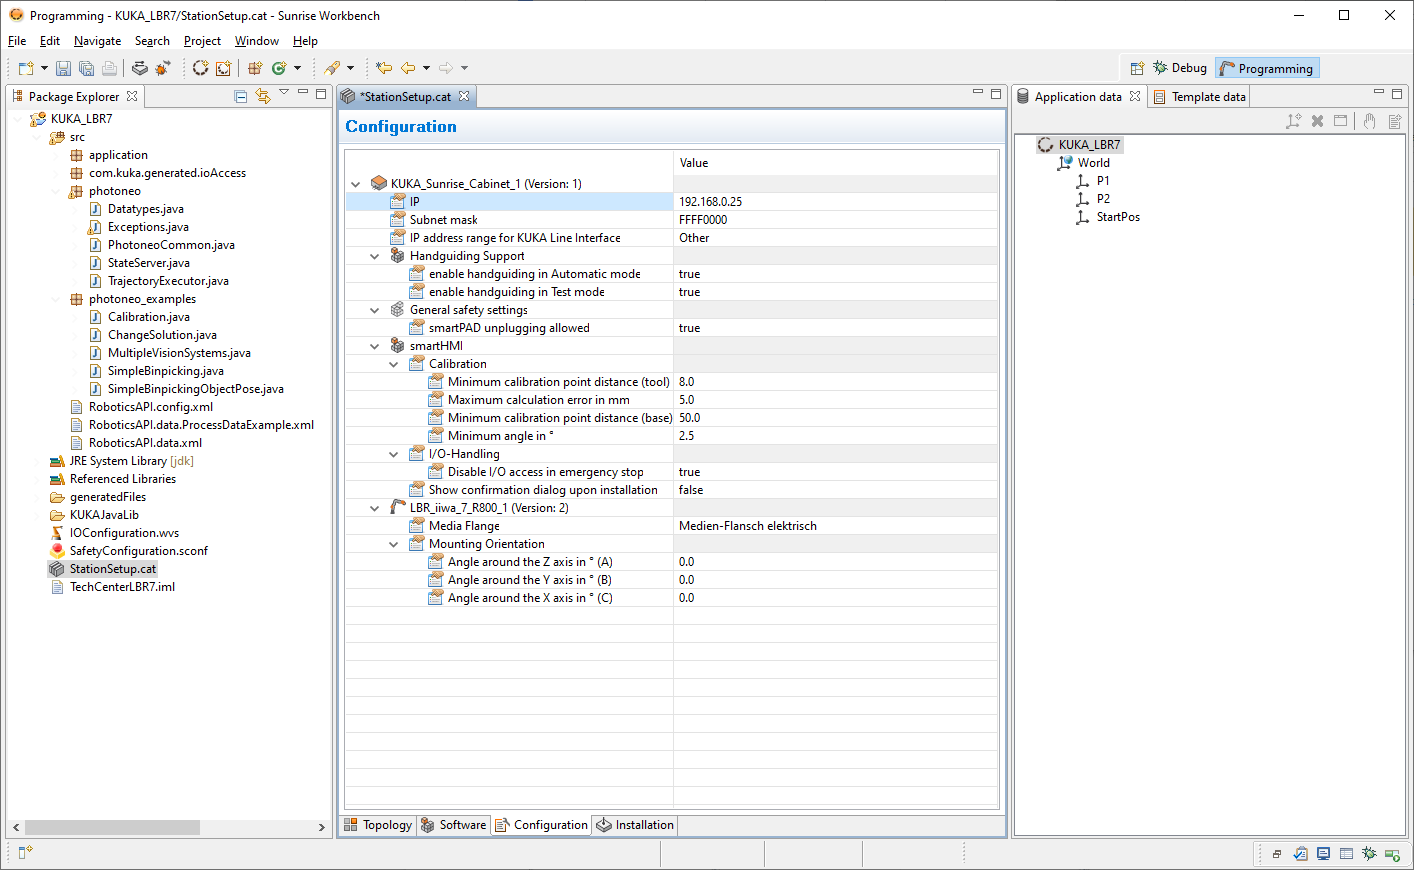
In your Sunrise Workbench project, open the StationSetup.cat file and go to the Configuration tab. Here you can change the IP address and subnet mask of your Sunrise Cabinet. After editing the network configuration, save the file and synchronize the project with your controller.
2.2 Robot module installation
The Robot module consists of the following files (folders are bold):
photoneo
Datatypes.java
Exceptions.java
PhotoneoCommon.java
StateServer.java
TrajectoryExecutor.java
photoneo_examples
Calibration.java
ChangeSolution.java
MultipleVisionSystems.java
SimpleBinpicking.java
2.2.1 Loading the Robot module files
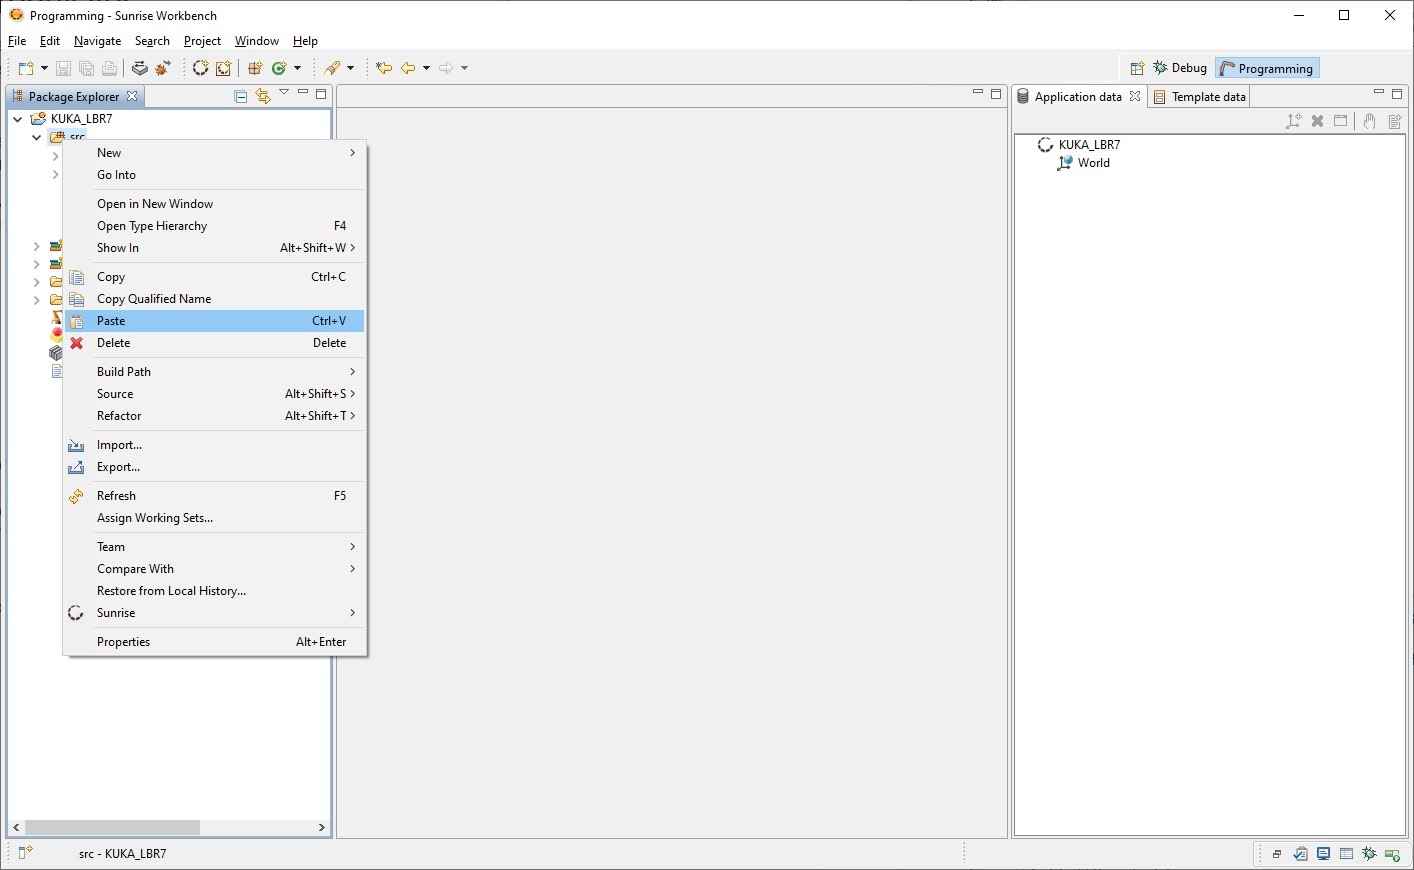
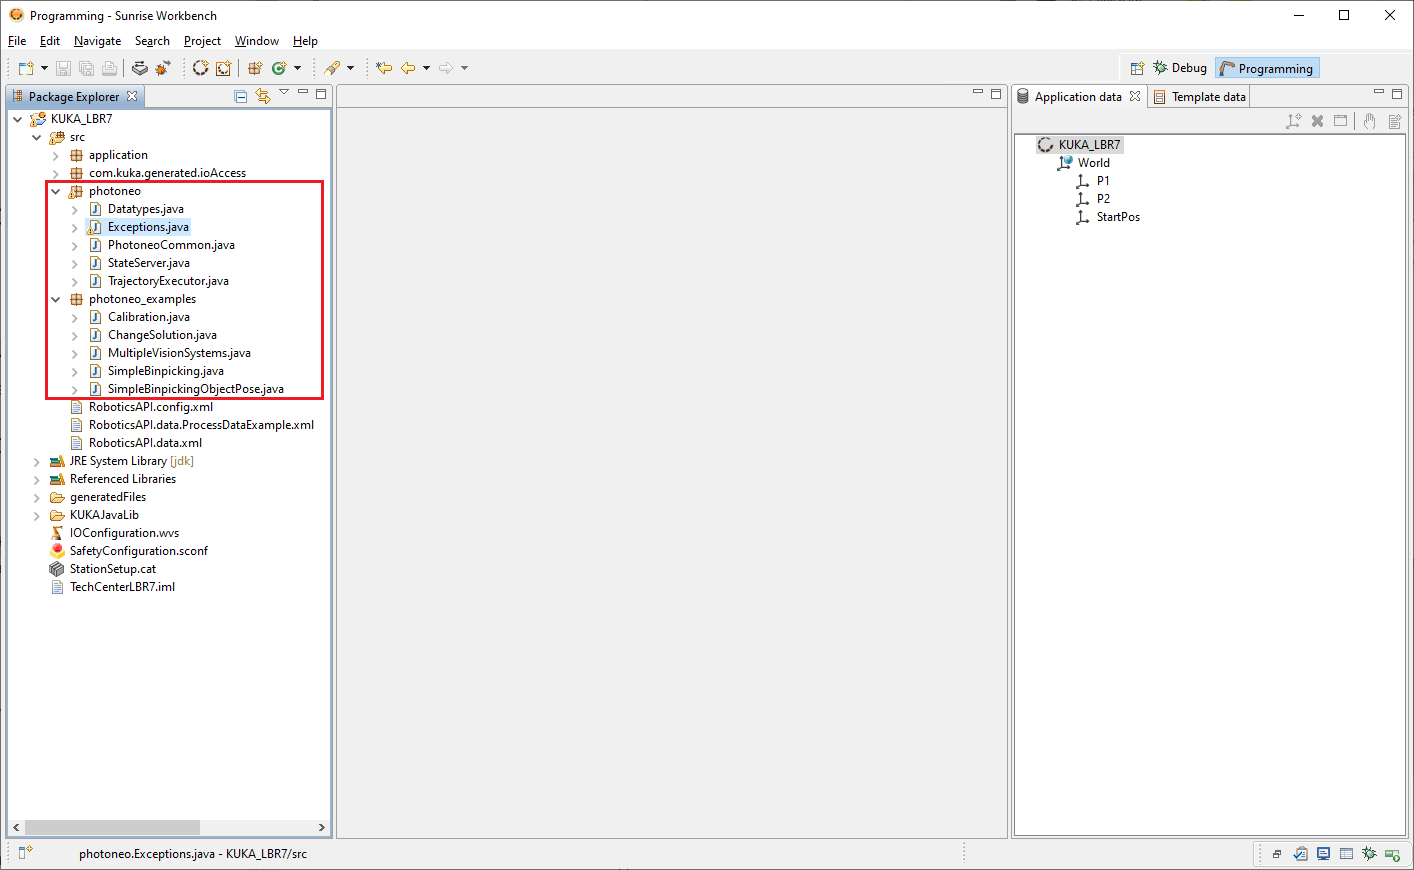
2.2.2 Robot State Server configuration
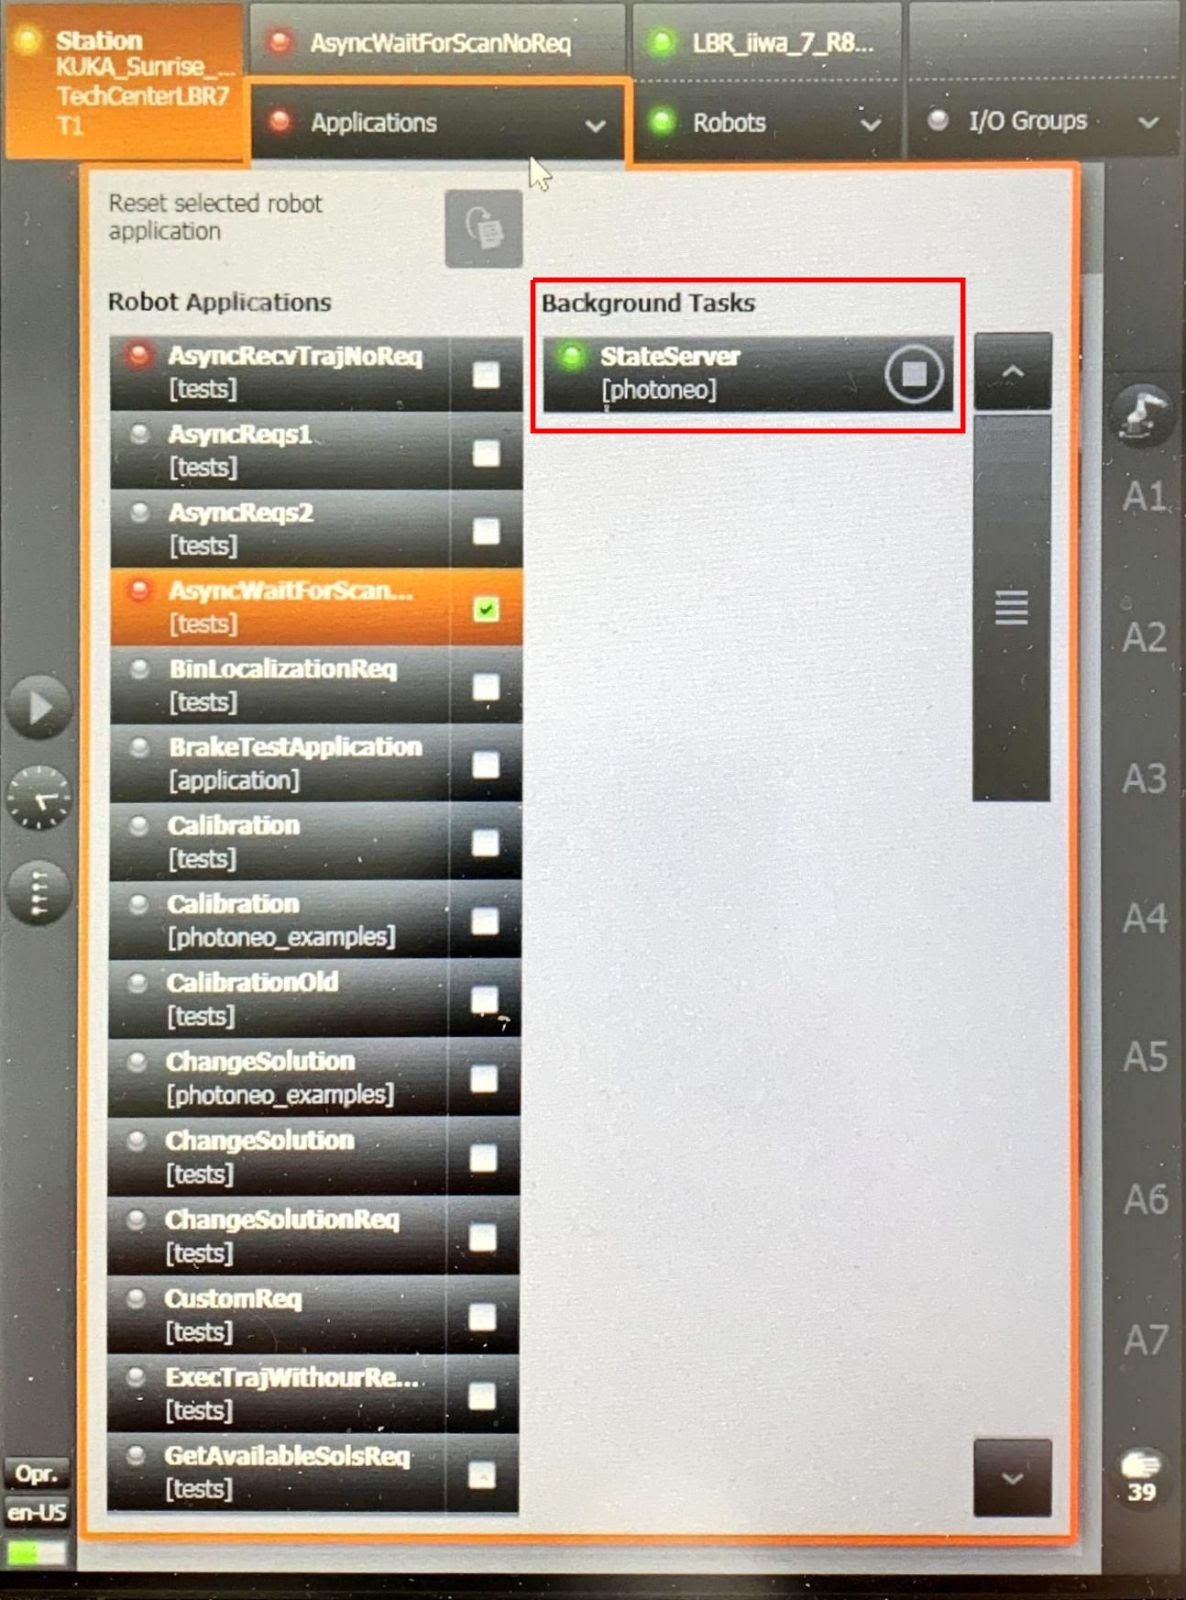
The Robot State Server needs to run in order to be able to calibrate a vision system, teach a gripping point, and use hand-eye vision systems. It also provides data for real-time visualization. The Robot State Server functionality is implemented as RoboticsAPICyclicBackgroundTask, so when the file StateServer.java is loaded to the robot controller, the Robot State Server will start and run automatically - no special setup is required.
3 Robot module
The Robot module is designed to be easily integrated into existing applications written in Java language.
3.1 Robotic API
Note: It is strongly recommended to read the Photoneo robotic API prior to this section.
3.1.1 Connection procedures
Warning: These procedures are contained in the PhotoneoCommon class and must not be edited!
Connection procedure |
Description / Usage |
|---|---|
Connect to Action Request Server boolean connectToVisionController(String address,int timeout) |
Description
Function to establish a new connection to the Action Request Server.
Input parameters:
Return value:
Usage
The procedure should be called only once at the beginning of the program. Only after the connection has been established it is possible to send requests.
|
3.1.2 Communication procedures
Note: Please read Action requests for detailed documentation of these procedures.
Warning: These procedures are contained in the PhotoneoCommon class (PhotoneoCommon.java) and must not be edited!
Bin picking requests
Request |
Input variables |
Output variables |
|---|---|---|
Initialization request SimpleResult initRequest(JointPosition end,JointPosition start,int visionSystemId) |
|
|
Scan request void scanRequest(int visionSystemId) |
|
Note: The response is received by the procedure Wait for scan completion. |
Trajectory request void trajectoryRequest(int visionSystemId) |
|
Note: The response is received by the procedure Receive trajectory. |
Pick-failed request SimpleResult sendPickFailed(int visionSystemId) |
|
|
Calibration requests
Request |
Input variables |
Output variables |
|---|---|---|
Add calibration point request SimpleResult calibrationAddPoint() |
— |
|
Solution requests
Request |
Input variables |
Output variables |
|---|---|---|
Change solution request SimpleResult changeSolutionRequest(int solutionId) |
|
|
Start solution request SimpleResult startSolutionRequest(int solutionId) |
|
|
Stop solution request SimpleResult stopSolutionRequest() |
— |
|
Get running solution request IntResult getRunningSolutionRequest() |
— |
|
Get available solutions request IntsResult getAvailableSolutionsRequest() |
— |
|
Response receiving procedures
Response receiving procedures |
Input variables |
Output variables |
|---|---|---|
Wait for scan completion SimpleResult waitForScan() |
— |
|
Receive trajectory TrajectoryResult receiveTrajectory() |
— |
|
3.1.3 Bin picking procedures
Note: These procedures are contained in the TrajectoryExecutor class (TrajectoryExecutor.java) and should be implemented (edited) by the user according to his requirements.
The TrajectoryExecutor is a helper class for the execution of received bin picking trajectory. It provides two constructors:
TrajectoryExecutor(Robot robot)TrajectoryExecutor(Robot robot, double[] velocity, double[] acceleration)
Both constructors require a Robot type object to be passed into them (a LBR type object can be also passed). Optional velocity and acceleration arrays specify normalized velocities and accelerations of the motion (values must be between 0 and 1) for each trajectory segment of the bin picking routine.
The gripper procedures need to be overridden by the user to execute the required code (setting gripper I/Os, etc.). The easiest way to do so is by using an anonymous inner class idiom, i.e..
TrajectoryExecutor executor = new TrajectoryExecutor(robot) {
   @Override
   protected void gripperAttach() {
     // insert your code here
   }
};
Bin picking procedure |
Description / Usage |
|---|---|
Gripper attach void gripperAttach() |
Description
A user-defined procedure. Typically it is the attach procedure used when the picked object is grasped in the Grasp waypoint.
Usage
It is automatically executed when the waypoint of the grasping method is configured to execute the Attach procedure when it is reached.
|
Gripper detach void gripperDetach() |
Description
A user-defined procedure. Typically it is the detach procedure used when the picked object is placed during the placing routine defined by the robot operator.
Usage
It is automatically executed when the waypoint of the grasping method is configured to execute the Detach procedure when it is reached.
Note: Typically this procedure is not configured to be executed automatically in a waypoint as it should be called during placing which is implemented by the robot operator. |
Gripper user-defined 1 void user1() |
Description
A user-defined procedure.
Usage
It is automatically executed when the waypoint of the grasping method is configured to execute the User 1 procedure when it is reached.
|
Gripper user-defined 2 void user2() |
Description
A user-defined procedure.
Usage
It is automatically executed when the waypoint of the grasping method is configured to execute the User 2 procedure when it is reached.
|
Gripper user-defined 3 void user3() |
Description
A user-defined procedure.
Usage
It is automatically executed when the waypoint of the grasping method is configured to execute the User 3 procedure when it is reached.
|
Execute bin picking routine IMotionContainer execute(TrajectoryResult trajectoryResult) |
Description
Pre-defined procedure for execution of the bin picking routine. This procedure must not be edited directly - to adapt the execution settings please read Bin picking routine execution settings.
Input parameters:
Return value:
Usage
It should be executed after the bin picking trajectory has been received. The robot must be in the start pose when the procedure is executed. At the end of the procedure, the robot will be in the end pose with the picked object attached to the gripper.
Note: The trajectory is executed asynchronously (Robot.moveAsync(…)) and IMotionContainer object is returned. This allows appending other waypoints at its end without the robot stopping its movement at the bin picking end position.
To wait until the whole bin picking trajectory is executed (not continue with the next program instructions), method await() should be called on the IMotionContainer object.
Warning: When using multiple start poses (different for multiple vision systems) be extra careful to be in the correct one before executing this procedure. |
3.1.4 Request response types
Error error - error code
boolean hasError() - method for checking the error occurrence (true if an error occurred)Error error - error code
boolean hasError() - method for checking the error occurrence (true if an error occurred)
int toolPointInv - tool point invariance
int grippingPointId - gripping point ID
int grippingPointInv - gripping point invariance
Queue<RobotTask> robotTasks - computed bin picking trajectory, a queue of tasks to be performed by the TrajectoryExecutor [internal variable]
ArrayList<Integer> infoData - additional data [internal variable]Error error - error code
boolean hasError() - method for checking the error occurrence (true if an error occurred)
Integer value - solution IDError error - error code
boolean hasError() - method for checking the error occurrence (true if an error occurred)
Integer[] values - an array of available solution IDs
3.2 Example programs
The following section contains basic example programs. Each program is intended for a specific bin picking application and it shows the correct usage of the robotic API.
These templates also contain demonstrative error handling. Please note that it serves only as an example and it is up to the user to define suitable routines for dealing with error situations.
3.2.1 Basic bin picking example
This program is a very basic example of a simple bin picking application. It connects to the vision controller, initializes one vision system, and in a loop, it requests scan, trajectory and executes the received trajectory.
Name: SimpleBinpicking.java (located in package photoneo_examples)
package photoneo_examples;

import javax.inject.Inject;

import com.kuka.roboticsAPI.applicationModel.RoboticsAPIApplication;
import static com.kuka.roboticsAPI.motionModel.BasicMotions.*;

import com.kuka.roboticsAPI.deviceModel.JointPosition;
import com.kuka.roboticsAPI.deviceModel.LBR;
import com.kuka.roboticsAPI.uiModel.ApplicationDialogType;
import com.kuka.task.ITaskLogger;

import photoneo.PhotoneoCommon;
import photoneo.Datatypes.SimpleResult;
import photoneo.Datatypes.TrajectoryResult;
import photoneo.Datatypes;
import photoneo.TrajectoryExecutor;


public class SimpleBinpicking extends RoboticsAPIApplication {
    @Inject
    private LBR robot;

    @Inject
    protected ITaskLogger logger;

    PhotoneoCommon phoCommon;
    TrajectoryExecutor phoExecutor;

    // ================= Update settings for your setup!!!
    final String serverAddress = "";
    final JointPosition placingPosition = new JointPosition(9, 9, 9, 9, 9, 9, 9);
    final JointPosition start = new JointPosition(9, 9, 9, 9, 9, 9, 9);     // Binpicking start position
    final JointPosition end = new JointPosition(9, 9, 9, 9, 9, 9, 9);       // Binpicking end position
    final int vsId = 1;   // vision system ID
    // ================= Update settings for your setup!!!


    public void initialize() {
        // Instantiate required classes to do Binpicking
        phoCommon = new PhotoneoCommon(robot);
        phoExecutor = new TrajectoryExecutor(robot, new double[]{1, 0.5, 0.5, 1}, null) {   // anonymous class
            @Override
            protected void gripperAttach() {
                logger.info("Attaching gripper - Implement your I/O here");
            }
        };
    }

    public void run() {
        // Connect to Binpicking Vision Controller
        boolean success = phoCommon.connectToVisionController(serverAddress, 10000);
        if (!success) {
            logger.error("Unable to connect to Vision Controller. Check your network setup. Terminating program.");
            return;
        }

        // Initialize Binpicking for desired vision system
        SimpleResult simpleResult = phoCommon.initRequest(start, end, vsId);
        if (simpleResult.hasError()) {
            logger.error(simpleResult.error + " error occurred. It seems that Binpicking solution is not deployed. Terminating program.");
            return;
        }

        // Prepare robot - move to placing position
        robot.move(ptp(placingPosition));

        // Scan and localize picked objects
        phoCommon.scanRequest(vsId);

        while (true) {
            // Prepare robot to Binpicking start position
            robot.move(ptp(start));

            // Wait for finished scan and localization
            SimpleResult scanResult = phoCommon.waitForScan();
            if (scanResult.hasError()) {
                if (doYouWantToContinue(scanResult.error)) { continue; } else { return;}
            }

            // Get planned trajectory
            phoCommon.trajectoryRequest(vsId);
            TrajectoryResult trajectoryResult = phoCommon.receiveTrajectory();
            if (trajectoryResult.hasError()) {
                if (doYouWantToContinue(trajectoryResult.error)) { continue; } else { return;}
            }

            // Execute Binpicking trajectory
            phoExecutor.execute(trajectoryResult);

            // Move from Binpicking end to placing position
            robot.move(ptp(placingPosition));

            // Perform new scan and localization during placing picked object
            phoCommon.scanRequest(vsId);

            logger.info("Detaching gripper");   // here you can set your I/O
        }
    }

    /**
     *  This is helper function to do stuff around error handling
     *
     * @param error
     * @return  true if user want to continue in program flow and repeat program loop, false otherwise
     */
    public boolean doYouWantToContinue(Datatypes.Error error) {
        String errorText = error + " error occurred during program run. Do you want to continue?";
        int terminateProgram = getApplicationUI().displayModalDialog(ApplicationDialogType.QUESTION, errorText, "Continue", "Terminate program");

        if (terminateProgram == 1) {    // Terminate option chosen
            logger.info("Terminating program");
            return false;
        } else {
            robot.move(ptp(placingPosition).setJointVelocityRel(0.2));      // set lower movement speed
            phoCommon.scanRequest(vsId);
            return true;
        }
    }
}
Program explanation
final JointPosition placingPosition = new JointPosition(9, 9, 9, 9, 9, 9, 9);
final JointPosition start = new JointPosition(9, 9, 9, 9, 9, 9, 9);   // Binpicking start position
final JointPosition end = new JointPosition(9, 9, 9, 9, 9, 9, 9);     // Binpicking end position
Declaration of PhotoneoCommon and TrajectoryExecutor objects which will be defined in the initialize() method.
// ================= Update settings for your setup!!!
final String serverAddress = "";
final JointPosition placingPosition = new JointPosition(9, 9, 9, 9, 9, 9, 9);
final JointPosition start = new JointPosition(9, 9, 9, 9, 9, 9, 9);     // Binpicking start position
final JointPosition end = new JointPosition(9, 9, 9, 9, 9, 9, 9);       // Binpicking end position
final int vsId = 1;   // vision system ID
// ================= Update settings for your setup!!!
Definitions of variables that are used in the program, adapt these settings according to your application requirements. Joint positions must be defined in radians.
phoCommon = new PhotoneoCommon(robot);
Construction of a PhotoneoCommon object with a passed LBR robot object.
phoExecutor = new TrajectoryExecutor(robot, new double[]{1, 0.5, 0.5, 1}, null) {   // anonymous class
   @Override
   protected void gripperAttach() {
     logger.info("Attaching gripper - Implement your I/O here");
   }
};
Construction of a TrajectoryExecutor object that will help to execute the received bin picking trajectory. The LBR robot object is passed also to this constructor together with speed parameters for individual segments of the bin picking trajectory:
Start -> Approach (100%)
Approach -> Grasp (50%)
Grasp -> Deaproach (50%)
Deaproach -> End (100%)
We want to use machine default accelerations so a null is passed as the third argument.
Thanks to the anonymous class declaration idiom here, we have a possibility to override procedures that can be executed in a configured waypoint of the grasping method. We override the Gripper attach method to log a string.
boolean success = phoCommon.connectToVisionController(serverAddress, 10000);
if (!success) {
  logger.error("Unable to connect to Vision Controller. Check your network setup. Terminating program.");
   return;
}
Next, the program tries to establish a connection to the Action Request Server running on the vision controller. When the connection is established successfully, the variable success will have the value true and the program will continue. If the 10-second timeout is reached or any other connection issue occurs, the success variable will have the value false and the program will be halted.
// Initialize Binpicking for desired vision system
SimpleResult simpleResult = phoCommon.initRequest(start, end, vsId);
Initialization of the vision system with start/end bin picking poses (robot joint positions).
if (simpleResult.hasError()) {
   logger.error(simpleResult.error + " error occurred. It seems that Binpicking solution is not deployed. Terminating program.");
   return;
}
Check if an error occurred during the initialization request. If so, an error will be logged to application output and the program will be halted.
// Prepare robot - move to placing position
robot.move(ptp(placingPosition));
Move the robot to the placing position that is out of the scanning area.
// Scan and localize picked objects
phoCommon.scanRequest(vsId);
Call the first scan request.
// Prepare robot to Binpicking start position
robot.move(ptp(start));
While the scan is triggered and localization with path planning are running, we can use this time to move the robot to the bin picking start position.
// Wait for finished scan and localization
SimpleResult scanResult = phoCommon.waitForScan();
if (scanResult.hasError()) {
   if (doYouWantToContinue(scanResult.error)) { continue; } else { return;}
}
When the robot is ready at the bin picking start position the response to the scan request can be received using the procedure Wait for scan completion. If an error occurred during the scan execution, error handling is performed.
// Get planned trajectory
phoCommon.trajectoryRequest(vsId);
TrajectoryResult trajectoryResult = phoCommon.receiveTrajectory();
if (trajectoryResult.hasError()) {
   if (doYouWantToContinue(trajectoryResult.error)) { continue; } else { return;}
}
If the scan result was successful, a bin picking trajectory can be requested with the Trajectory request and then received using the procedure Receive trajectory. The same error handling as before is performed.
// Execute Binpicking trajectory
phoExecutor.execute(trajectoryResult);
If a bin picking trajectory was received successfully, it can be executed. Thanks to the robot’s asynchronous movement the procedure Execute bin picking routine returns immediately and while the robot is moving, the program continues to the next line:
// Move from Binpicking end to placing position
robot.move(ptp(placingPosition));
The robot finishes the bin picking routine and continues moving to the placing position where it stops.
// Perform new scan and localization during placing picked object
phoCommon.scanRequest(vsId);
When the robot is out of the scanning area, the next scan request can be called.
logger.info("Detaching gripper"); // here you can set your I/O
While the scanning is in progress, the picked object can be placed - add the gripper command here.
The program then continues from the beginning of the main loop.
3.2.2 Multiple Vision Systems example
This program is an extension of the basic bin picking example. Instead of one, it initializes two vision systems and switches between them in each cycle.
Name: MultipleVisionSystems.java (located in package photoneo_examples)
package photoneo_examples;

import com.kuka.roboticsAPI.applicationModel.RoboticsAPIApplication;
import com.kuka.roboticsAPI.deviceModel.JointPosition;
import com.kuka.roboticsAPI.deviceModel.LBR;
import com.kuka.roboticsAPI.uiModel.ApplicationDialogType;
import com.kuka.task.ITaskLogger;
import photoneo.PhotoneoCommon;
import photoneo.Datatypes;
import photoneo.Datatypes.SimpleResult;
import photoneo.Datatypes.TrajectoryResult;
import photoneo.TrajectoryExecutor;

import javax.inject.Inject;

import static com.kuka.roboticsAPI.motionModel.BasicMotions.ptp;

/**
 * Helper data structure to represent a vision system with required attributes
 */
class VisionSystemData {
    int id;
    JointPosition start;
    JointPosition end;
    VisionSystemData(int id, JointPosition start, JointPosition end) {
        this.id = id;
        this.start = start;
        this.end = end;
    }
}

public class MultipleVisionSystems extends RoboticsAPIApplication {
    @Inject
    private LBR robot;

    @Inject
    protected ITaskLogger logger;

    PhotoneoCommon phoCommon;
    TrajectoryExecutor phoExecutor;


    // ================= Update settings for your setup!!!
    final String serverAddress = "";
    final JointPosition placingPosition = new JointPosition(9, 9, 9, 9, 9, 9, 9);
    final VisionSystemData firstVs = new VisionSystemData(1,
                                                     new JointPosition(9, 9, 9, 9, 9, 9, 9),
                                                     new JointPosition(9, 9, 9, 9, 9, 9, 9));
    final VisionSystemData secondVs = new VisionSystemData(2,
                                                     new JointPosition(9, 9, 9, 9, 9, 9, 9),
                                                     new JointPosition(9, 9, 9, 9, 9, 9, 9));
    VisionSystemData activeVs = firstVs;
    // ================= Update settings for your setup!!!


    public void initialize() {
        // Instantiate required classes to do Binpicking
        phoCommon = new PhotoneoCommon(robot);
        phoExecutor = new TrajectoryExecutor(robot) {   // anonymous class
            @Override
            protected void gripperAttach() {
                logger.info("Attaching gripper - Implement your I/O here");
            }
        };
    }

    public void run() {
        // Connect to Binpicking Vision Controller
        boolean success = phoCommon.connectToVisionController(serverAddress, 10000);
        if (!success) {
            logger.info("Unable to connect to Vision Controller. Check your network setup. Terminating program.");
            return;
        }

        // Initialize Binpicking for desired vision system
        phoCommon.initRequest(firstVs.start, firstVs.end, firstVs.id);
        phoCommon.initRequest(secondVs.start, secondVs.end, secondVs.id);

        // Prepare robot - move to placing position
        robot.move(ptp(placingPosition));

        // Scan and localize picked objects
        phoCommon.scanRequest(activeVs.id);

        while (true) {
            // Prepare robot to Binpicking start position
            robot.move(ptp(activeVs.start));

            // Wait for finished scan and localization
            SimpleResult scanResult = phoCommon.waitForScan();
            if (scanResult.hasError()) {
                if (doYouWantToContinue(scanResult.error)) { continue; } else { return;}
            }

            // Get planned trajectory
            phoCommon.trajectoryRequest(activeVs.id);
            TrajectoryResult trajectoryResult = phoCommon.receiveTrajectory();
            if (trajectoryResult.hasError()) {
                if (doYouWantToContinue(trajectoryResult.error)) { continue; } else { return;}
            }

            // Execute Binpicking trajectory
            phoExecutor.execute(trajectoryResult);

            // Move from Binpicking end to placing position
            robot.move(ptp(placingPosition));

            // Switch active vision system
            activeVs = (activeVs.id == firstVs.id) ? secondVs : firstVs;

            // Perform new scan and localization during placing picked object
            phoCommon.scanRequest(activeVs.id);

            logger.info("Detaching gripper");   // here you can set your I/O
        }
    }

    /**
     *  This is helper function to do stuff around error handling
     *
     * @param error
     * @return  true if user want to continue in program flow and repeat program loop, false otherwise
     */
    public boolean doYouWantToContinue(Datatypes.Error error) {
        String errorText = error + " error occurred during program run. Do you want to continue?";
        int terminateProgram = getApplicationUI().displayModalDialog(ApplicationDialogType.QUESTION, errorText, "Continue", "Terminate program");

        if (terminateProgram == 1) {    // Terminate option chosen
            logger.info("Terminating program");
            return false;
        } else {
            robot.move(ptp(placingPosition).setJointVelocityRel(0.2));      // set lower movement speed
            phoCommon.scanRequest(activeVs.id);
            return true;
        }
    }
}
3.2.3 Change solution example
A single robotic cell can take part in several production processes. Handling of multiple parts concurrently is done by using multiple vision systems in one solution. When completely changing the production process it is more suitable to have separate dedicated solutions that can be deployed directly from the robot.
This program is an extension of the basic bin picking example. After a defined number of bin picking cycles, it sends a request to change the deployed solution.
Name: ChangeSolution.java (located in package photoneo_examples)
package photoneo_examples;

import com.kuka.roboticsAPI.applicationModel.RoboticsAPIApplication;
import com.kuka.roboticsAPI.deviceModel.JointPosition;
import com.kuka.roboticsAPI.deviceModel.LBR;
import com.kuka.roboticsAPI.uiModel.ApplicationDialogType;
import com.kuka.task.ITaskLogger;
import photoneo.PhotoneoCommon;
import photoneo.Datatypes;
import photoneo.Datatypes.SimpleResult;
import photoneo.Datatypes.TrajectoryResult;
import photoneo.TrajectoryExecutor;

import javax.inject.Inject;

import static com.kuka.roboticsAPI.motionModel.BasicMotions.ptp;


public class ChangeSolution extends RoboticsAPIApplication {
    @Inject
    private LBR robot;

    @Inject
    protected ITaskLogger logger;

    PhotoneoCommon phoCommon;
    TrajectoryExecutor phoExecutor;

    // ================= Update settings for your setup!!!
    final String serverAddress = "";
    final JointPosition placingPosition = new JointPosition(9, 9, 9, 9, 9, 9, 9);
    final JointPosition start = new JointPosition(9, 9, 9, 9, 9, 9, 9);     // Binpicking start position
    final JointPosition end = new JointPosition(9, 9, 9, 9, 9, 9, 9);       // Binpicking end position
    final int vsId = 1;   // vision system ID
    final int firstSolutionId = 1;
    final int secondSolutionId = 2;
    int currentSolutionId = firstSolutionId;    // start with the first solution
    final int maxPicksPerSolution = 10;
    int pickCounter = 0;
    // ================= Update settings for your setup!!!


    public void initialize() {
        // Instantiate required classes to do Binpicking
        phoCommon = new PhotoneoCommon(robot);
        phoExecutor = new TrajectoryExecutor(robot) {   // anonymous class
            @Override
            protected void gripperAttach() {
                logger.info("Attaching gripper - Implement your I/O here");
            }
        };
    }

    public void run() {
        // Connect to Binpicking Vision Controller, wait max 10 seconds for it
        boolean success = phoCommon.connectToVisionController(serverAddress, 10000);
        if (!success) {
            logger.info("Unable to connect to Vision Controller. Check your network setup. Terminating program.");
            return;
        }

        // Initialize Binpicking for desired vision system
        phoCommon.initRequest(start, end, vsId);

        // Prepare robot - move to placing position
        robot.move(ptp(placingPosition));

        // Scan and localize picked objects
        phoCommon.scanRequest(vsId);

        while (true) {
            // Prepare robot to Binpicking start position
            robot.move(ptp(start));

            // Wait for finished scan and localization
            SimpleResult scanResult = phoCommon.waitForScan();
            if (scanResult.hasError()) {
                    if (doYouWantToContinue(scanResult.error)) { continue; } else { return;}
            }

            // Get planned trajectory
            phoCommon.trajectoryRequest(vsId);
            TrajectoryResult trajectoryResult = phoCommon.receiveTrajectory();
            if (trajectoryResult.hasError()) {
                if (doYouWantToContinue(trajectoryResult.error)) { continue; } else { return;}
            }

            // Execute Binpicking trajectory
            phoExecutor.execute(trajectoryResult);

            // Move from Binpicking end to placing position
            robot.move(ptp(placingPosition));

            pickCounter++;
            if (pickCounter == maxPicksPerSolution) {
                pickCounter = 0;
                currentSolutionId = (currentSolutionId == firstSolutionId) ? secondSolutionId : firstSolutionId;    // swap currentSolutionId
                SimpleResult changeSolResult = phoCommon.changeSolutionRequest(currentSolutionId);
                if (changeSolResult.hasError()) {
                    if (doYouWantToContinue(changeSolResult.error)) { continue; } else { return;}
                }

                // Initialize Binpicking for desired vision system
                phoCommon.initRequest(start, end, vsId);

                // Establish new connection to Binpicking Vision Controller, wait max 60 seconds for it
                success = phoCommon.connectToVisionController(serverAddress, 60000);
                if (!success) {
                    logger.info("Unable to connect to Vision Controller. Check your network setup. Terminating program.");
                    return;
                }
            }

            // Perform new scan and localization during placing picked object
            phoCommon.scanRequest(vsId);

            logger.info("Detaching gripper");   // here you can set your I/O
        }
    }

    /**
     *  This is helper function to do stuff around error handling
     *
     * @param error
     * @return  true if user want to continue in program flow and repeat program loop, false otherwise
     */
    public boolean doYouWantToContinue(Datatypes.Error error) {
        String errorText = error + " error occurred during program run. Do you want to continue?";
        int terminateProgram = getApplicationUI().displayModalDialog(ApplicationDialogType.QUESTION, errorText, "Continue", "Terminate program");

        if (terminateProgram == 1) {    // Terminate option chosen
            logger.info("Terminating program");
            return false;
        } else {
            robot.move(ptp(placingPosition).setJointVelocityRel(0.2));      // set lower movement speed
            phoCommon.scanRequest(vsId);
            return true;
        }
    }
}
3.2.4 Calibration example
This program is a template for semi-automatic calibration.
Before running the program:
teach the calibration start pose through which the robot will move to the individual calibration poses
teach the individual calibration poses
the program contains 5 poses, add more (at least 9 calibration poses are required)
start the calibration in the Bin Picking Studio
Now you can start the program. It will move to individual calibration poses and send the** Add calibration point** request when it reaches them. In between the calibration poses the robot will go through the calibration start pose. Once all the calibration points are successfully added, the program ends. If you are satisfied with the calibration result, save it in the Bin Picking Studio.
Name: Calibration.java (located in package photoneo_examples)
package photoneo_examples;

import com.kuka.roboticsAPI.applicationModel.RoboticsAPIApplication;
import com.kuka.roboticsAPI.deviceModel.JointPosition;
import com.kuka.roboticsAPI.deviceModel.LBR;
import com.kuka.roboticsAPI.geometricModel.ObjectFrame;
import com.kuka.roboticsAPI.uiModel.ApplicationDialogType;
import com.kuka.task.ITaskLogger;
import photoneo.PhotoneoCommon;
import photoneo.Datatypes.SimpleResult;

import javax.inject.Inject;

import static com.kuka.roboticsAPI.motionModel.BasicMotions.ptp;


public class Calibration extends RoboticsAPIApplication {
    @Inject
    private LBR robot;

    @Inject
    protected ITaskLogger logger;

    PhotoneoCommon phoCommon;

    // ================= Update settings for your setup!!!
    final String serverAddress = "";

    boolean popupAddQuestion = true;
    // ================= Update settings for your setup!!!
    // ================= Calibration poses are defined in `run():doc:` function


    public void initialize() {
        // Instantiate required classes to do Binpicking
        phoCommon = new PhotoneoCommon(robot);
    }

    public void run() {
        // Connect to Binpicking Vision Controller
        boolean success = phoCommon.connectToVisionController(serverAddress, 10000);
        if (!success) {
            logger.info("Unable to connect to Vision Controller. Check your network setup. Terminating program.");
            return;
        }

        // Define start pose for calibration!
        // Position from which robot can safely get to all of calibration poses

        ObjectFrame calibrationStart = getApplicationData().getFrame("/CalibrationStartPose");

        // You can also define it via joint states
        // JointPosition calibrationStart = new JointPosition(9, 9, 9, 9, 9, 9, 9);

        // Define calibration poses!
        ObjectFrame[] calibrationPoses = new ObjectFrame[]{
                getApplicationData().getFrame("/Calibration1/P1"),
                getApplicationData().getFrame("/Calibration1/P2"),
                getApplicationData().getFrame("/Calibration1/P3"),
                getApplicationData().getFrame("/Calibration1/P4"),
                getApplicationData().getFrame("/Calibration1/P5")
        };

        // You can also define calibration poses via joint states
        // JointPosition[] calibrationPoses = new JointPosition[] {
        //    new JointPosition(9, 9, 9, 9, 9, 9, 9),
        //    new JointPosition(9, 9, 9, 9, 9, 9, 9),
        // };

        for (int i = 0; i < calibrationPoses.length; i++) {
            if (popupAddQuestion) {
                int addQuestion = getApplicationUI().displayModalDialog(ApplicationDialogType.QUESTION,
                        "Do you want to add '" + i + "' calibration point?", "Add point", "Add all points", "Cancel");
                if (addQuestion == 1) {
                    popupAddQuestion = false;
                } else if (addQuestion == 2) {
                    return;
                }
            }

            // Move to starting pose first - should be safe to move to any of calibration poses from this one
            robot.move(ptp(calibrationStart));

            // Move to i-th calibration pose
            robot.move(ptp(calibrationPoses[i]));

            SimpleResult result = phoCommon.calibrationAddPoint();
            if (result.hasError()) {
               getApplicationUI().displayModalDialog(ApplicationDialogType.ERROR,
                       "An error occurred while adding '" + i + "' point. Terminating program.");
               return;
            }

            logger.info("Point '" + i + "' added successfully");
        }

        logger.info("All points added.");
    }
}
3.3 Error handling & Exceptions
If an error occurs during the execution of the operation requested by the sent request the error is stored in the response object in the attribute error. It is recommended to implement adequate error handling for your particular application after each synchronous request and response receiving procedure.
Error codes together with their description and troubleshooting can be found here <error-codes>.
The most important error codes are defined as constants in the Datatypes.java in the enum Error. These error codes are:
Error code |
AS constant |
|---|---|
No error (0) |
NO_ERROR(0) |
Service error (1) |
SERVICE_ERROR(1) |
Path planning failed (201) |
PLANNING_FAILED(201) |
No object found (202) |
NO_PART_FOUND(202) |
Vision system not initialized (203) |
NOT_INITIALIZED(203) |
Empty scene (218) |
EMPTY_SCENE(218) |
Wrong bin picking configuration (255) |
WRONG_BPS_CONF(255) |
During runtime the following exceptions can be thrown:
WrongUsage Thrown when the robotic API is used in the wrong way. The code needs to be reviewed and fixed.
ReceivedDataMismatch This exception corresponds with the error Bad data (4) (it is implemented as exception instead of an error enum).
CommunicationError This exception corresponds with the error Communication error (3) (it is implemented as exception instead of an error enum).
It is not recommended to catch WrongUsage and ReceivedDataMismatch exceptions in your program. Should they occur, the detected issue needs to be fixed. When the exception CommunicationError occurs, it might be due to a power failure of the vision controller. In this case, the user has the option to catch the exception and try to re-establish a connection to the Action Request Server (when the vision controller boots up).
4 Running the basic bin picking example program
4.1 Prerequisites
Before the Basic bin picking example can be run, the following requirements must be met:
A fully configured BPS solution with a single vision system must be prepared for deployment
The robot controller must be configured according to the chapter Robot controller setup of this integration guide
Bin Picking Studio network settings must be configured
Gripper procedures should be implemented (optional - if not implemented, the robot will not actually pick the object)
The placing procedure should be implemented
4.2 Bin picking routine execution settings
As mentioned in section 3.1.3 Bin picking procedures the constructor of the TrajectoryExecutor class enables passing optional velocity and acceleration arrays specifying normalized velocities and accelerations of the motion (values must be between 0 and 1) for each trajectory segment of the binpicking routine.
By default, there are 5 path stages defined in the Grasping method of the BPS solution with 4 trajectories joining them. That means arrays of 4 elements need to be passed into the constructor of the TrajectoryExecutor class.
Adapt these values to meet your requirements. If adding custom path stages (trajectories), configure the suitable number of values in the velocities / accelerations arrays. Beware of the order of the trajectories - the first speed value in an array applies to the first trajectory, the second value to the second trajectory, etc…
4.3 Reteach the robot poses
A crucial step of bin picking configuration is the teaching of home, start, and end poses. The home position of the robot should be taught in such a way that the robot is outside the scanning area. The start position should be taught in such a way that the robot gripper is approximately above the center of the bin. The end position can be similar to the start position or slightly shifted towards the placing area. Do not define the end pose too far from the bin as this might affect the path planning (increase total planning time, cause planning errors, etc.).
The Basic bin picking example program uses the following poses:
final JointPosition placingPosition = new JointPosition(9, 9, 9, 9, 9, 9, 9);
final JointPosition start = new JointPosition(9, 9, 9, 9, 9, 9, 9);   // Binpicking start position
final JointPosition end = new JointPosition(9, 9, 9, 9, 9, 9, 9);     // Binpicking end position
Note: The home pose in the Basic bin picking example is also the placing position (placingPosition).
4.4 Runtime
Deploy your BPS solution. The Action Request Client status on the Deployment page of the BPS should be ** DISCONNECTED ** (from the Action Request Server).
After the start of your robotic program and successful call of the procedure Connect to Action Request Server, the Action Request Client status on the Deployment page will change to the ** CONNECTED ** state.
The robot should now start sending requests to the Vision Controller and execute bin picking movements.
NOTE: Ensure that you are ready to halt motion execution immediately in case of any problem. It is strongly recommended to reduce the speed to 10% of maximum or less during initial bin picking tests.