Integration Guide Doosan
Note: It is strongly recommended to read the Robot communication overview prior to this integration guide.
Contents
1 Prerequisites
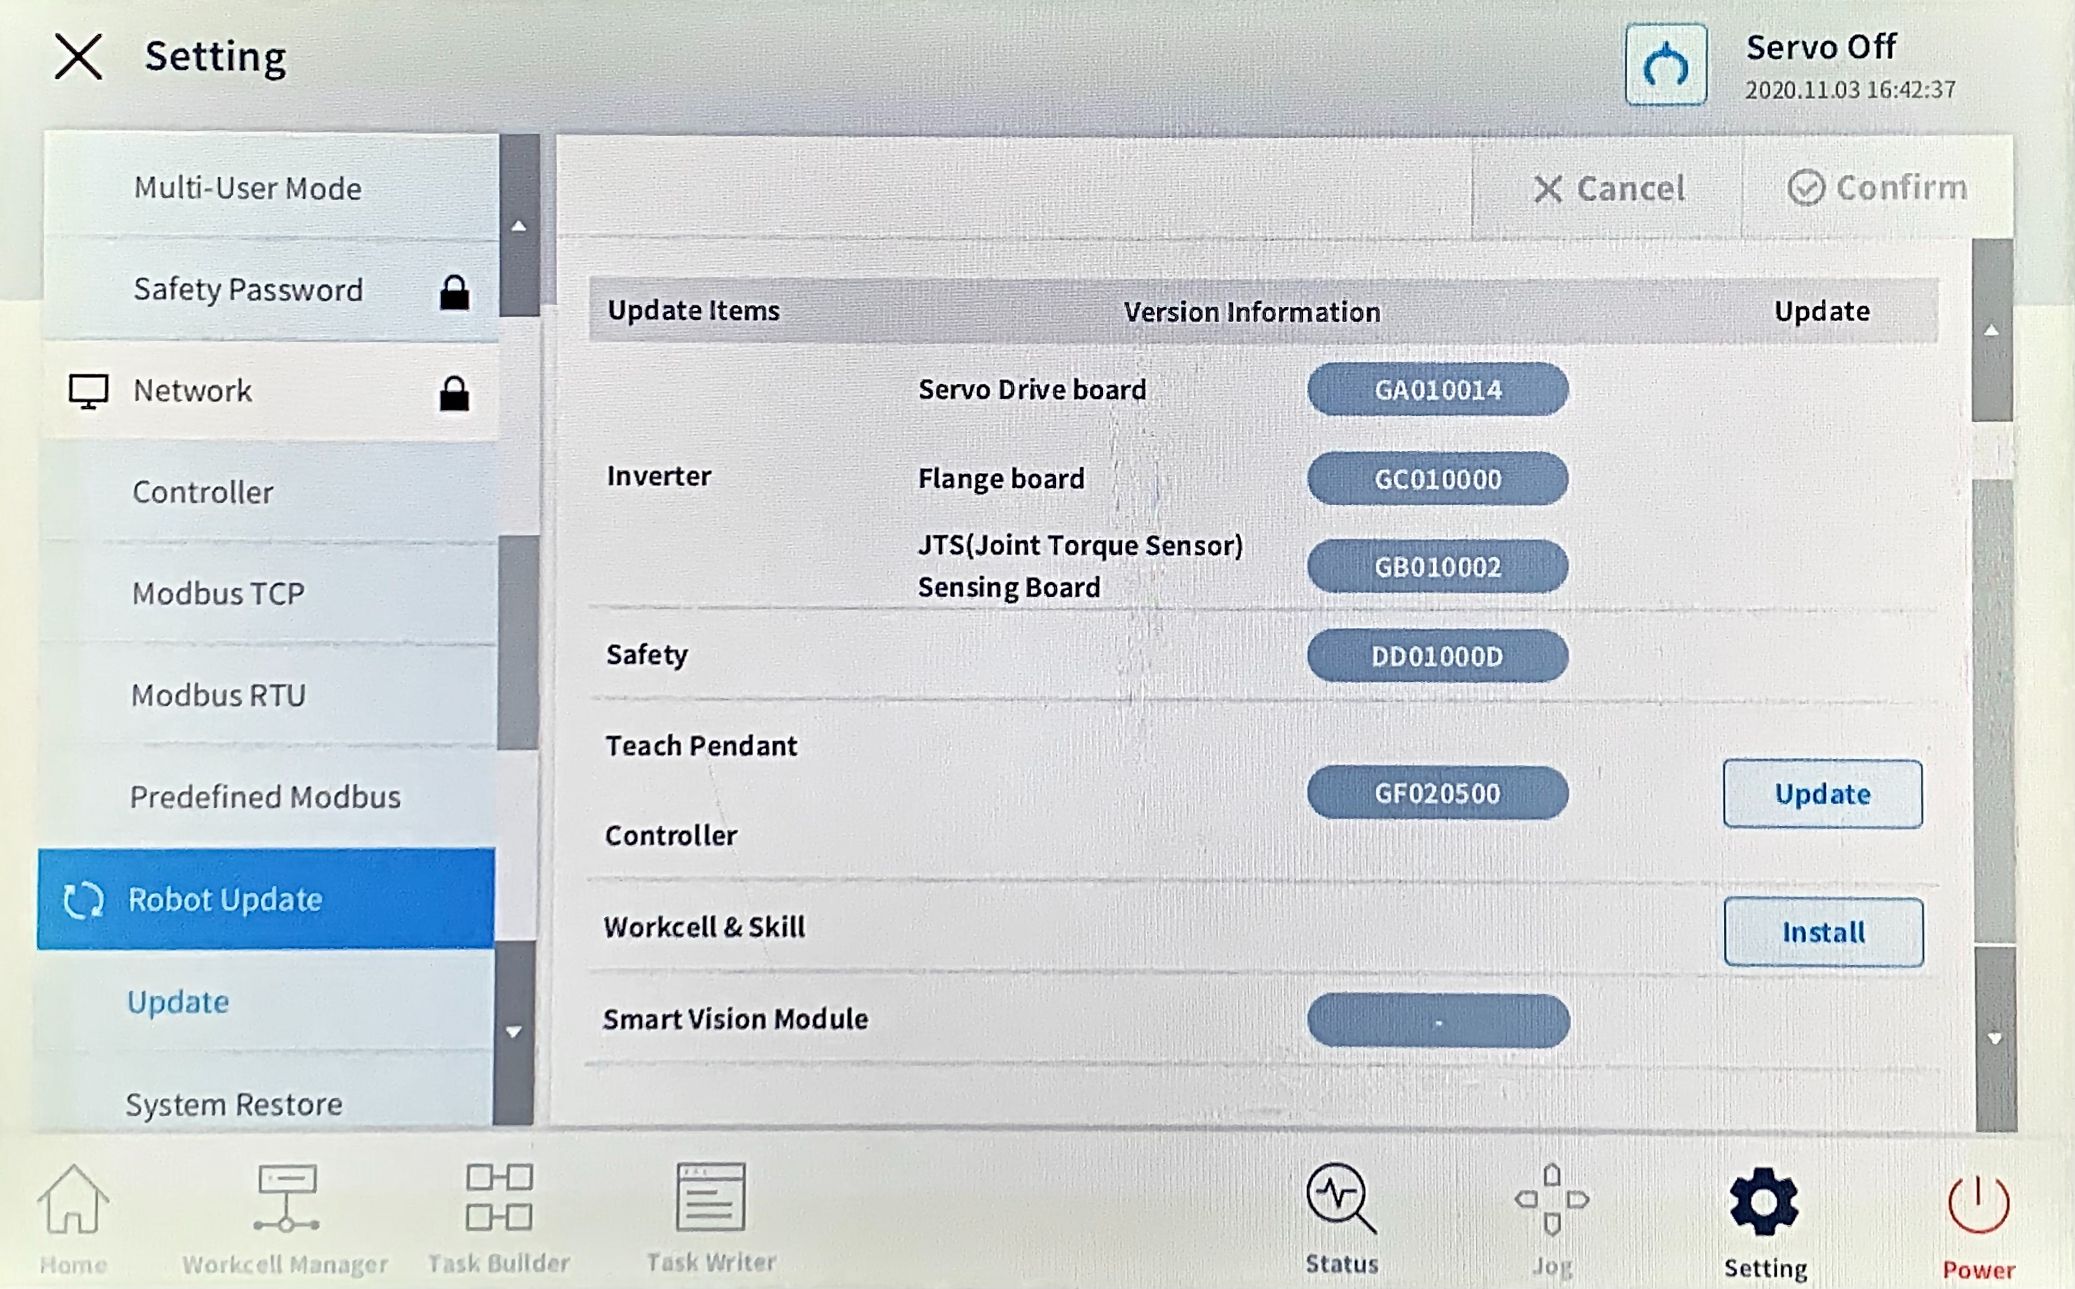
2 Robot controller setup
2.1 Controller configuration
2.1.1 Network configuration
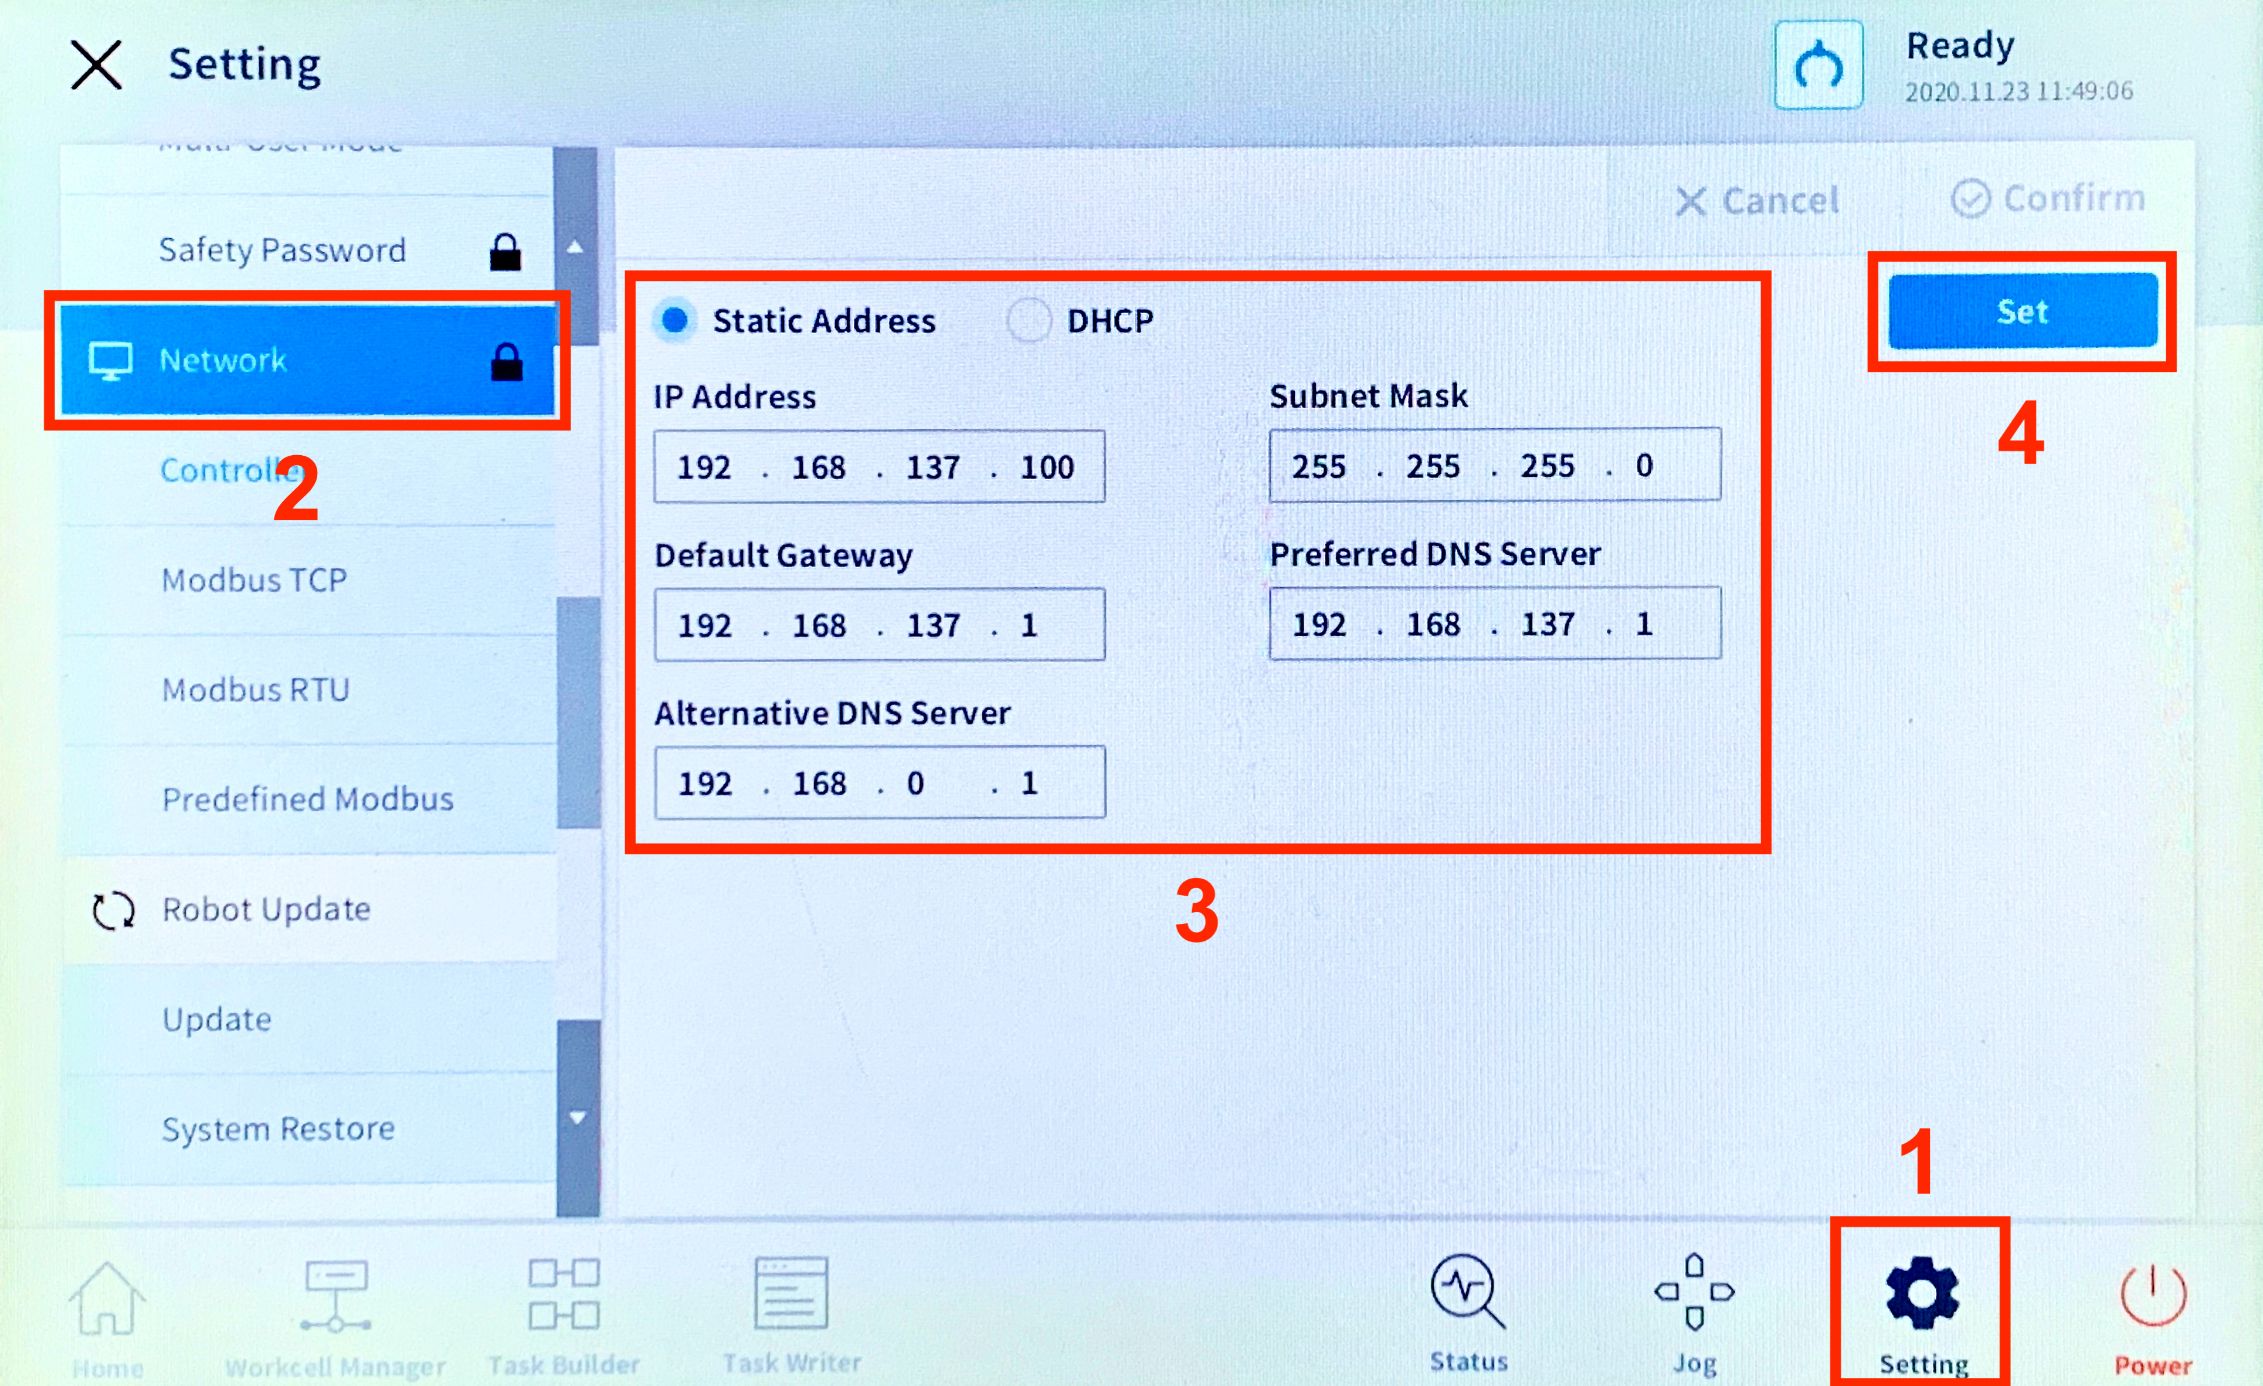
2.2 Robot module installation
The Robot module consists of three core** DRL script files located in the folder **scripts:
- customer_definitions.txt
- photoneo_common.txt
- state_server.txt
Besides that Photoneo provides three example bin picking programs and a semi-automatic calibration example program (also written as DRL scripts) located in the folder example_programs-scripts:
- main_basic.txt
- main_multiple_vision_systems.txt
- main_change_solution.txt
- main_calibration.txt
These scripts can be used to create custom tasks for bin picking as explained later.
In the folder example_programs-tasks, there are Task writer *.tw files. These files integrate the core scripts and one of the scripts containing the example programs into complete tasks that can be run after importing into the TP:
- BasicExample.tw
- MultipleVisionSystemsExample.tw
- ChangeSolutionExample.tw
- Calibration.tw
- CalibrationSemiAuto.tw
NOTE: The task CalibrationSemiAuto.tw includes the example for the semi-automatic calibration routine - the DRL script main_calibration.txt. The task Calibration.tw allows you the calibrate by hand guiding. For more details regarding the calibration procedure see this chapter.
2.2.1 Loading the example program
You can import the files into the robot controller directly from the USB stick using the TP.
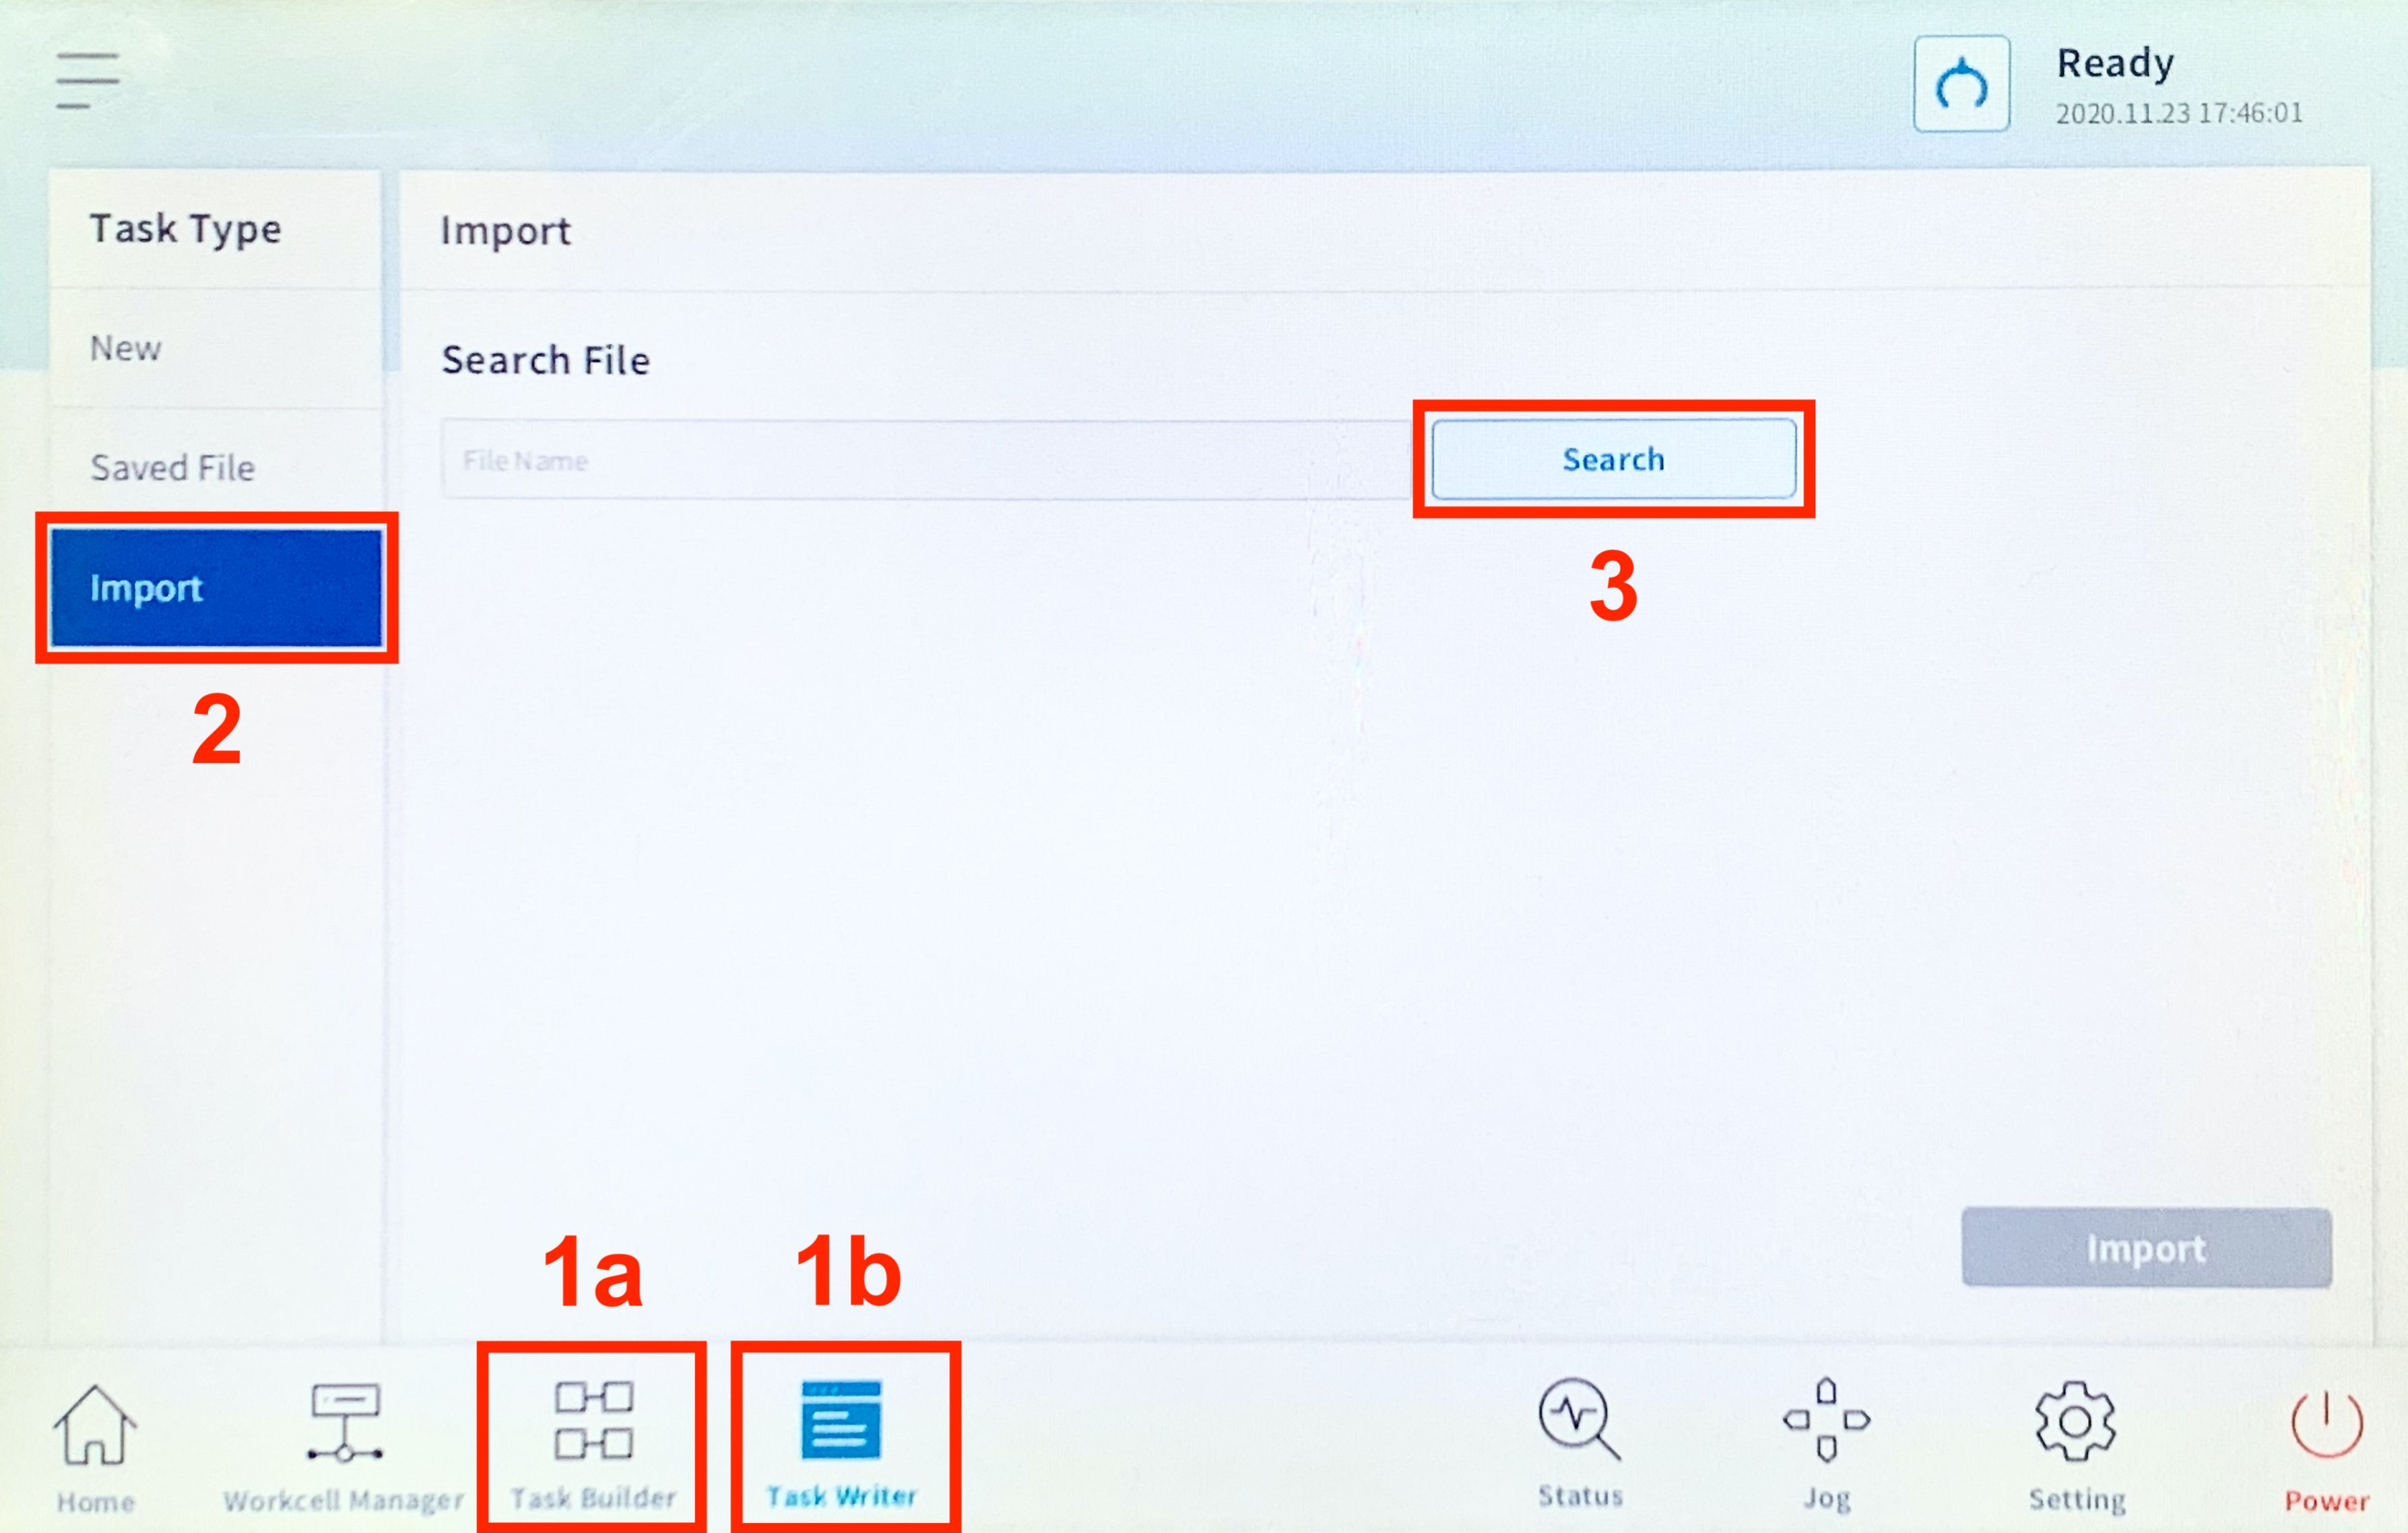
To import an example program - a complete task - select the option Task Writer (for *.tw files) from the bottom menu. In the list on the left choose the option Import and then click on the Search button. A window will appear where you should see your USB stick - select it and find your task file. The task should be opened. To save the task press the menu icon in the top left corner (☰) and press Save.
2.2.2 Creating a new program from scratch
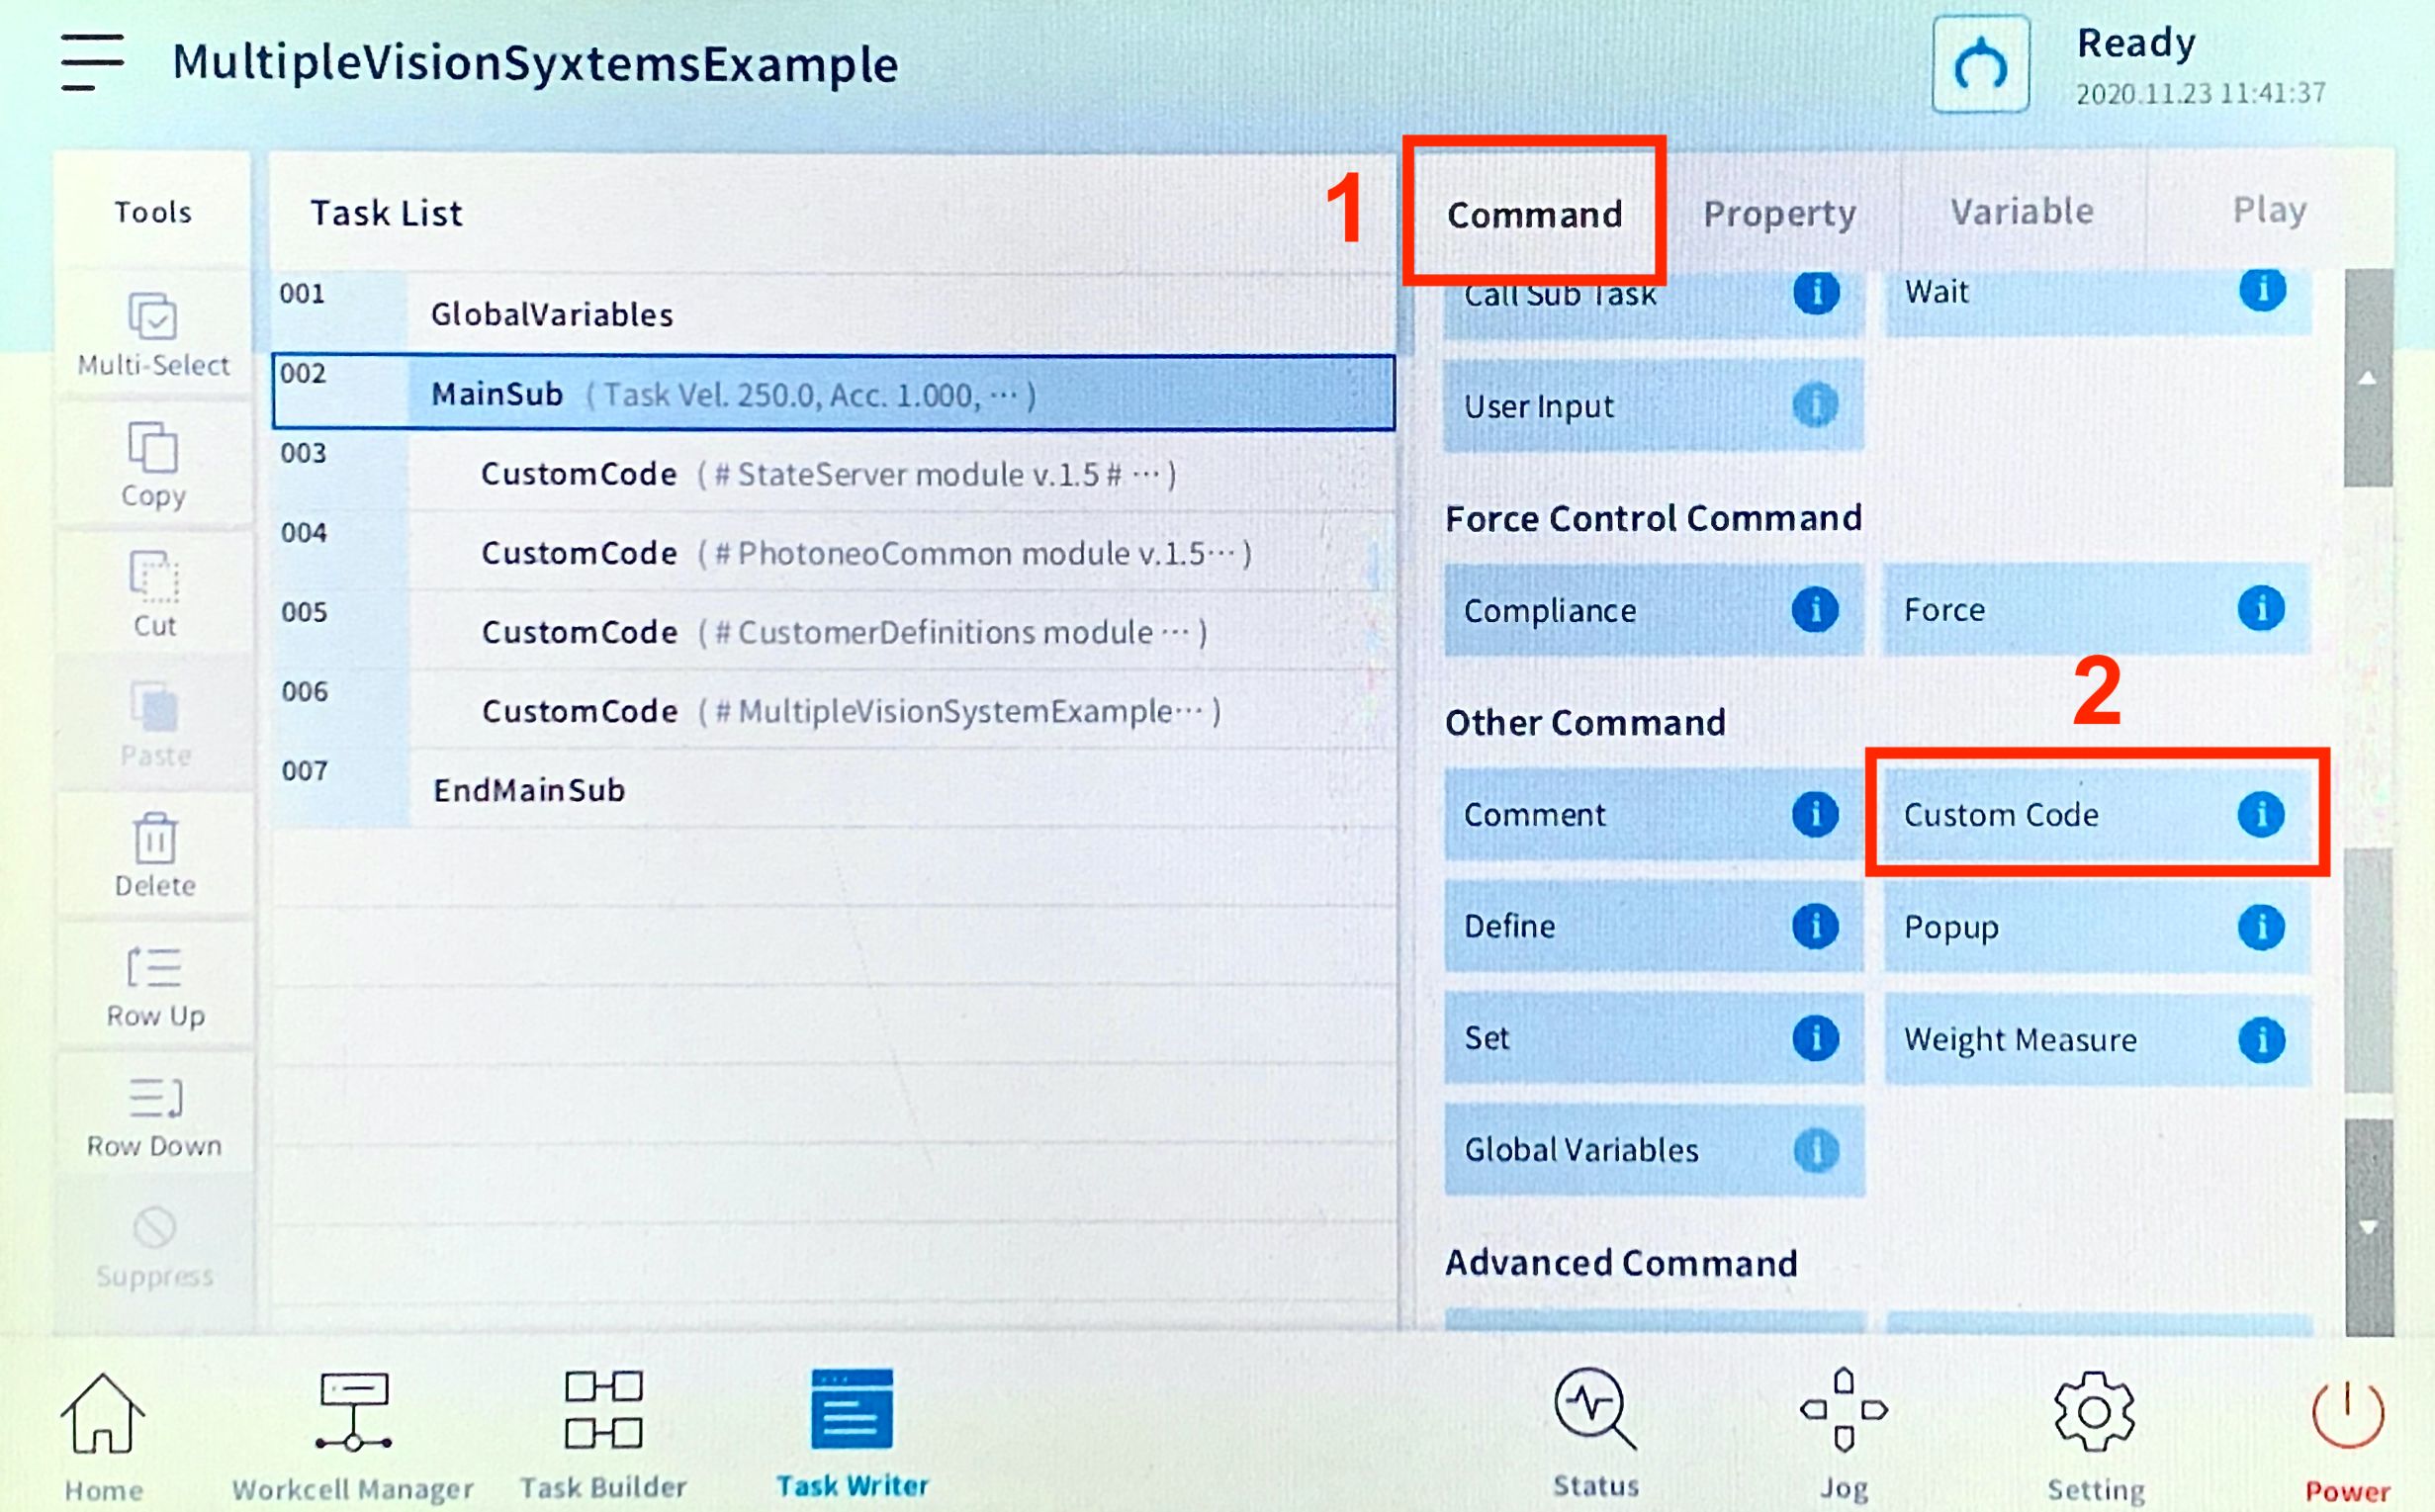
Each main bin picking program must include the core DRL scripts state_server.txt,** photoneo_common.txt,** and** customer_definitions.txt**.
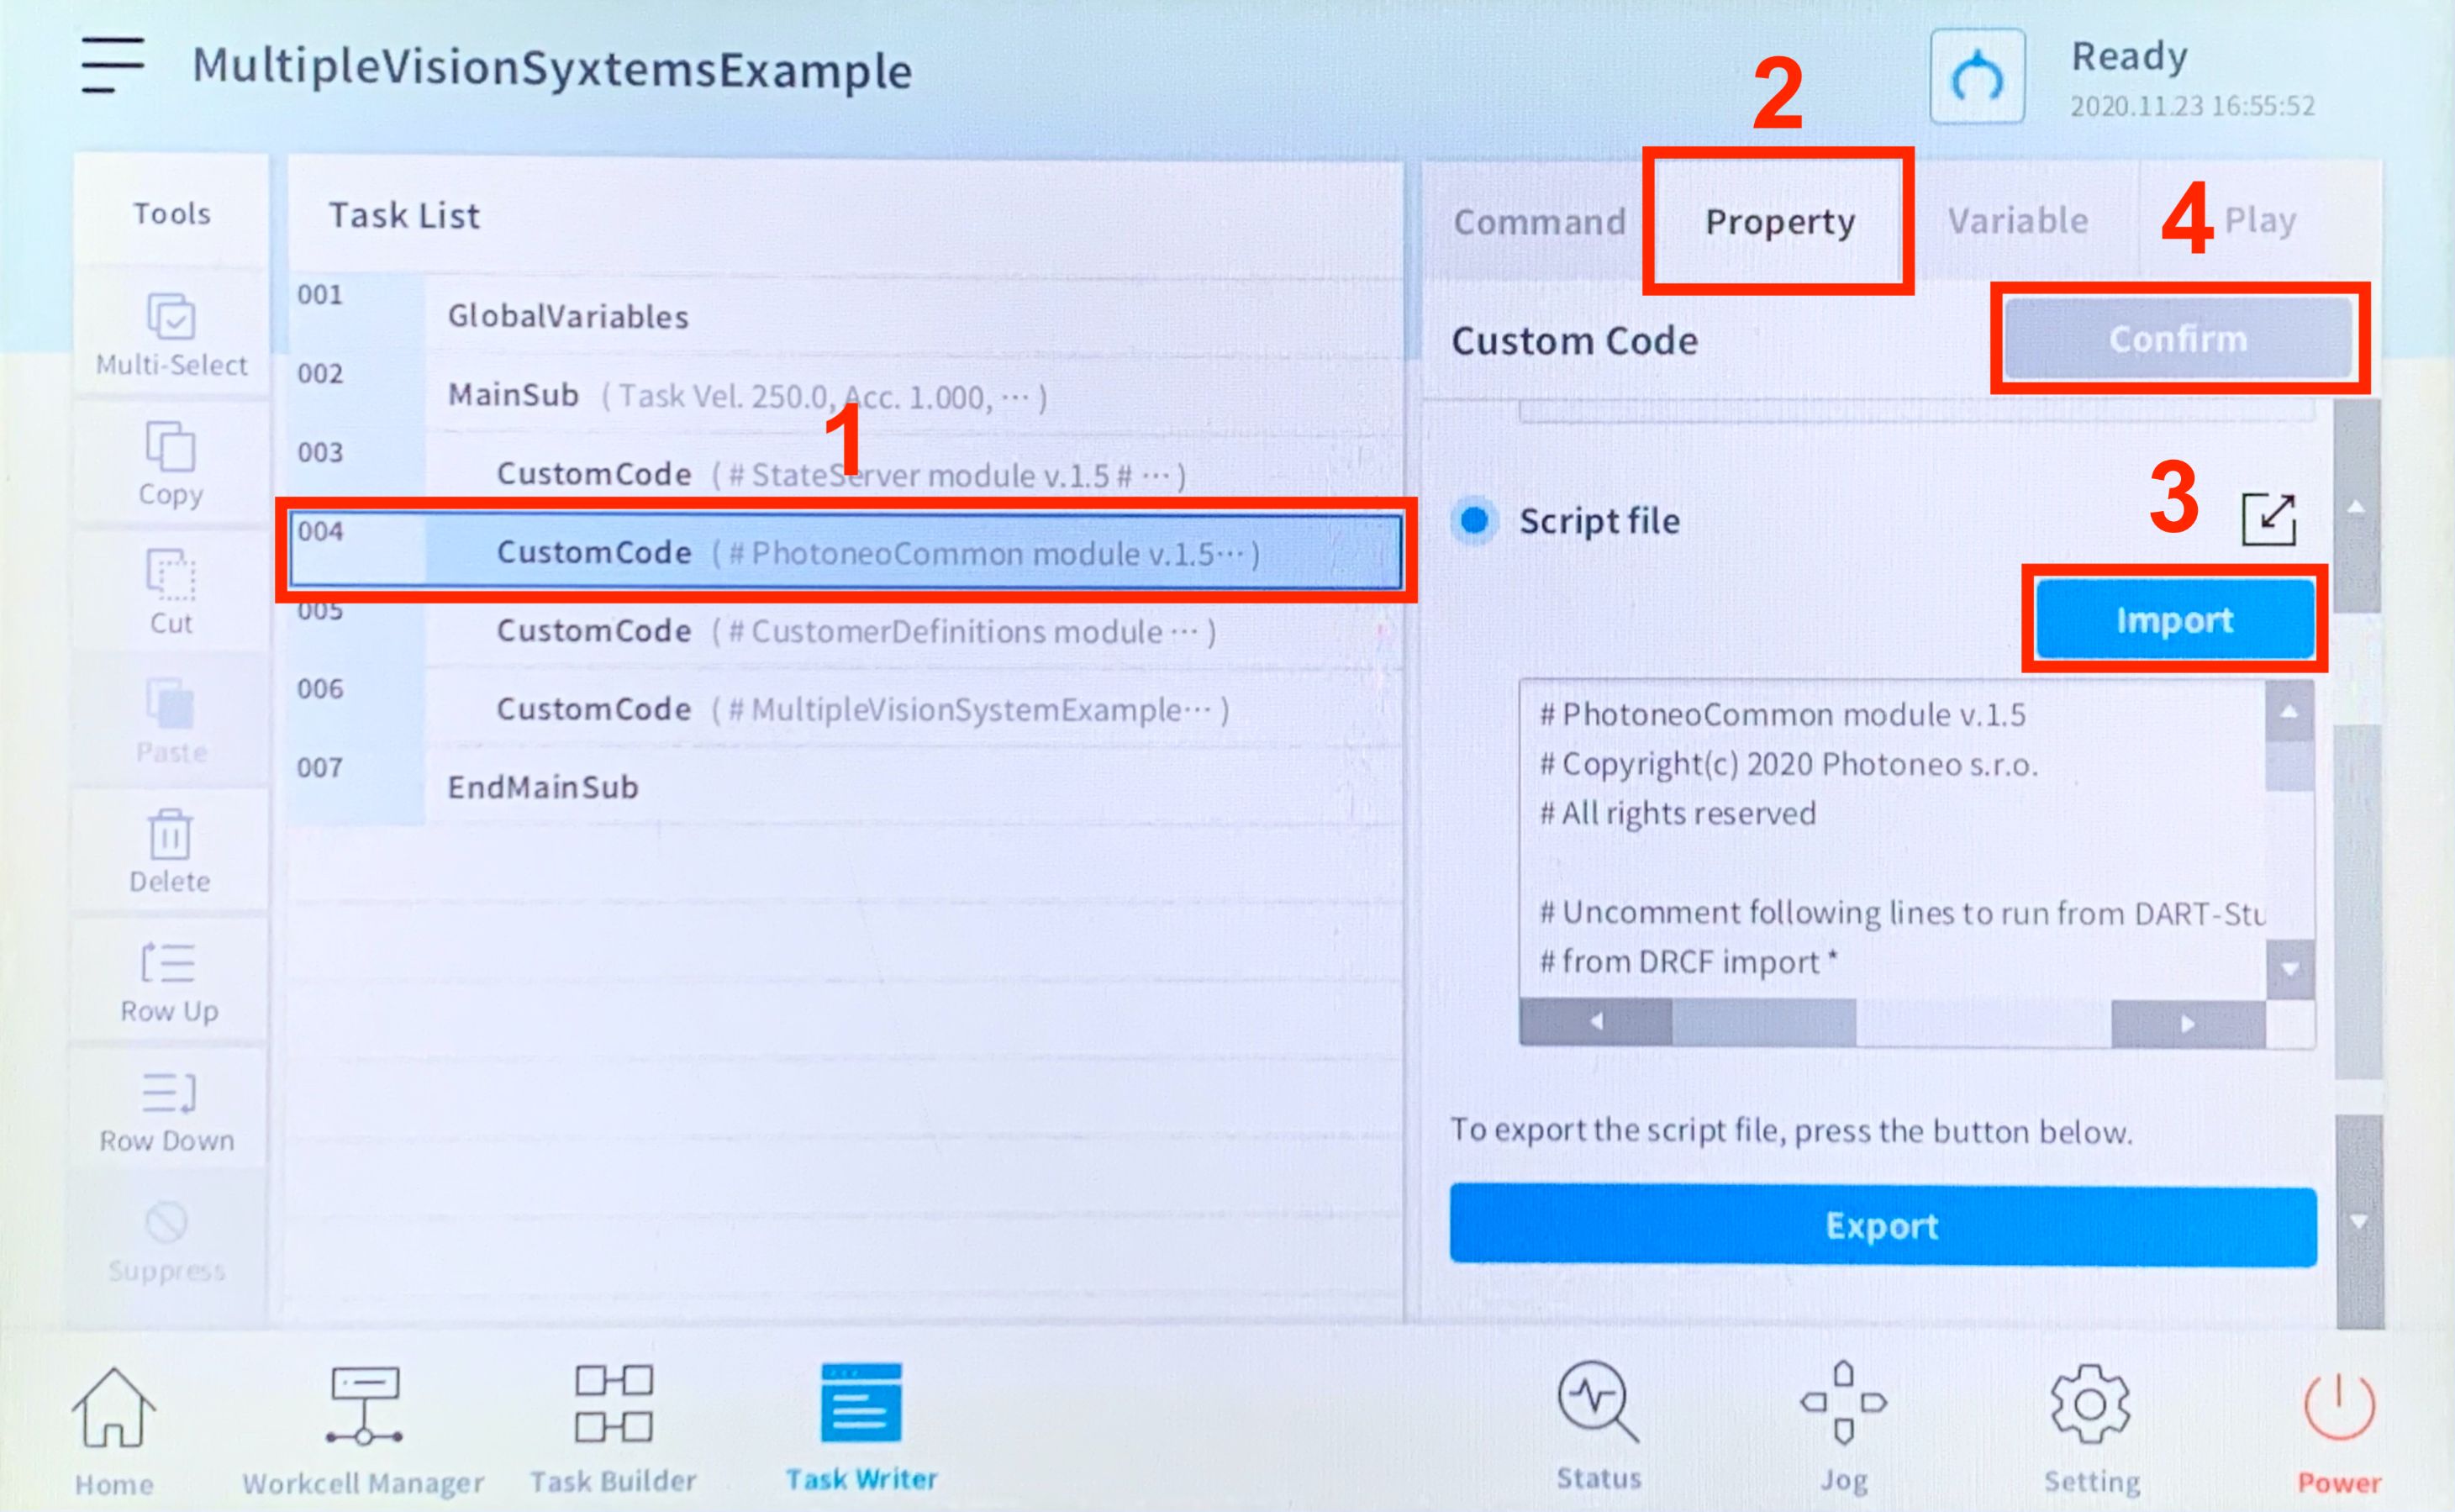
3 Robot module
The Robot module is designed to be easily integrated into existing applications.
3.1 Robotic API
Note: It is strongly recommended to read the Photoneo robotic API prior to this section.
3.1.1 Connection procedures
Warning: These procedures are contained in the photoneo_common.txt API section and must not be edited!
Connection procedure |
Description / Usage |
|---|---|
Connect to Action Request Server
|
Description
Function to establish a new connection to the Action Request Server.
Input parameters:
Usage
The procedure should be called only once at the beginning of the program. Only after the connection has been established it is possible to send requests.
pho_wait_for_server('')
|
3.1.2 Communication procedures
Note: Please read Action Requests for detailed documentation of these procedures.
Warning: These procedures are contained in the photoneo_common.txt API section and must not be edited!
Note: Procedures with optional parameter wait_time have its default value set to -1. This means the timeout for receiving packets is infinite.
Bin picking requests
Request |
Input variables |
Output variables |
|---|---|---|
Initialization request pho_request_init(pho_start_bin_picking_pose,pho_end_bin_picking_pose,vision_system_id,wait_time = -1) |
||
Note: The pose is either a posj object or a list of float values defining the joint angles in degrees. |
|
|
Scan request pho_request_scan(vision_system_id) |
|
Note: The response is received by the procedure Wait for scan completion. |
Trajectory request pho_request_trajectory(vision_system_id) |
|
Note: The response is received by the procedure Receive trajectory. |
Pick-failed request pho_request_send_pick_failed(vision_system_id) |
|
|
Change scene state request pho_request_change_env_state(state_id) |
|
|
Calibration requests
Request |
Input variables |
Output variables |
|---|---|---|
Add calibration point request pho_request_calib_add_point() |
— |
|
Solution requests
Request |
Input variables |
Output variables |
|---|---|---|
Change solution request pho_request_change_solution(required_solution_id) |
|
|
Start solution request pho_request_start_solution(required_solution_id) |
|
|
Stop solution request pho_request_stop_solution() |
— |
|
Get running solution request pho_request_get_running_solution() |
— |
|
Get available solutions request pho_request_get_available_solutions() |
— |
|
Response receiving procedures
Response receiving procedures |
Input variables |
Output variables |
|---|---|---|
Wait for scan completion pho_wait_for_scan_completion(wait_time = -1) |
|
|
Receive trajectory pho_receive_trajectory(wait_time = -1) |
|
|
3.1.3 Bin picking procedures
Note: These procedures are contained in the customer_definitions.txt API section and should be implemented (edited) by the user according to his requirements.
Bin picking procedure |
Description / Usage |
|---|---|
Gripper attach gripper_attach() |
Description
A user-defined procedure. Typically it is the attach procedure used when the picked object is grasped in the Grasp waypoint.
Usage
It is automatically executed when the waypoint of the grasping method is configured to execute the Attach procedure when it is reached.
|
Gripper detach gripper_detach() |
Description
A user-defined procedure. Typically it is the detach procedure used when the picked object is placed during the placing routine defined by the robot operator.
Usage
It is automatically executed when the waypoint of the grasping method is configured to execute the Detach procedure when it is reached.
Note: Typically this procedure is not configured to be executed automatically in a waypoint as it should be called during placing which is implemented by the robot operator. |
Gripper user-defined 1 gripper_user_1() |
Description
A user-defined procedure.
Usage
It is automatically executed when the waypoint of the grasping method is configured to execute the User 1 procedure when it is reached.
|
Gripper user-defined 2 gripper_user_2() |
Description
A user-defined procedure.
Usage
It is automatically executed when the waypoint of the grasping method is configured to execute the User 2 procedure when it is reached.
|
Gripper user-defined 3 gripper_user_3() |
Description
A user-defined procedure.
Usage
It is automatically executed when the waypoint of the grasping method is configured to execute the User 3 procedure when it is reached.
|
Execute bin picking routine pho_bin_picking() |
Description
Pre-defined procedure for execution of the bin picking routine. This procedure must not be edited directly - to adapt the execution settings please read Bin picking routine execution settings.
Usage
It should be executed after the bin picking trajectory has been received. The robot must be in the start pose when the procedure is executed. At the end of the procedure, the robot will be in the end pose with the picked object attached to the gripper.
Warning: When using multiple start poses (different for multiple vision systems) be extra careful to be in the correct one before executing this procedure. |
Set bin picking settings binpicking_settings() |
Description
Pre-defined procedure for configuration of the parameters of the individual trajectory segments of the bin picking routine.
Usage
It is automatically called before the bin picking routine is executed.
Note: Go to Bin picking routine execution settings to read more about bin picking routine configuration. |
3.2 Example programs
The following section contains basic example programs. Each program is intended for a specific bin picking application and it shows the correct usage of the robotic API.
These templates also contain demonstrative error handling. Please note that it serves only as an example and it is up to the user to define suitable routines for dealing with error situations.
3.2.1 Basic bin picking example
This program is the very basic example of simple binpicking application. It connects to Vision Controller, initializes one Vision System and in loop it requests scan, trajectory and executes the received trajectory.
Name: main_basic.txt (DRL script located in folder example_programs-scripts, used in task BasicExample.tw located in folder example_programs-tasks)
# BasicExample module v.1.7
# Copyright(c) 2023 Photoneo s.r.o.
# All rights reserved


# Adjust Vision Controller IP address if necessary
BINPICKING_SRV_IP = ''

# Definition of global variables (proper values are set in the main function)
home_pose = None
start_pose = None
end_pose = None

MAX_ERR_COUNT = 2
err_counter = 0


def main_binpicking_example_basic():
    global pho_err_code, pho_err_occurred, err_counter, BINPICKING_SRV_IP,  home_pose, start_pose, end_pose

    # Start the state server in a separate thread
    pho_start_state_server()

    # Reset state of error handling variables
    err_counter = 0
    pho_err_code = PhoCommErr.OK


    # Note that: Instead of the poses definitions below you may also
    # use joint pose variables defined in the task (in properties of task commands: GlobalVariables / Define),
    # where you can adjust the values more easily when working with teach pendant

    # Reteach home position for your application
    home_pose = posj(167.0, -27.0, -101.0, 178.0, 48.0, -16.0)

    # Reteach bin picking start and end pose
    start_pose = posj(167.0, -38.0, -101.0, 178.0, 48.0, -16.0)
    end_pose = posj(150.0, -38.0, -101.0, 178.0, 48.0, -16.0)

    # Set Vision System ID (default = 1)
    vision_system_id = 1

    # Connect to the Vision Controller,
    if not pho_wait_for_server(BINPICKING_SRV_IP):
        exit()

    # Send bin picking initialization request for the current Vision System ID,
    # start & end poses sent via this request will be used in trajectory planning pipeline
    pho_request_init(start_pose, end_pose, vision_system_id)

    # Move the robot out of the scanning volume!
    movej(home_pose, v=50, a=150)

    # Request first scan
    pho_request_scan(vision_system_id)

    while True:
        # ==================== PHOTONEO BIN PICKING START ====================
        # Wait for scan completion
        pho_wait_for_scan_completion()

        # Handle errors if occurred
        if pho_err_occurred:
            err_handling(vision_system_id)
            continue  # start the loop again

        # Request trajectory
        pho_request_trajectory(vision_system_id)

        # Move to start position while the trajectory is being calculated
        movej(start_pose, v=50, a=200)

        # Receive trajectory (sequence of operations & operations data)
        pho_receive_trajectory()

        # Execute bin picking application if the trajectory was received with no error
        if not pho_err_occurred:
            pho_bin_picking()
        # ==================== PHOTONEO BIN PICKING END ====================

        if pho_err_occurred:
            err_handling(vision_system_id)
            continue
        else:
            # Clear error counter
            err_counter = 0

            # ==================== PLACING START ====================
            # Move the robot away so that we can trigger a new scan
            # movej(home_pose, v=50, a=150)

            # Trigger next scan, so that
            # localization and trajectory computation for the next cycle can run while the object is being placed
            pho_request_scan(vision_system_id)

            # Commands for actual part placing (reteach position for your robot and work cell)
            # movej(posj(0.0, 0.0, 0.0, 0.0, 0.0, 0.0), v=50, a=100)
            # gripper_detach()
            # movej(home_pose, v=50, a=150)
            # ==================== PLACING END ====================


def err_handling(vision_system_id):
    global pho_err_occurred, pho_err_code, MAX_ERR_COUNT, err_counter, \
        home_pose, start_pose, end_pose, BINPICKING_SRV_IP

    # Release the gripper if necessary
    # gripper_detach()

    # Move robot to home pose
    movej(home_pose, v=50, a=150)

    # Log the error
    err_code_str = '"{}" ({})'.format(
        PhoCommErrND.get(pho_err_code, PhoBipiErrND.get(pho_err_code, '?')),
        pho_err_code)
    tp_log('Error occurred: {}'.format(err_code_str))

    if err_counter >= MAX_ERR_COUNT:
        # Log error & exit (exits via the popup window)
        tp_popup('Photoneo internal error: {}. '
                 'Please reboot the Vision Controller and restart application'.format(err_code_str),
                 DR_PM_ALARM, 1)

    # If planning failed or no part was found, notify user and continue by a new scan request (Adjust if necessary)
    if pho_err_code in [PhoBipiErr.PLANNING_FAILED, PhoBipiErr.NO_PART_FOUND]:
        tp_log('No part found or path planning failed')
        pho_request_scan(vision_system_id)

    # If bin picking has not been initialized or service returned error response,
    # reinitialize and send a new scan request (Adjust if necessary)
    elif pho_err_code == PhoBipiErr.NOT_INITIALIZED:
        wait(5.0)
        pho_request_init(start_pose, end_pose, vision_system_id)
        pho_request_scan(vision_system_id)

    # if bin picking returned error response, reinitialize and trigger a new scan (Adjust if necessary)
    elif pho_err_code == PhoCommErr.SERVICE_ERR:
        wait(10.0)
        pho_request_init(start_pose, end_pose, vision_system_id)
        pho_request_scan(vision_system_id)

    # In case of communication failure, log the error and exit program
    elif pho_err_code in [PhoCommErr.BAD_DATA, PhoCommErr.TIMEOUT, PhoCommErr.COMM_FAILURE]:
        wait(10.0)
        pho_wait_for_server(BINPICKING_SRV_IP)
        pho_request_init(start_pose, end_pose, vision_system_id)
        pho_request_scan(vision_system_id)

    # Otherwise trigger next scan and try to continue
    else:
        pho_request_scan(vision_system_id)

    err_counter += 1

    # Clear the error flag
    pho_err_occurred = False

main_binpicking_example_basic()
3.2.2 Multiple Vision Systems example
This program is an extension of the basic bin picking example. Instead of one, it initializes two vision systems and switches between them in each cycle.
Name: main_multiple_vision_systems.txt (DRL script located in folder example_programs-scripts, used in task MultipleVisionSystemsExample.tw located in folder example_programs-tasks)
# MultipleVisionSystemExample module v.1.7
# Copyright(c) 2023 Photoneo s.r.o.
# All rights reserved


# Adjust Vision Controller IP address if necessary
BINPICKING_SRV_IP = ''

# Definition of global variables (proper values are set in the main function)
home_pose = None
start_pose = None
end_pose = None

MAX_ERR_COUNT = 5
err_counter = 0


def main_multiple_vision_systems_example():
    global pho_err_code, pho_err_occurred, err_counter, BINPICKING_SRV_IP, home_pose, start_pose, end_pose

    # Start the state server in a separate thread
    pho_start_state_server()

    # Reset state of error handling variables
    err_counter = 0
    pho_err_code = PhoCommErr.OK

    # Set Vision System ID (default = 1)
    vision_system_ids = [1, 2]
    active_vision_system_id = vision_system_ids[0]


    # Note that: Instead of the poses definitions below you may also
    # use joint pose variables defined in the task (in properties of task commands: GlobalVariables / Define),
    # where you can adjust the values more easily when working with teach pendant
    # An example code of using GlobalVariables from a task is commented below
    # or you may use the provided task MultipleVisionSyxtemsExample.tw which has poses defined in GlobalVariables

    # Reteach home pose, bin picking start and end pose for your application
    # home_pose = Global_home_pose
    # start_pose = {vision_system_ids[0]: Global_start_pose_1,
    #               vision_system_ids[1]: Global_start_pose_2}
    # end_pose = {vision_system_ids[0]: Global_end_pose_1,
    #             vision_system_ids[1]: Global_end_pose_2}

    # Reteach home pose, bin picking start and end pose for your application
    # In case you're using poses defined in the task from above, remove/comment pose definitions below
    start_pose = {vision_system_ids[0]: posj(3.29, -34.42, 130.6, -6.62, 58.61, -68.77),
                  vision_system_ids[1]: posj(12.21, -34.42, 130.6, -6.62, 58.61, -68.77)}
    end_pose = {vision_system_ids[0]: posj(43.59, 30.48, 92.73, -2.61, 53.47, -73.04),
                vision_system_ids[1]: posj(43.59, 30.48, 92.73, -2.61, 53.47, -73.04)}
    home_pose = posj(8.29, -34.42, 130.6, -6.62, 58.61, -68.77)

    # Connect to the Vision Controller,
    if not pho_wait_for_server(BINPICKING_SRV_IP):
        exit()

    # Send bin picking initialization request for the current Vision System ID,
    # start & end poses sent via this request will be used in trajectory planning pipeline
    pho_request_init(start_pose[vision_system_ids[0]], end_pose[vision_system_ids[0]], vision_system_ids[0])
    pho_request_init(start_pose[vision_system_ids[1]], end_pose[vision_system_ids[1]], vision_system_ids[1])

    # Move the robot out of the scanning volume!
    movej(home_pose, v=50, a=150)

    # Request first scan
    pho_request_scan(active_vision_system_id)

    while True:
        # ==================== PHOTONEO BIN PICKING START ====================
        # Wait for scan completion
        pho_wait_for_scan_completion()

        # Handle errors if occurred
        if pho_err_occurred:
            err_handling(active_vision_system_id)
            continue  # start the loop again

        # Request trajectory
        pho_request_trajectory(active_vision_system_id)

        # Move to start position while the trajectory is being calculated
        movej(start_pose[active_vision_system_id], v=50, a=200)

        # Receive trajectory (sequence of operations & operations data)
        pho_receive_trajectory()

        # Execute bin picking application if the trajectory was received with no error
        if not pho_err_occurred:
            pho_bin_picking()
        # ==================== PHOTONEO BIN PICKING END ====================

        if pho_err_occurred:
            err_handling(active_vision_system_id)
            continue
        else:
            # Clear error counter
            err_counter = 0

            # ==================== PLACING START ====================
            # Move the robot away so that we can trigger a new scan
            # movej(home_pose, v=50, a=150)

            # Switch active vision system
            if active_vision_system_id == vision_system_ids[0]:
                active_vision_system_id = vision_system_ids[1]
            else:
                active_vision_system_id = vision_system_ids[0]

            # Trigger next scan, so that
            # localization and trajectory computation for the next cycle can run while the object is being placed
            pho_request_scan(active_vision_system_id)

            # Commands for actual part placing (reteach position for your robot and work cell)
            # movej(posj(0.0, 0.0, 0.0, 0.0, 0.0, 0.0), v=50, a=100)
            # gripper_detach()
            # movej(home_pose, v=50, a=150)
            # ==================== PLACING END ====================


def err_handling(vision_system_id):
    global pho_err_occurred, pho_err_code, MAX_ERR_COUNT, err_counter, \
        home_pose, start_pose, end_pose, BINPICKING_SRV_IP

    # Release the gripper if necessary
    # gripper_detach()

    # Move robot to home pose
    movej(home_pose, v=50, a=150)

    # Log the error
    err_code_str = '"{}" ({})'.format(
        PhoCommErrND.get(pho_err_code, PhoBipiErrND.get(pho_err_code, '?')),
        pho_err_code)
    tp_log('Error occurred: {}'.format(err_code_str))

    if err_counter >= MAX_ERR_COUNT:
        # Log error & exit (exits via the popup window)
        tp_popup('Photoneo internal error: {}. '
                 'Please reboot the Vision Controller and restart application'.format(err_code_str),
                 DR_PM_ALARM, 1)

    # If planning failed or no part was found, notify user and continue by a new scan request (Adjust if necessary)
    if pho_err_code in [PhoBipiErr.PLANNING_FAILED, PhoBipiErr.NO_PART_FOUND]:
        tp_log('No part found or path planning failed')
        pho_request_scan(vision_system_id)

    # If bin picking has not been initialized or service returned error response,
    # reinitialize and send a new scan request (Adjust if necessary)
    elif pho_err_code == PhoBipiErr.NOT_INITIALIZED:
        wait(5.0)
        pho_request_init(start_pose[vision_system_id], end_pose[vision_system_id], vision_system_id)
        pho_request_scan(vision_system_id)

    # if bin picking returned error response, reinitialize and trigger a new scan (Adjust if necessary)
    elif pho_err_code == PhoCommErr.SERVICE_ERR:
        wait(10.0)
        pho_request_init(start_pose[vision_system_id], end_pose[vision_system_id], vision_system_id)
        pho_request_scan(vision_system_id)

    # In case of communication failure, log the error and exit program
    elif pho_err_code in [PhoCommErr.BAD_DATA, PhoCommErr.TIMEOUT, PhoCommErr.COMM_FAILURE]:
        wait(10.0)
        pho_wait_for_server(BINPICKING_SRV_IP)
        pho_request_init(start_pose[vision_system_id], end_pose[vision_system_id], vision_system_id)
        pho_request_scan(vision_system_id)


    # Otherwise trigger next scan and try to continue
    else:
        pho_request_scan(vision_system_id)

    err_counter += 1

    # Clear the error flag
    pho_err_occurred = False

main_multiple_vision_systems_example()
3.2.3 Change solution example
A single robotic cell can take part in several production processes. Handling of multiple parts concurrently is done by using multiple vision systems in one solution. When completely changing the production process it is more suitable to have separate dedicated solutions that can be deployed directly from the robot.
This program is an extension of the basic bin picking example. After a defined number of bin picking cycles, it sends a request to change the deployed solution.
Name: main_change_solution.txt (DRL script located in folder example_programs-scripts, used in task ChangeSolutionExample.tw located in folder example_programs-tasks)
# SolutionExample module v.1.7
# Copyright(c) 2023 Photoneo s.r.o.
# All rights reserved


# Adjust Vision Controller IP address if necessary
BINPICKING_SRV_IP = ''

# Definition of global variables (proper values are set in the main function)
home_pose = None
start_pose = None
end_pose = None

MAX_ERR_COUNT = 2
err_counter = 0

CHANGE_SOLUTION_AFTER_PICK_COUNT = 5Name: main_change_solution.txt (DRL script located in folder example_programs-scripts, used in task ChangeSolutionExample.tw located in folder example_programs-tasks)
EXIT_AFTER_SOLUTION_CHANGE = True


def main_solution_example():
    global pho_err_code, pho_err_occurred, err_counter, BINPICKING_SRV_IP,  home_pose, start_pose, end_pose, \
        pho_available_solutions, pho_running_solution

    # Start the state server in a separate thread
    pho_start_state_server()

    # Reset state of error handling variables
    err_counter = 0
    pho_err_code = PhoCommErr.OK

    pick_counter = 0

    solution_id_1 = 1
    solution_id_2 = 2
    actual_solution = solution_id_2


    # Note that: Instead of the poses definitions below you may also
    # use joint pose variables defined in the task (in properties of task commands: GlobalVariables / Define),
    # where you can adjust the values more easily when working with teach pendant

    # Reteach home position for your application
    home_pose = posj(167.0, -27.0, -101.0, 178.0, 48.0, -16.0)

    # Reteach bin picking start and end pose
    start_pose = posj(167.0, -38.0, -101.0, 178.0, 48.0, -16.0)
    end_pose = posj(150.0, -38.0, -101.0, 178.0, 48.0, -16.0)

    # Set Vision System ID (default = 1)
    vision_system_id = 1

    # Connect to the Vision Controller,
    if not pho_wait_for_server(BINPICKING_SRV_IP):
        exit()

    # Get available solutions
    pho_request_get_available_solutions()
    tp_log('Available solution/solutions is/are: {}'.format(pho_available_solutions))

    # Start solution 1
    pho_request_start_solution(solution_id_2)

    # Get running solution
    pho_request_get_running_solution()
    tp_log('Currently is running solution with ID: {}'.format(pho_running_solution))

    # Send bin picking initialization request for the current Vision System ID,
    # start & end poses sent via this request will be used in trajectory planning pipeline
    pho_request_init(start_pose, end_pose, vision_system_id)

    # Move the robot out of the scanning volume!
    movej(home_pose, v=50, a=150)

    # Request first scan
    pho_request_scan(vision_system_id)

    while True:
        # ==================== PHOTONEO BIN PICKING START ====================
        # Wait for scan completion
        pho_wait_for_scan_completion(5.0)

        # Handle errors if occurred
        if pho_err_occurred:
            err_handling(vision_system_id, actual_solution)
            continue  # start the loop again

        # Request trajectory
        pho_request_trajectory(vision_system_id)

        # Move to start position while the trajectory is being calculated
        movej(start_pose, v=50, a=200)

        # Receive trajectory (sequence of operations & operations data)
        pho_receive_trajectory()

        # Execute bin picking application if the trajectory was received with no error
        if not pho_err_occurred:
            pho_bin_picking()
        # ==================== PHOTONEO BIN PICKING END ====================

        if pho_err_occurred:
            err_handling(vision_system_id, actual_solution)
            continue
        else:
            # Clear error counter
            err_counter = 0

            # Increment pick counter
            pick_counter += 1

            # ==================== PLACING START ====================
            # Move the robot away so that we can trigger a new scan
            # movej(home_pose, v=50, a=150)

            # Do not request scan in case the solution switch will follow after placing the part
            if pick_counter < CHANGE_SOLUTION_AFTER_PICK_COUNT:
                # Trigger next scan, so that
                # localization and trajectory computation for the next cycle can run while the object is being placed
                pho_request_scan(vision_system_id)

            # Commands for actual part placing (reteach position for your robot and work cell)
            # movej(posj(0.0, 0.0, 0.0, 0.0, 0.0, 0.0), v=50, a=100)
            # gripper_detach()
            # movej(home_pose, v=50, a=150)
            # ==================== PLACING END ====================

        # If required number of picked parts is reached, call change solution request and production will be changed
        if pick_counter >= CHANGE_SOLUTION_AFTER_PICK_COUNT:

            pick_counter = 0
            if actual_solution == solution_id_1:
                actual_solution = solution_id_2
            else:
                actual_solution = solution_id_1

            # ==================== CHANGING OF PRODUCTION START ====================
            # Move the robot to home position
            movej(home_pose, v=50, a=150)
            pho_request_change_solution(actual_solution)

            # Get running solution
            pho_request_get_running_solution()
            tp_log('Currently is running solution with ID: {}'.format(pho_running_solution))

            pho_wait_for_server(BINPICKING_SRV_IP)
            pho_request_init(start_pose, end_pose, vision_system_id)

            # Wait 10 sec to see that solution was changed
            wait(15.0)
            if EXIT_AFTER_SOLUTION_CHANGE:
                pho_request_stop_solution()
                exit()
            else:
                pho_request_scan(vision_system_id)
            # ==================== CHANGING OF PRODUCTION END ====================


def err_handling(vision_system_id, solution_id):
    global pho_err_occurred, pho_err_code, MAX_ERR_COUNT, err_counter, \
        home_pose, start_pose, end_pose, BINPICKING_SRV_IP

    # Release the gripper if necessary
    # gripper_detach()

    # Move robot to home pose
    movej(home_pose, v=50, a=150)

    # Log the error
    err_code_str = '"{}" ({})'.format(
        PhoCommErrND.get(pho_err_code, PhoBipiErrND.get(pho_err_code, '?')),
        pho_err_code)
    tp_log('Error occurred: {} (solution ID: {}; Vision System ID: {})'.format(
        err_code_str, solution_id, vision_system_id))

    if err_counter >= MAX_ERR_COUNT:
        # Log error & exit (exits via the popup window)
        tp_popup('Photoneo internal error: {}. '
                 'Please reboot the Vision Controller and restart application'.format(err_code_str),
                 DR_PM_ALARM, 1)

    # If planning failed or no part was found, notify user and continue by a new scan request (Adjust if necessary)
    if pho_err_code in [PhoBipiErr.PLANNING_FAILED, PhoBipiErr.NO_PART_FOUND]:
        tp_log('No part found or path planning failed')
        pho_request_scan(vision_system_id)

    # If bin picking has not been initialized or service returned error response,
    # reinitialize and send a new scan request (Adjust if necessary)
    elif pho_err_code == PhoBipiErr.NOT_INITIALIZED:
        wait(5.0)
        pho_request_init(start_pose, end_pose, vision_system_id)
        pho_request_scan(vision_system_id)

    # if bin picking returned error response, reinitialize and trigger a new scan (Adjust if necessary)
    elif pho_err_code == PhoCommErr.SERVICE_ERR:
        wait(10.0)
        pho_request_init(start_pose, end_pose, vision_system_id)
        pho_request_scan(vision_system_id)

    # In case of communication failure, log the error and exit program
    elif pho_err_code in [PhoCommErr.BAD_DATA, PhoCommErr.TIMEOUT, PhoCommErr.COMM_FAILURE]:
        wait(10.0)
        pho_wait_for_server(BINPICKING_SRV_IP)
        pho_request_init(start_pose, end_pose, vision_system_id)
        pho_request_scan(vision_system_id)

    # Otherwise trigger next scan and try to continue
    else:
        pho_request_scan(vision_system_id)

    err_counter += 1

    # Clear the error flag
    pho_err_occurred = False

main_solution_example()
3.2.4 Calibration example
This program is a template for semi-automatic calibration.
Before running the program:
teach the calibration home pose through which the robot will move to the individual calibration poses
teach the individual calibration poses
start the calibration in the Bin Picking Studio
Now you can start the program. It will move to individual calibration poses and send the** Add calibration point** request when it reaches them. In between the calibration poses the robot will go through the calibration home pose. Once all the calibration points are successfully added, the program ends. If you are satisfied with the calibration result, save it in the Bin Picking Studio.
Name: main_calibration.txt (DRL script located in folder example_programs-scripts, used in task CalibrationSemiAuto.tw located in folder example_programs-tasks)
# CalibrationExample module v.1.7
# Copyright(c) 2023 Photoneo s.r.o.
# All rights reserved


# Adjust Vision Controller IP address if necessary
BINPICKING_SRV_IP = ''

# Definition of global variables (proper values are set in the main function)
home_pose = None

MAX_ERR_COUNT = 2
err_counter = 0

# calibration_positions should be uncommented and adjusted according to the scene
# calibration_positions = [
#    posj(0.0, 0.0, 0.0, 0.0, 0.0, 0.0),
#    posj(0.0, 0.0, 0.0, 0.0, 0.0, 0.0),
#    posj(0.0, 0.0, 0.0, 0.0, 0.0, 0.0),
#    posj(0.0, 0.0, 0.0, 0.0, 0.0, 0.0),
#    posj(0.0, 0.0, 0.0, 0.0, 0.0, 0.0),
#    posj(0.0, 0.0, 0.0, 0.0, 0.0, 0.0),
#    posj(0.0, 0.0, 0.0, 0.0, 0.0, 0.0),
#    posj(0.0, 0.0, 0.0, 0.0, 0.0, 0.0),
#    posj(0.0, 0.0, 0.0, 0.0, 0.0, 0.0)
# ]


def main_calibration_example():
    global pho_err_code, pho_err_occurred, err_counter, BINPICKING_SRV_IP,  home_pose

    # Start the state server in a separate thread
    pho_start_state_server()

    # Reset state of error handling variables
    err_counter = 0
    pho_err_code = PhoCommErr.OK


    # Note that: Instead of the poses definitions below you may also
    # use joint pose variables defined in the task (in properties of task commands: GlobalVariables / Define),
    # where you can adjust the values more easily when working with teach pendant

    # Reteach home position for your application
    home_pose = posj(167.0, -27.0, -101.0, 178.0, 48.0, -16.0)

    # Connect to the Vision Controller,
    if not pho_wait_for_server(BINPICKING_SRV_IP):
        exit()

    # Move the robot out of the scanning volume!
    movej(home_pose, v=50, a=150)

    for calibration_pose in calibration_positions:

        # Move robot to one of the calibration position
        movej(calibration_pose, v=50, a=150)

        # Request for add calibration point
        pho_request_calib_add_point()

        movej(home_pose, v=50, a=150)

        # Check if the error occurred. If there is error the error code is logged to robot logs and the calibration is stopped
        if pho_err_occurred:
            tp_log('An error has occurred when calibration point was added. The error code is: {} '.format(pho_err_code))
            break


main_calibration_example()
3.3 Error handling
If an error occurs during the execution of the operation requested by the sent request the global variable informing about an error occurrence is set to true (pho_error_occurred) and the error code is stored in the global variable pho_err_code. It is recommended to implement adequate error handling for your particular application after each synchronous request and response receiving procedure.
Error codes together with their description and troubleshooting can be found here.
The most important error codes are defined as constants in the DRL script photoneo_common.txt. These error codes are split into two classes with static variables:
class PhoCommErr
Error code |
UR Script constant |
|---|---|
No error (0) |
OK = 0 |
Service error (1) |
SERVICE_ERR = 1 |
Communication error (3) |
COMM_FAILURE = 3 |
Bad data (4) |
BAD_DATA = 4 |
Timeout (5) |
TIMEOUT = 5 |
Error code |
UR Script constant |
|---|---|
Path planning failed (201) |
PLANNING_FAILED = 201 |
No object found (202) |
NO_PART_FOUND = 202 |
Vision system not initialized (203) |
NOT_INITIALIZED = 203 |
Empty scene (218) |
EMPTY_SCENE = 218 |
Wrong bin picking configuration (255) |
WRONG_BP_CONF = 255 |
4 Running the basic bin picking example program
4.1 Prerequisites
Before the Basic bin picking example can be run, the following requirements must be met:
A fully configured BPS solution with a single vision system must be prepared for deployment
The robot controller must be configured according to the chapter Robot controller setup of this integration guide
Bin Picking Studio network settings must be configured
Gripper procedures should be implemented (optional - if not implemented, the robot will not actually pick the object)
The placing procedure should be implemented
4.2 Bin picking routine execution settings
By default, the speeds and accelerations of the first 6 trajectories of the bin picking routine are configured (the default number of trajectories in a bin picking routine is 4 - as defined in the Grasping method of the BPS solution).
For each trajectory, it is possible to define a float value [degrees per second] that will be set as the speed for all joints or to define a list of 6 float values to be set as speeds for the individual joints. The same applies to the acceleration data [degrees per second^2].
Adapt these values to meet your requirements. If adding custom path stages (trajectories), configure the suitable number of values in the pho_speed_data and pho_acceleration_data arrays. Beware of the order of the trajectories - the first value (list of 6 values) in the array applies to the first trajectory, the second value/(list of 6 values) to the second trajectory, etc…
max_velocity = [120.0, 120.0, 180.0, 225.0, 225.0, 225.0]
The list of acceleration values per joint is defined as follows (the same value for all 6 joints):
acceleration = [400] * 6
The speeds and accelerations for a trajectory segment are then added to the arrays pho_speed_data and pho_acceleration_data:
pho_speed_data.append([maxvj * 1.0 for maxvj in max_velocity])
pho_acceleration_data.append(acceleration)
4.3 Reteach the robot poses
A crucial step of bin picking configuration is the teaching of home, start, and end poses. The home position of the robot should be taught in such a way that the robot is outside the scanning area. The start position should be taught in such a way that the robot gripper is approximately above the center of the bin. The end position can be similar to the start position or slightly shifted towards the placing area. Do not define the end pose too far from the bin as this might affect the path planning (increase total planning time, cause planning errors, etc.).
The Basic bin picking example program uses the following poses:
home_pose - Home position, a posj object, e.g.:
home_pose = posj(167.0, -27.0, -101.0, 178.0, 48.0, -16.0)
start_pose - Start position, a posj object or a list of float values defining the joint angles in degrees
end_pose - End position, a posj object or a list of float values defining the joint angles in degrees
The poses can be also defined as joint pose variables in the task (in properties of task commands: GlobalVariables / Define), where you can adjust the values more easily when working with the teach pendant, e.g.:
home_pose = Global_home_pose
4.4 Runtime
Deploy your BPS solution. The Action Request Client status on the Deployment page of the BPS should be ** DISCONNECTED ** (from the Action Request Server).
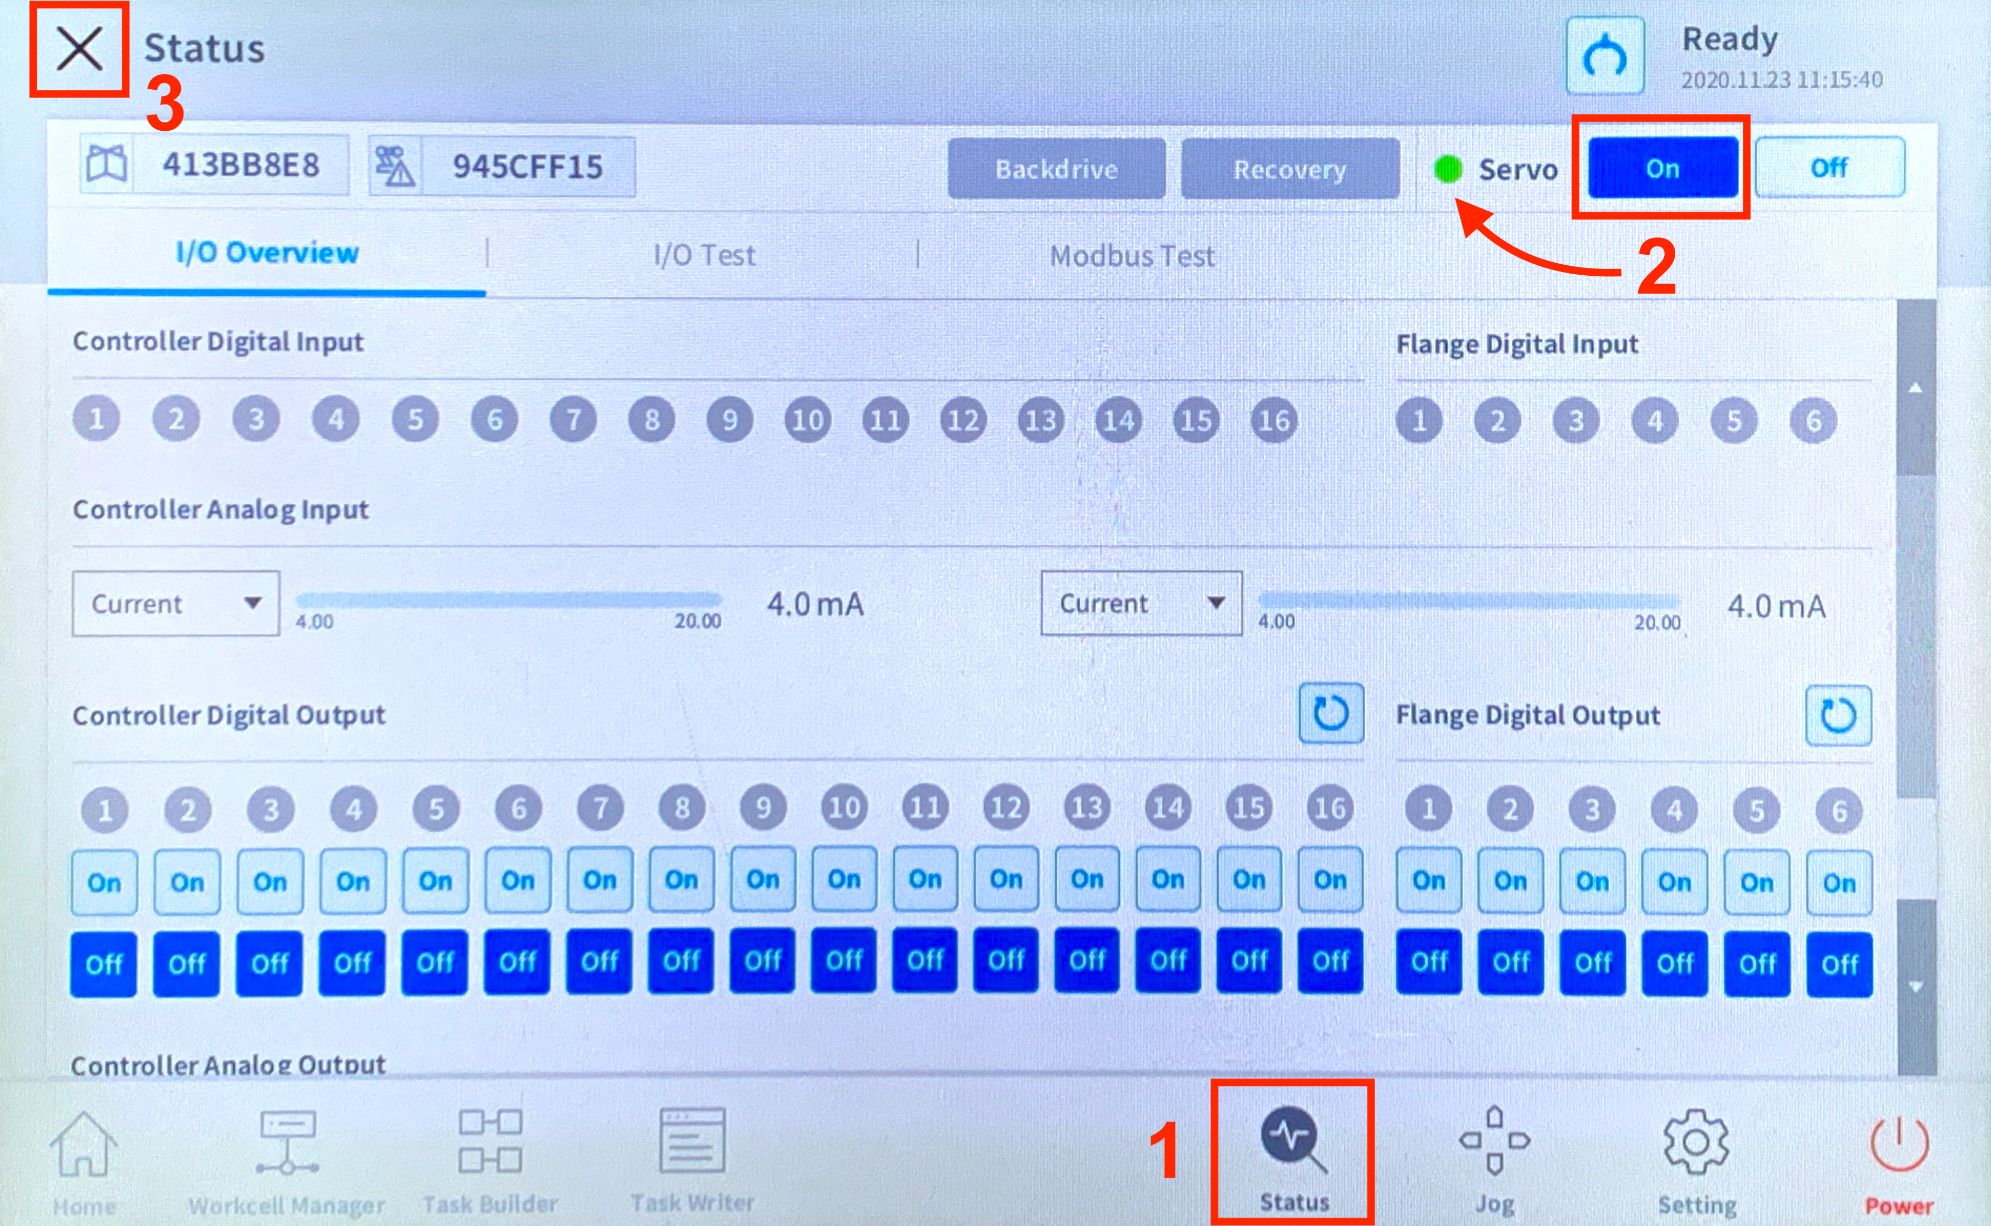
Before running any task you need to start the servo. To do so enter the Status screen, press On and close the screen by tapping on ‘X’ in the top left corner as shown below.
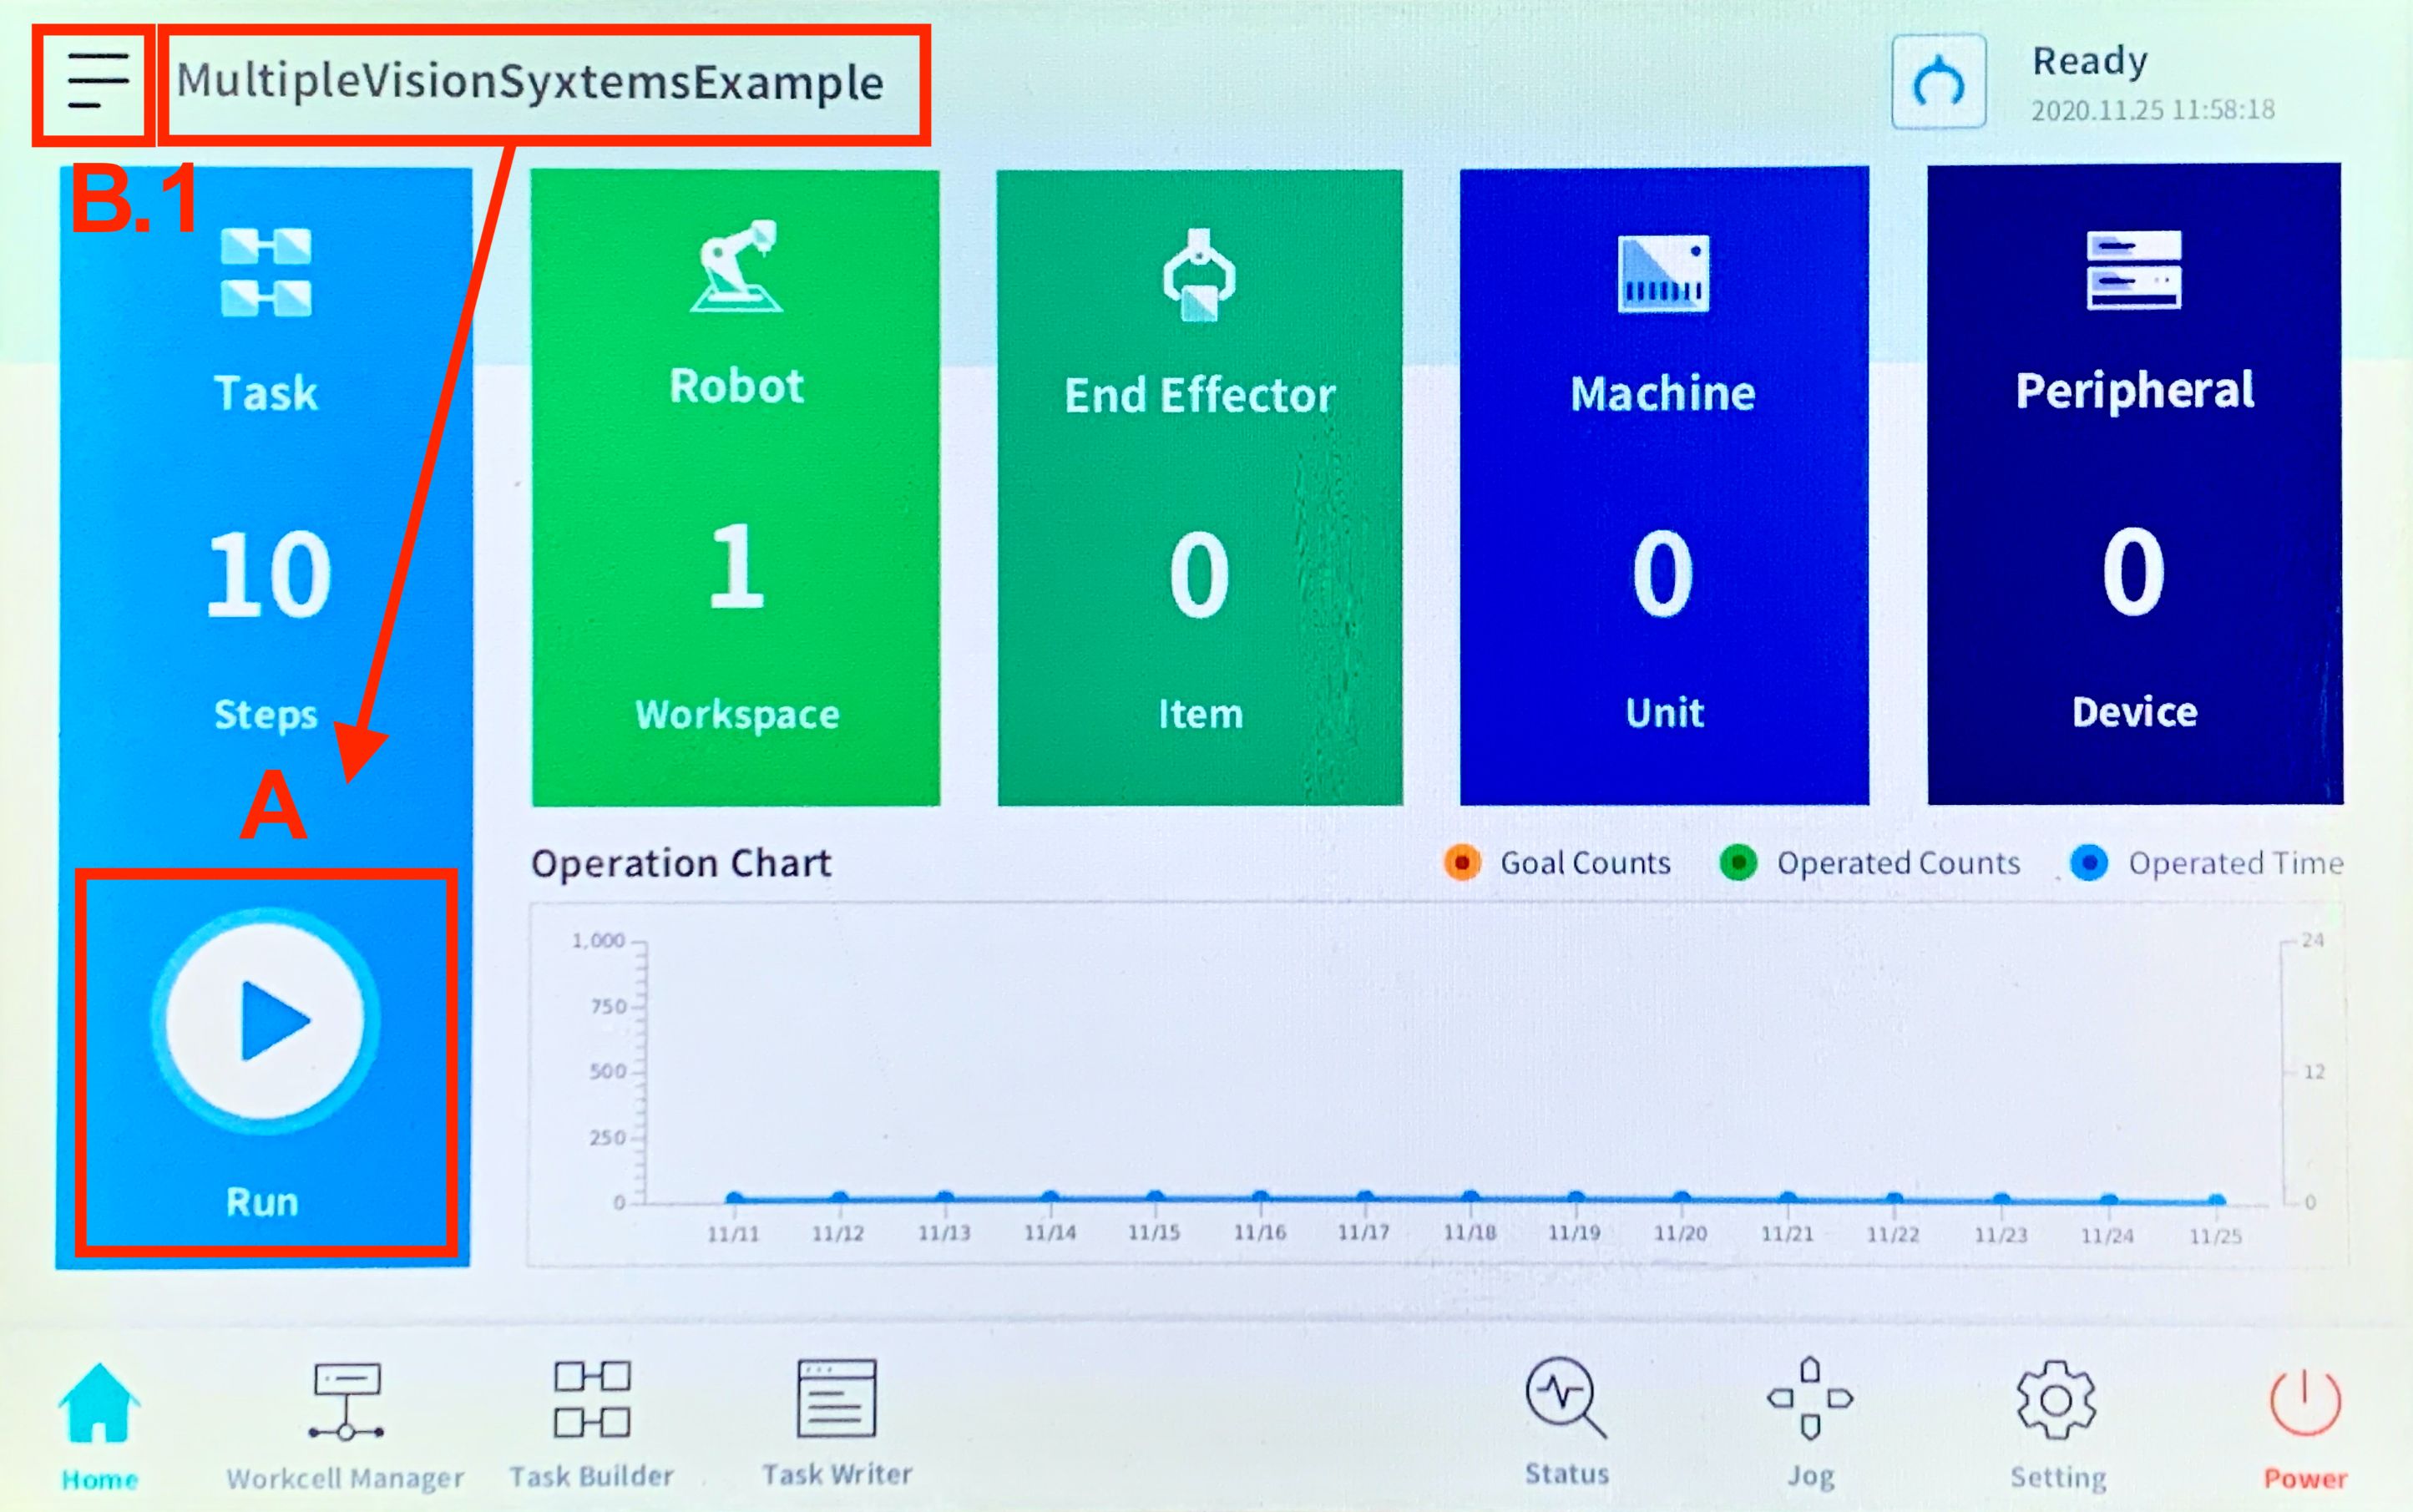
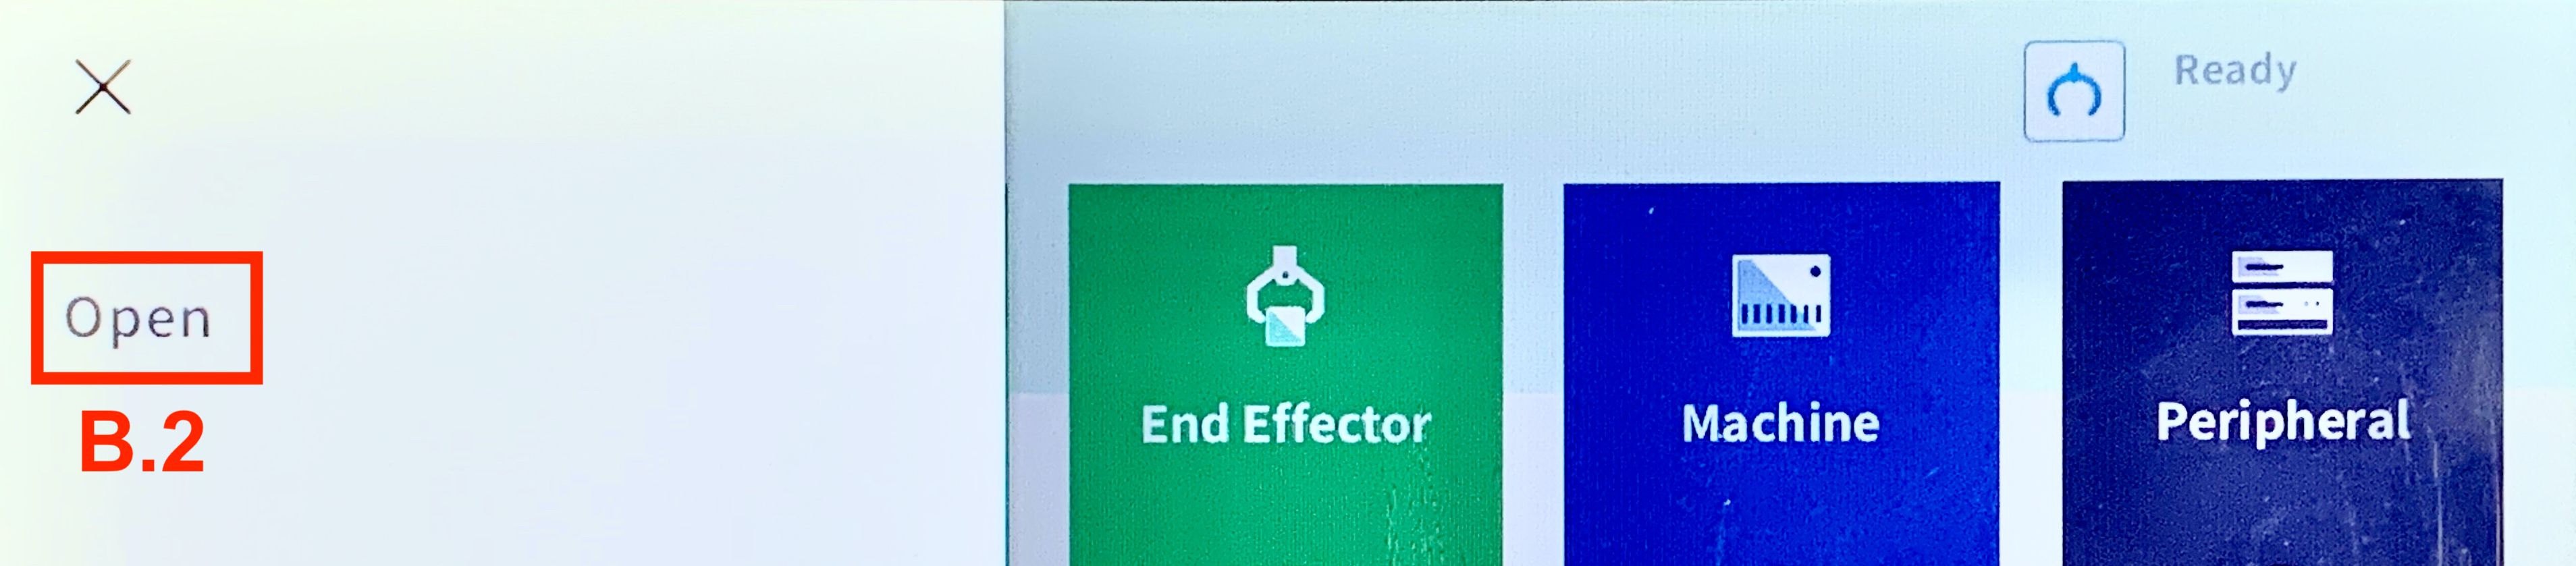
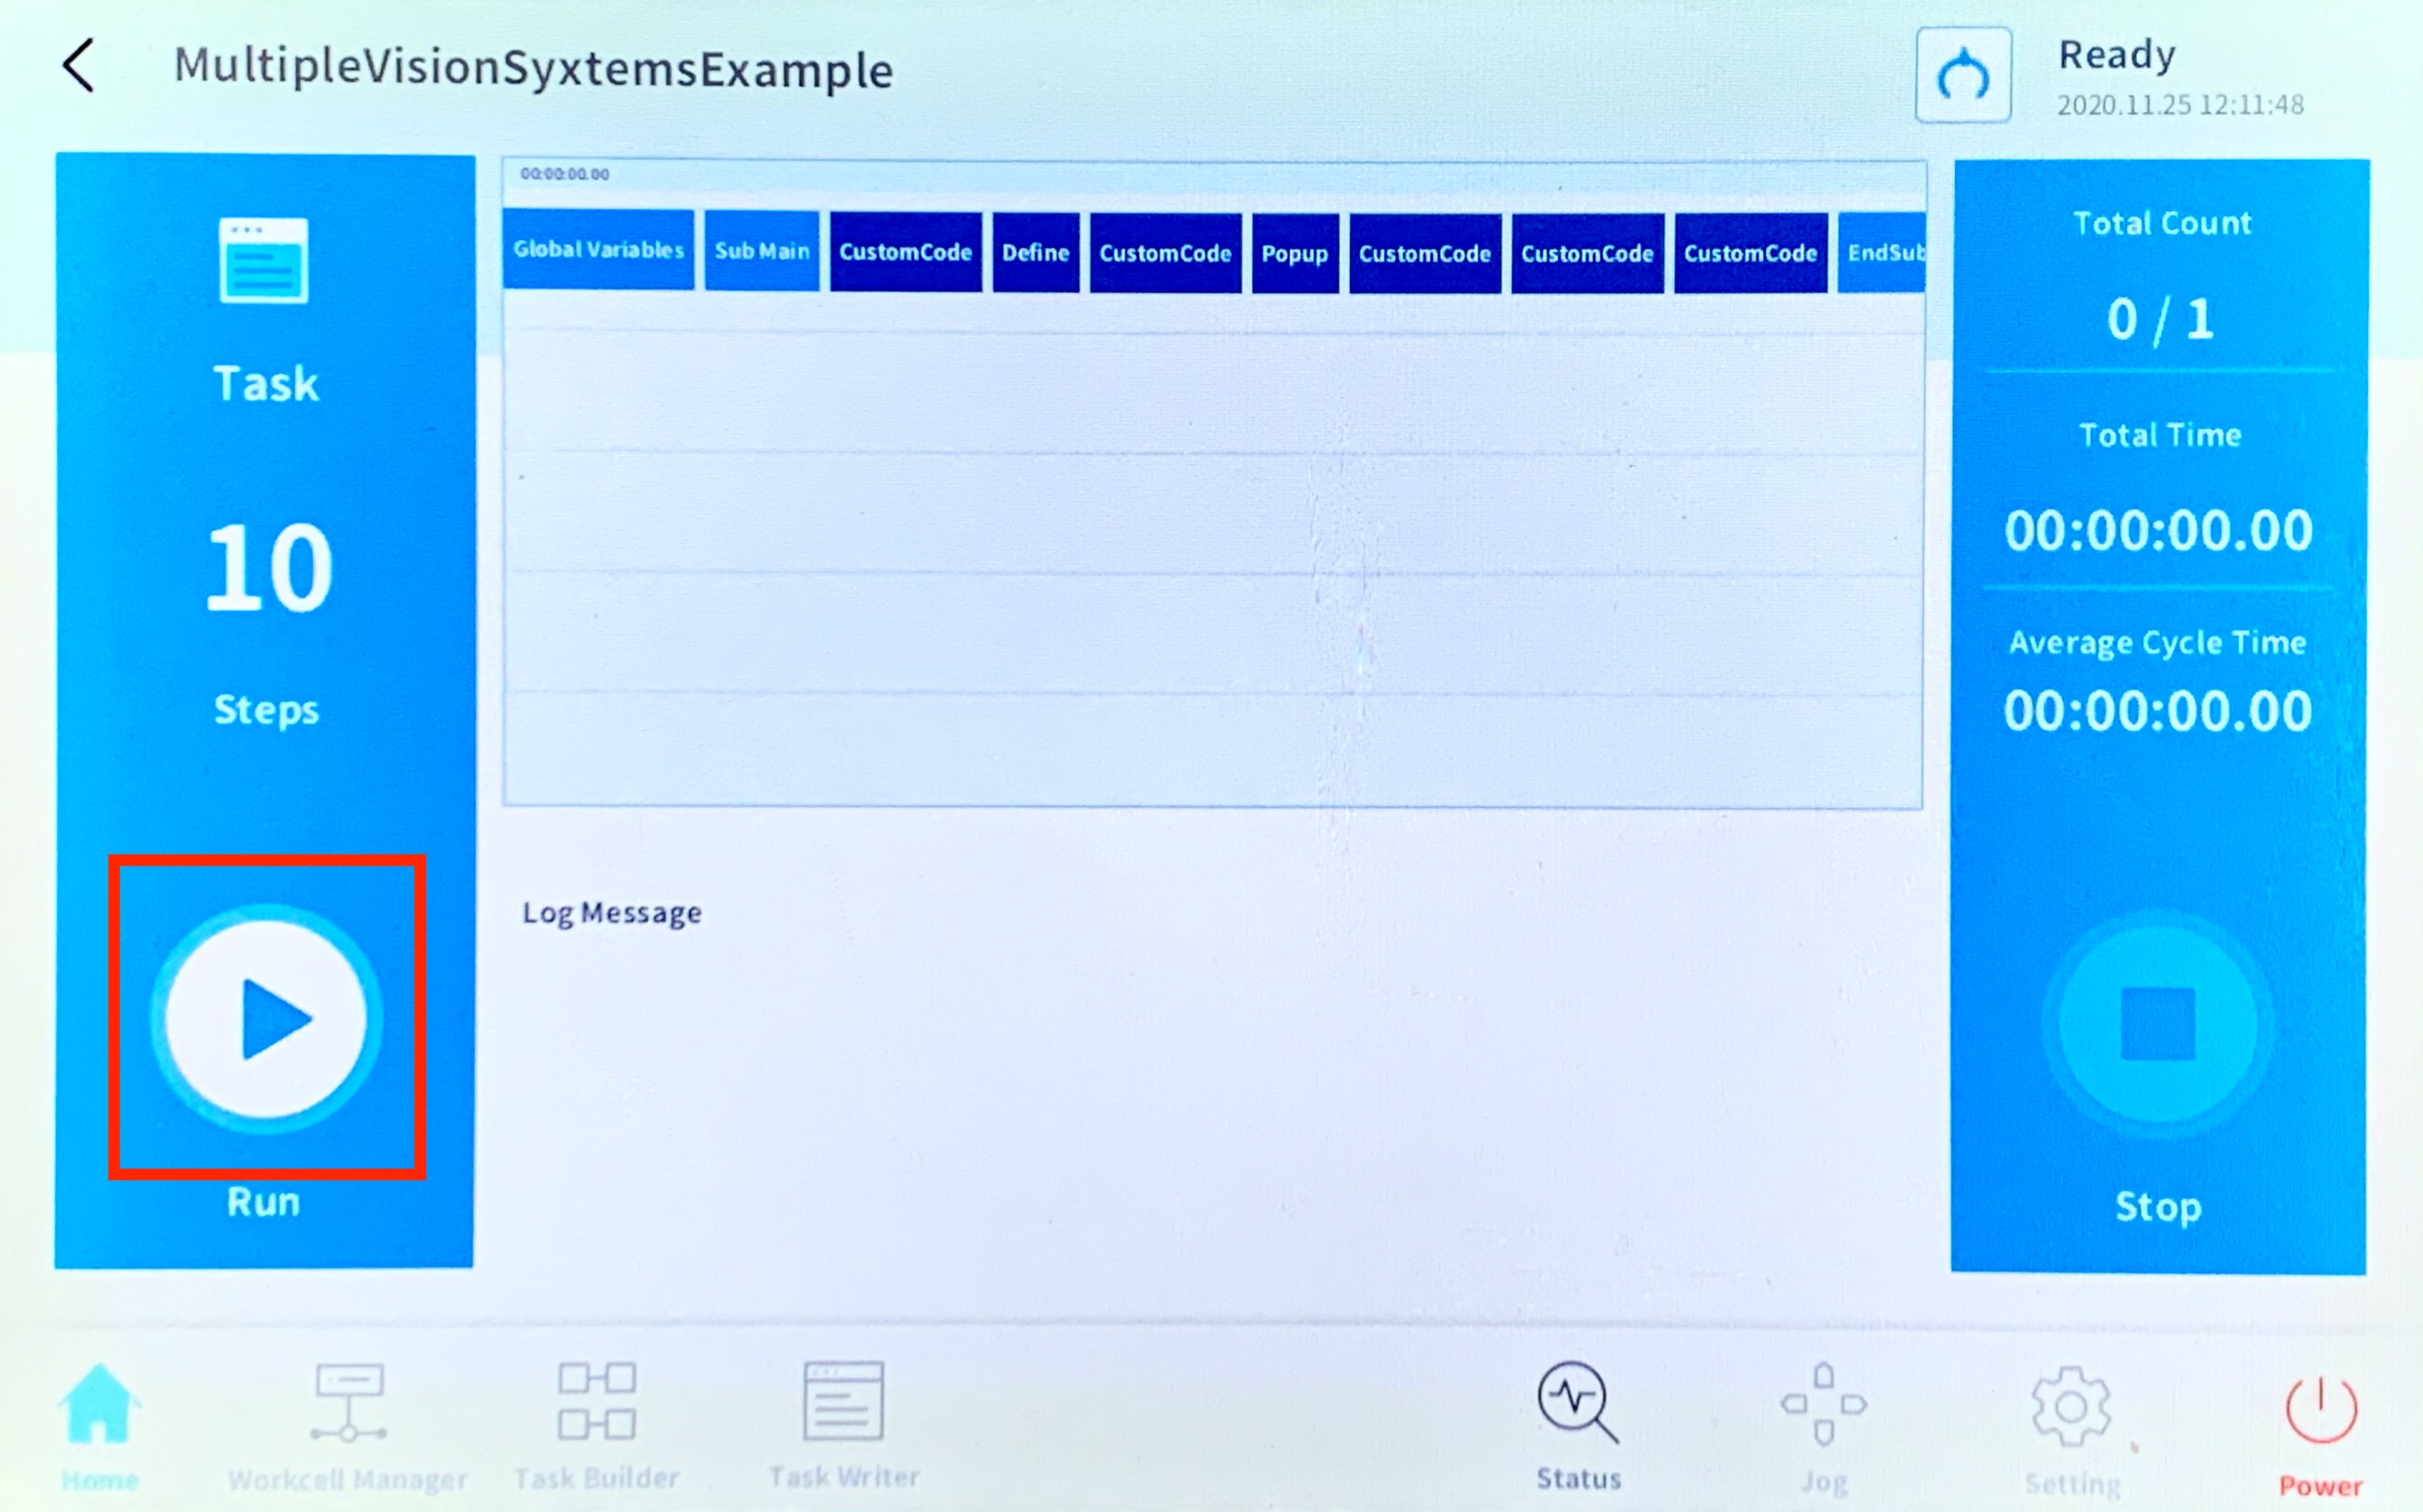
At this point, the robot should start sending requests to the Vision Controller and execute bin picking movements.
NOTE: Ensure that you are ready to halt motion execution immediately. It is strongly recommended to reduce the speed to 10% of maximum during initial bin picking tests.
4.5 Logging
Photoneo Robotic API uses the function tp_log(), and the logs have the default category Log Message, which is not shown during the task runtime. Therefore only necessary logs are presented - in a popup window. These are usually fatal errors that do not allow continuing the task execution. All logged messages from the task can be found by entering Settings > Log Message on the TP.
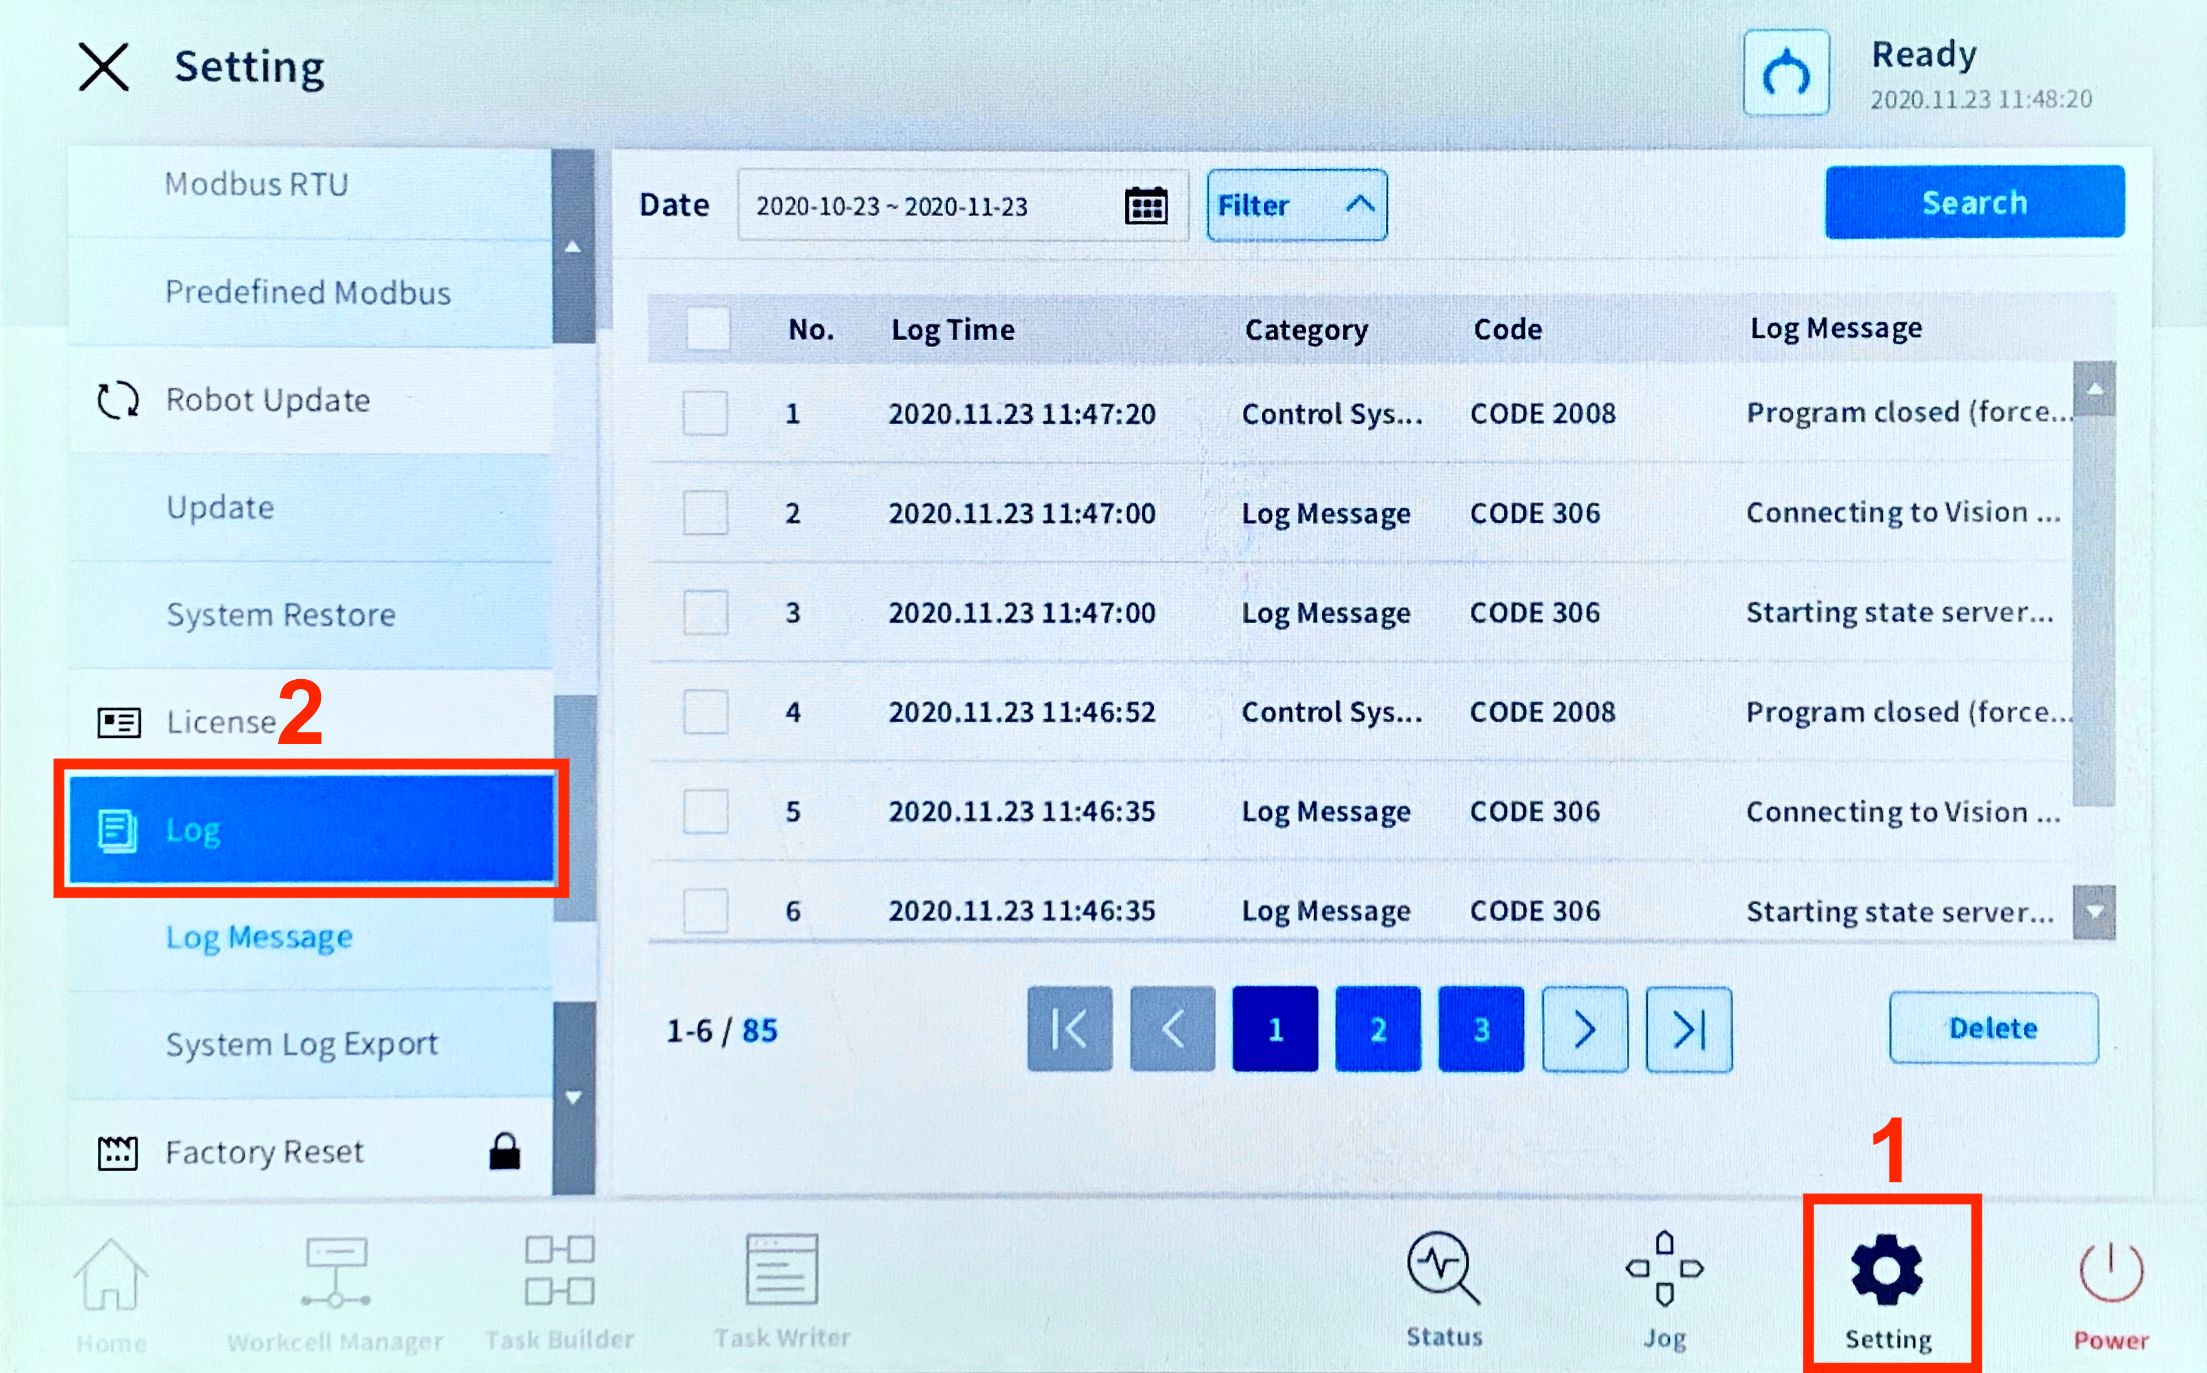
5 Migration guide
This chapter will walk you through the process of updating your robot module to newer version. It also documents program flow, API and other changes to help you make all necessary modifications in your current program without encountering any problems.
5.1 BPS 1.5.x -> BPS 1.7.x
NOTE: Migration between these versions does require robot module update as described in chapter **:ref:`5.2 <integration_guide_for_robots_by_doosan_5.2_Robot_module_update>`**. The main program, however, does not require any changes.
Please read the general Migration guide here. The table below summarizes changes specific to the Robot module for Universal Robots.
Variable |
Bin Picking Studio 1.5.x |
Bin Picking Studio 1.7.x |
Version compatibility |
|---|---|---|---|
Error code [6] LONG TRAJECTORY |
Unused. |
Removed. The BPS won’t generate a too-long trajectory. |
Changed. |
Error code [204] PART LOST |
Unused. |
Removed. |
Changed. |
Error code [205] COLLISION DETECT |
Unused. |
Removed. |
Changed. |
5.2 Robot module update
Please follow these steps to update your current robot module to newer version compatible with Bin Picking Studio version you are using:
Back up your changes in script customer_definitions.txt. It contains your custom settings as well as gripper action procedures
Remove scripts you have loaded to your main task: photoneo_common.txt, customer_definitions.txt, and state_server.txt
Load the new version of these scripts into your main task
Apply your modifications from the old customer_definitions.txt to the new one
Carefully read the API changes in the new version of the robot module and modify your current API calls in your main program accordingly (if necessary)
6 Calibration
The calibration procedure requires the Robot State Server to be running to provide the current state of the robot. The Robot State Server also provides necessary data during hand-eye bin picking and for real-time visualization of the robot. The main Robot State Server functionality is implemented in DRL script state_server.txt, however, it also requires definitions from photoneo_common.txt. The Robot State Server is started by procedure pho_start_state_server() which creates a server socket and runs in a separate thread. After a client connects it starts sending the robot state data. In case of client disconnection, it waits for a new client.
Therefore each task must include the script state_server.txt (and also the photoneo_common.txt) and start the server by the following call:
pho_start_state_server()
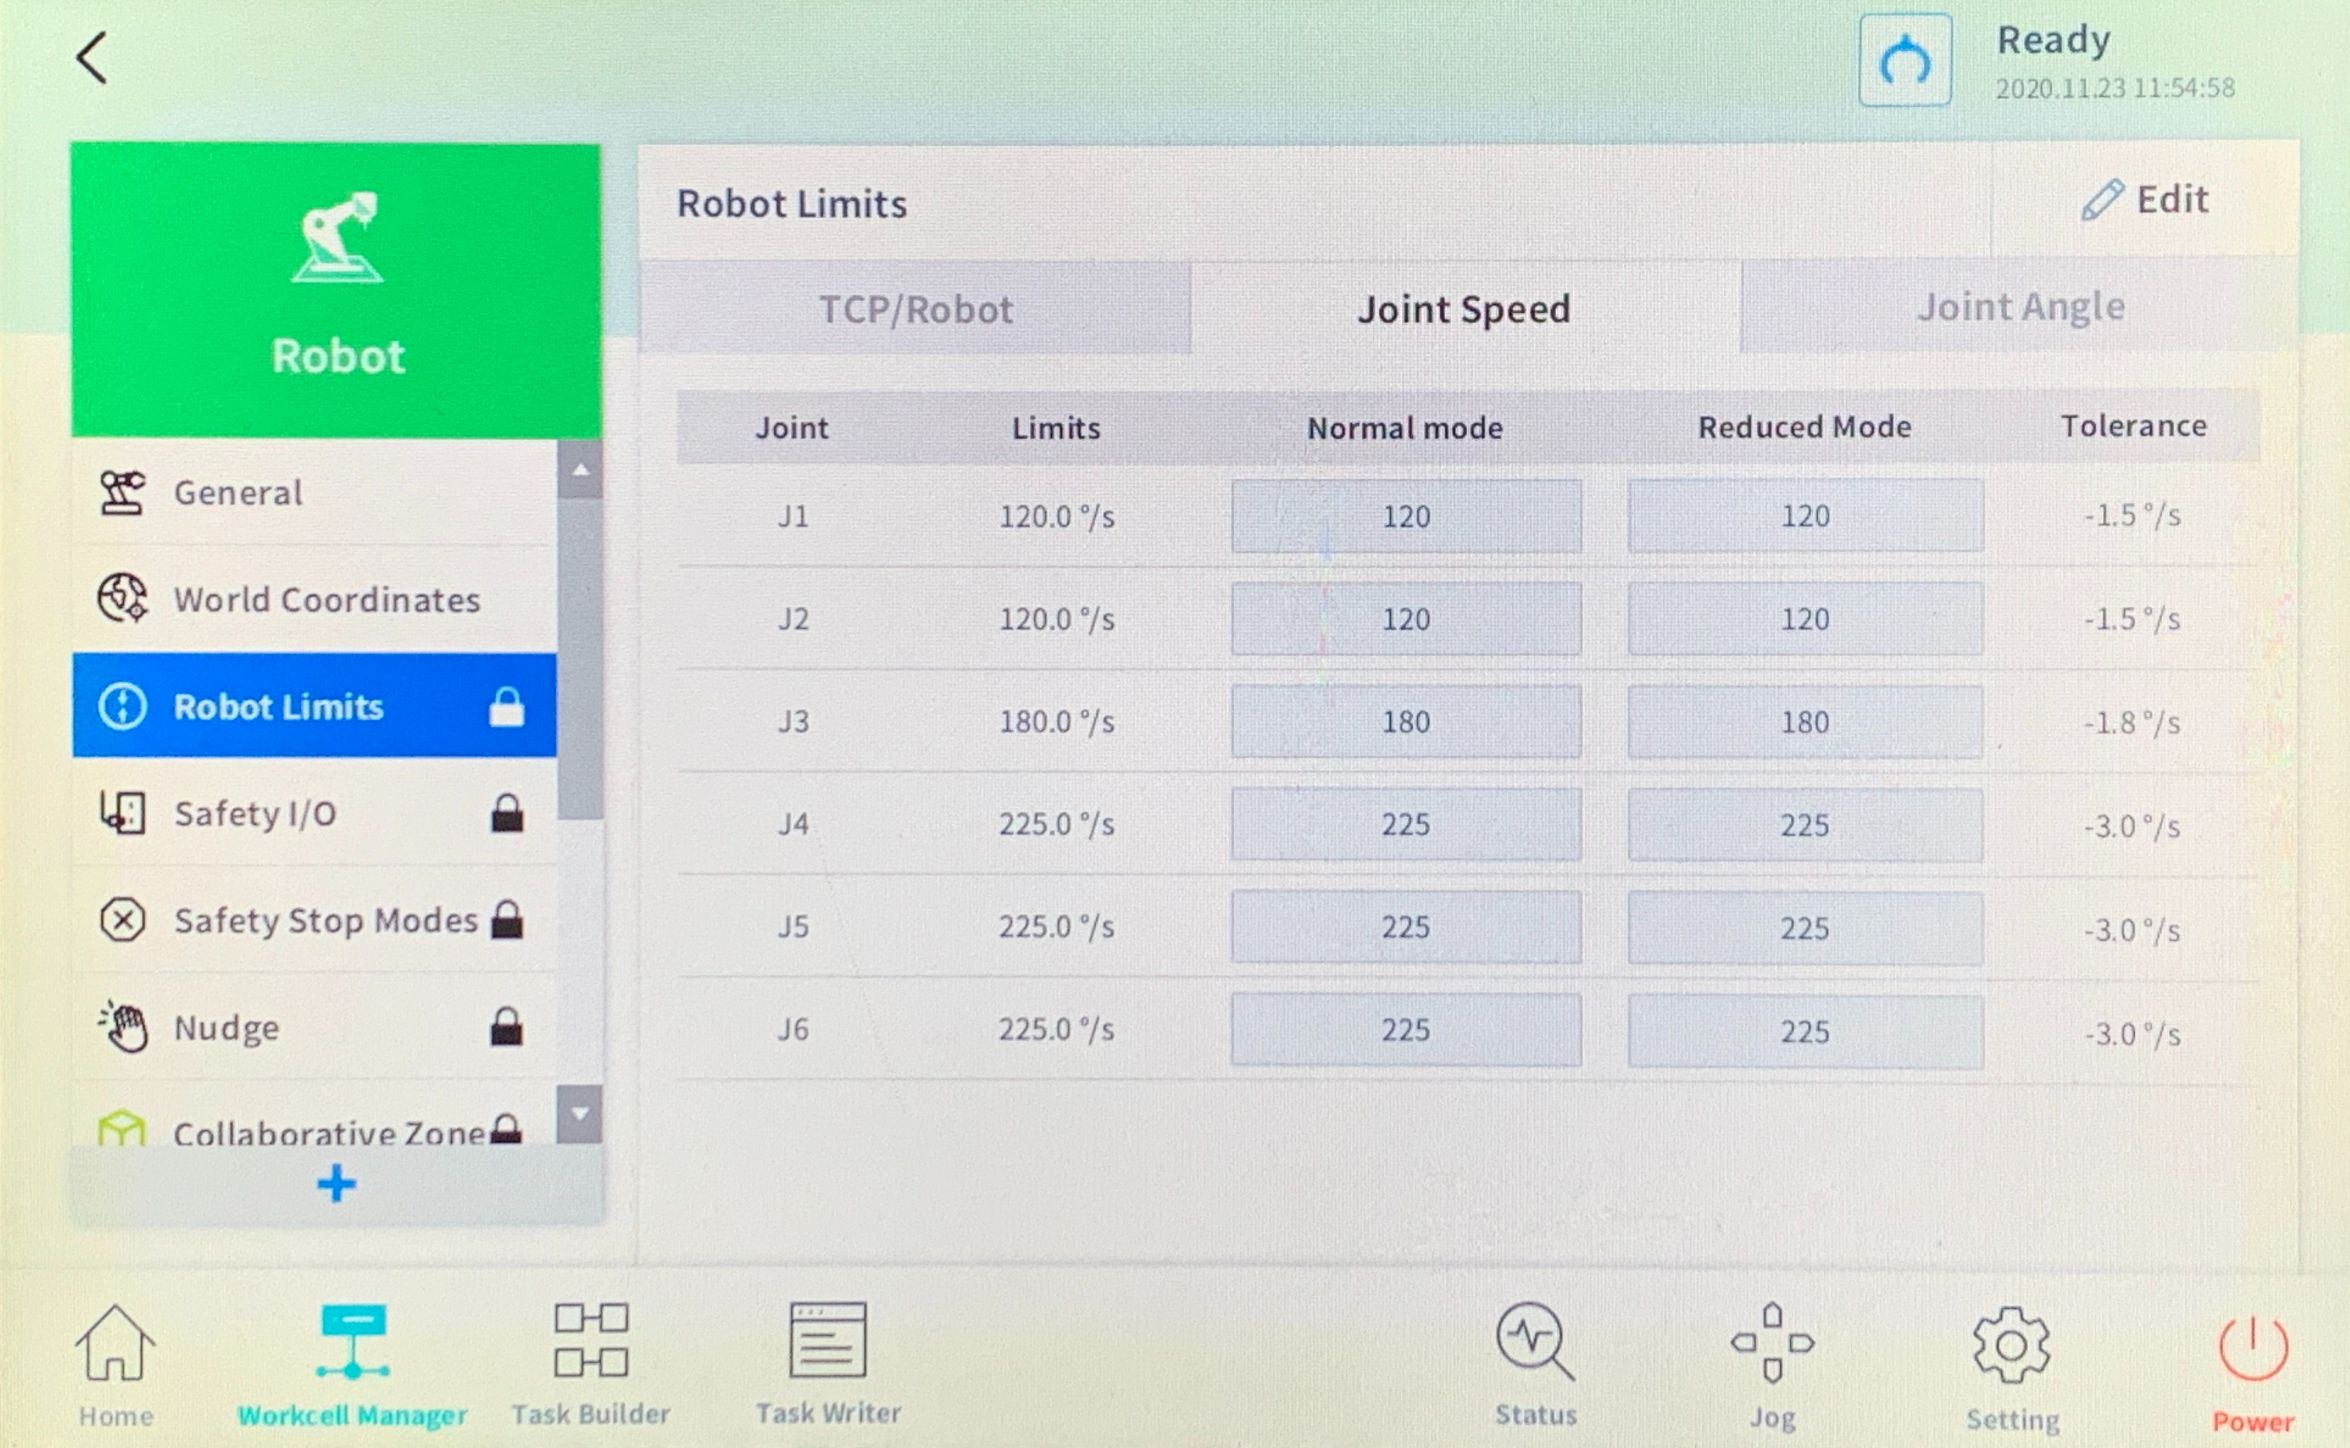
6.1 Hand guiding
6.2 Semi-automatic
The operator is just expected to start the calibration process in the BPS and finish it (verify the result and save).