Integration Guide for Robots by Stäubli
Note: It is strongly recommended to read the Robot communication overview prior to this integration guide.
Contents
1 Prerequisites
Photoneo Stäubli Interface was developed using the CS9 controler version s8.12.2-Cs9_BS2561.
It should be compatible with older CS8 controllers with several (mostly UI-related) changes. The required VAL3 version is s7.7.2 or higher.
2 Robot controller setup
2.1 Controller configuration
2.1.1 Network configuration
The first step of the setup is to configure the network interfaces.
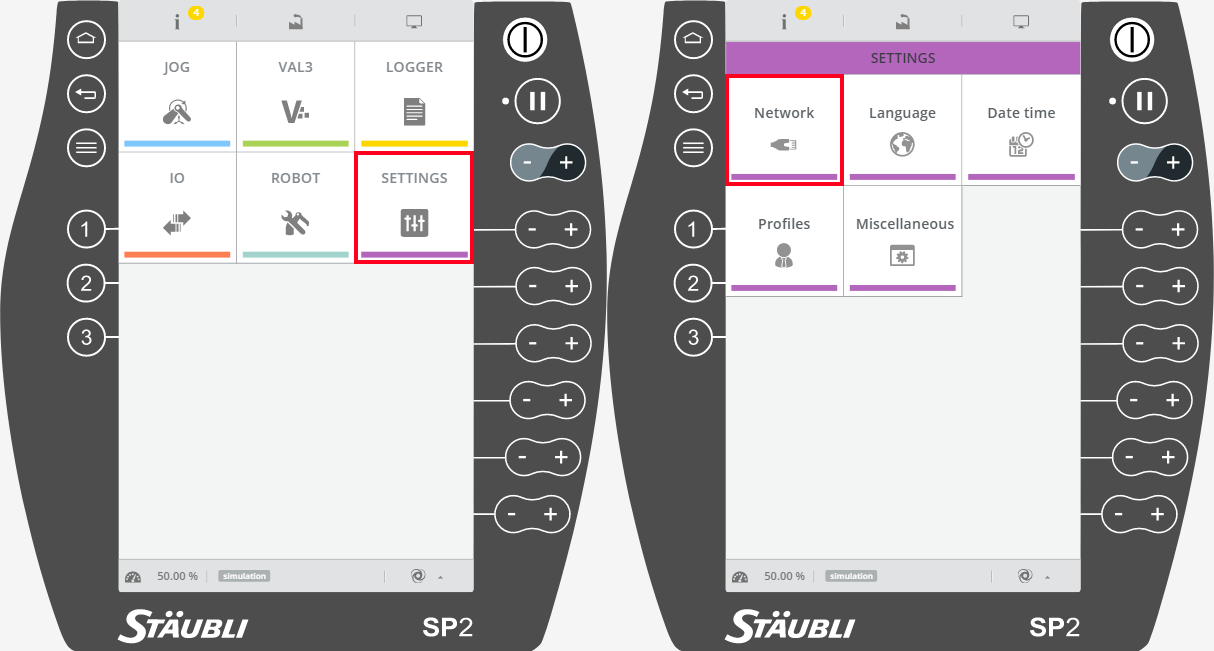
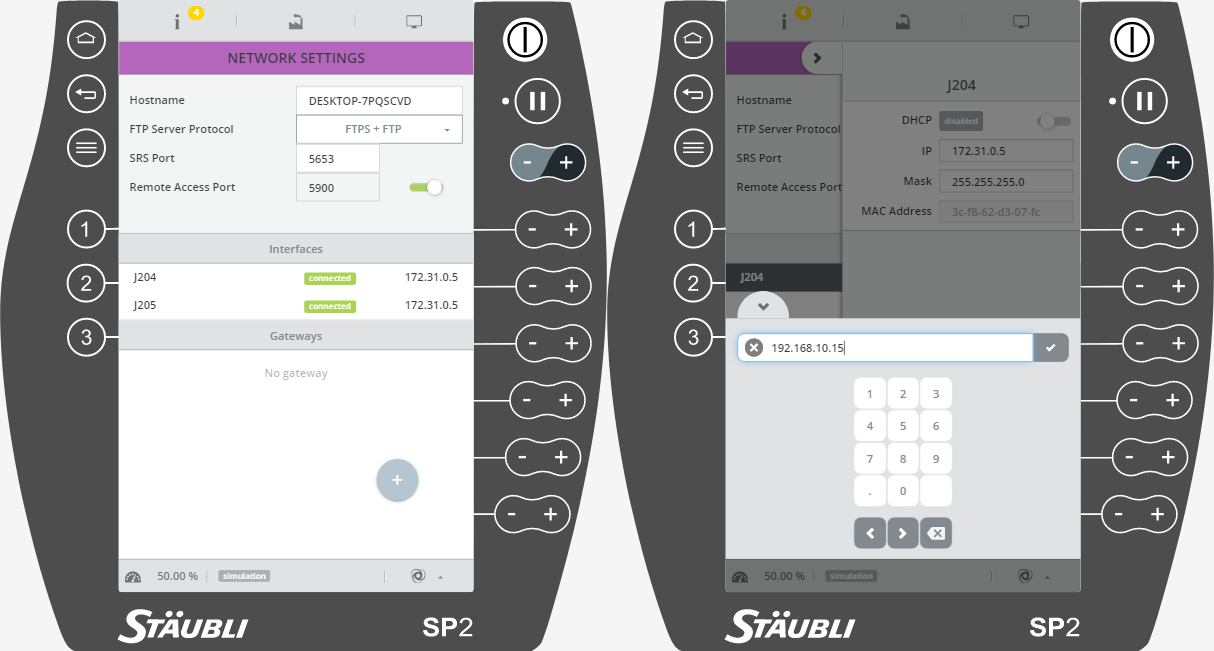
J204
usually used for communication with third-party devices, in our case, the Vision Controller
configure the IP address to meet the network configuration of the Vision Controller (check the Network interface of the Vision Controller)
J205
usually designated for file transfers between the Stäubli Robotics Suite and the robot controller
configure the IP address to meet the network configuration of your PC running the Stäubli Robotics Suite
2.2 Robot module installation
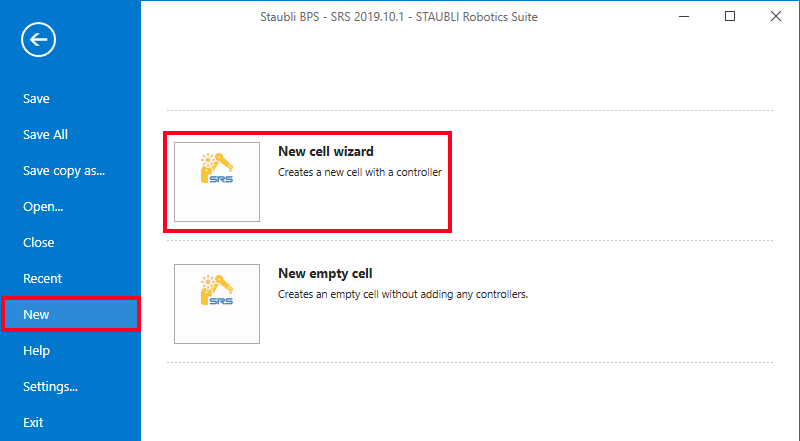
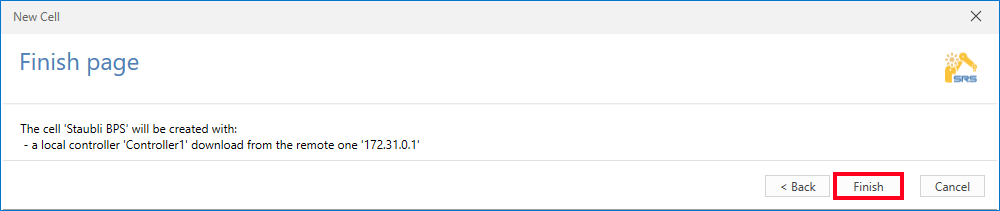
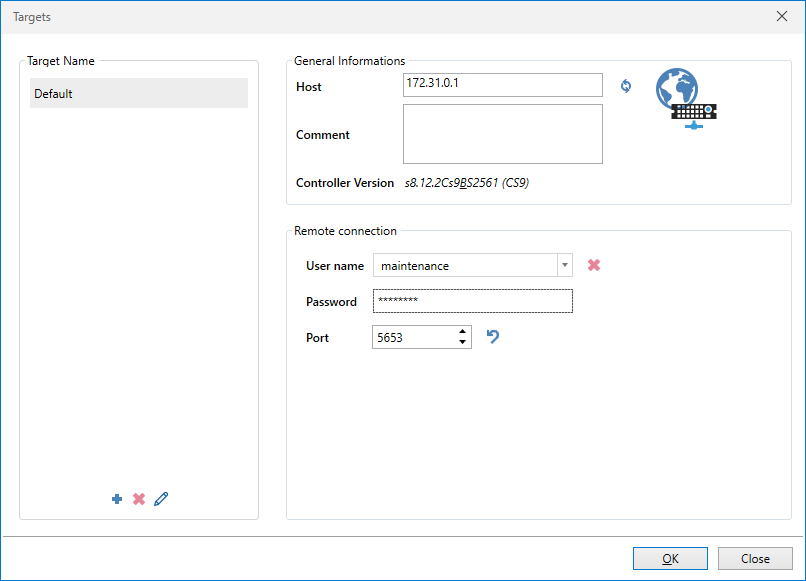
2.2.1 Creating new SRS project
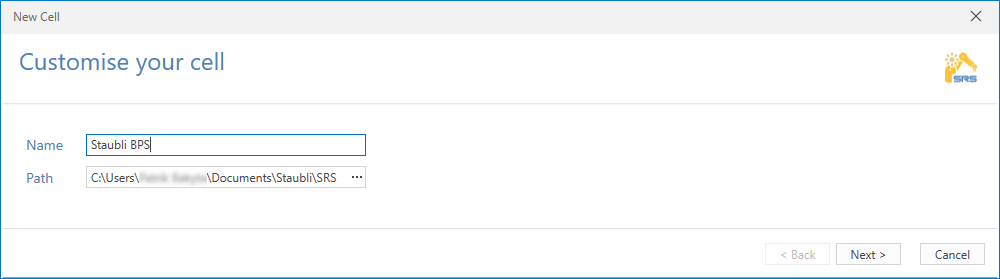
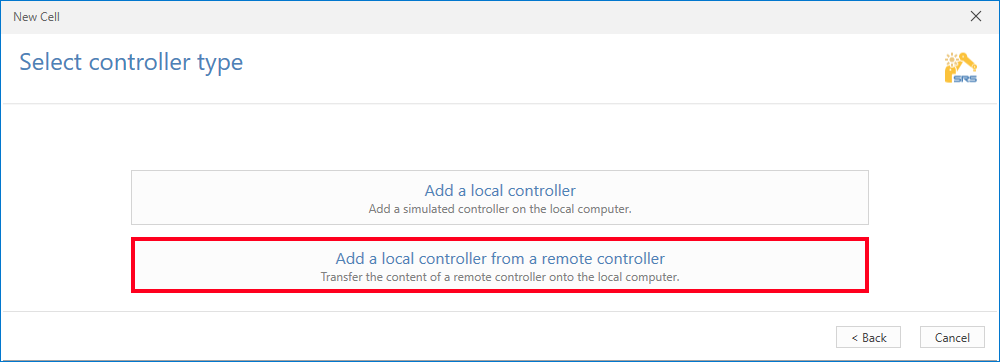
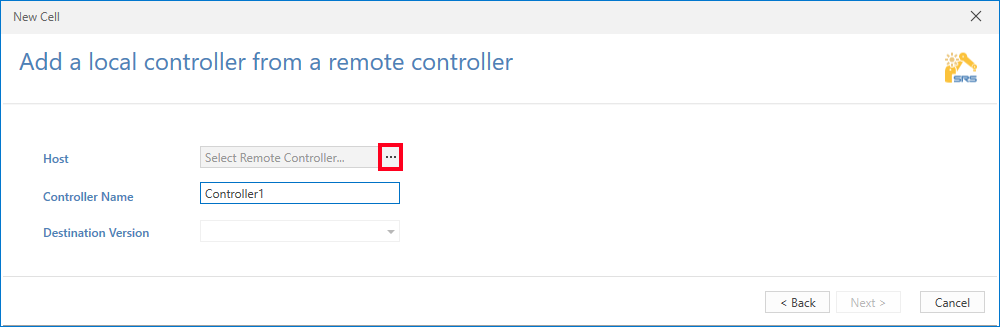
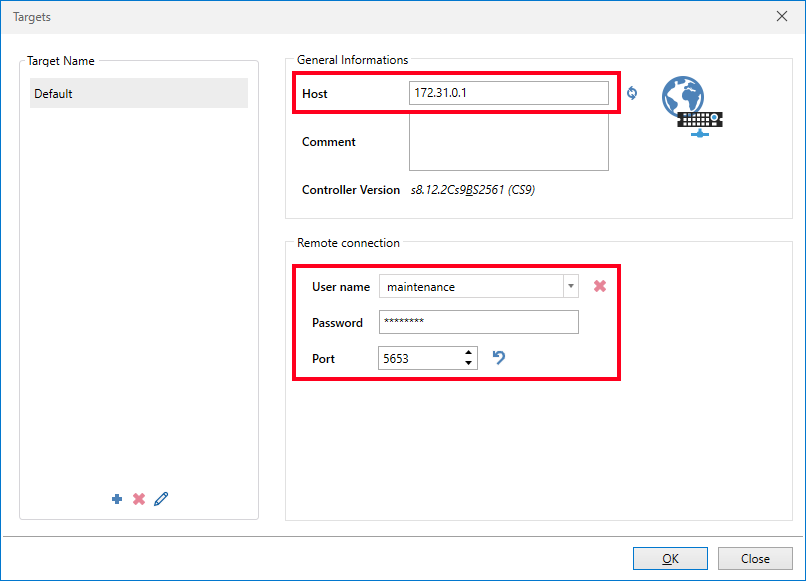
Host - the IP address of the J205 network interface of the robot controller
The Remote Connection section contains authorization information, fill in the fields:
User Name: maintenance
Password: spec_cal
Port: 5653
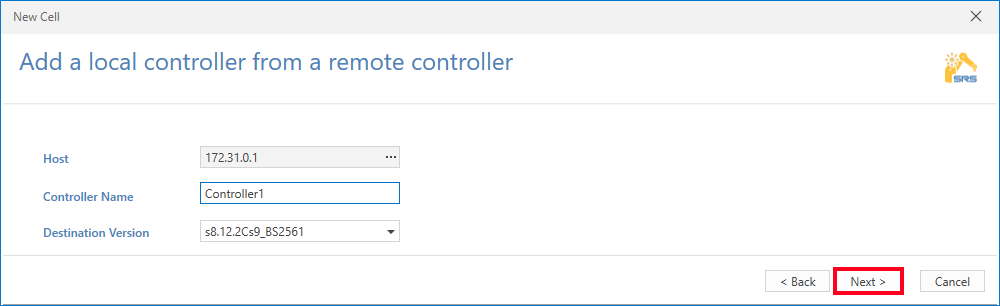
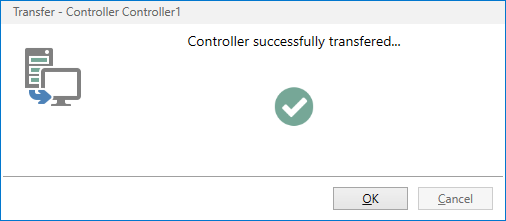
2.2.2 Loading the Robot module files
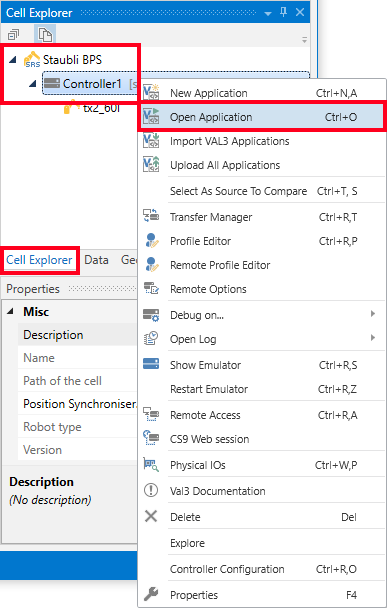
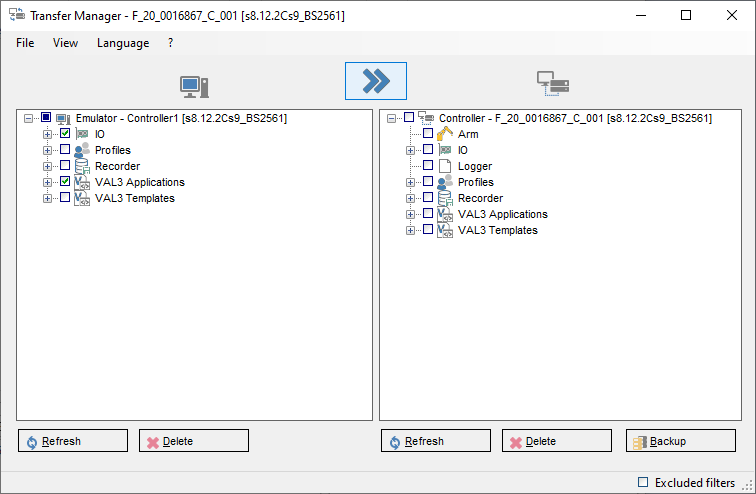
The Robot module files need to be transferred to the robot controller but first, they need to be loaded to the SRS project.
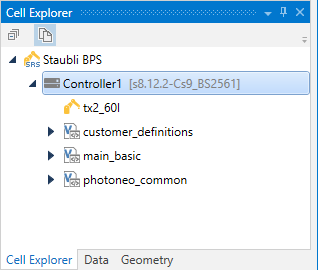
The Robot module consists of two core folders containing val3 files:
photoneo_common
customer_definitions
Besides that Photoneo provides three example bin picking programs and a semi-automatic calibration example program located in folder example_programs:
Besides that Photoneo provides three example programs located in folder example_programs:
main_basic
main_multiple_vs
main_change_solution
main_calibration
The core folders (and optionally the example program you wish to use) need to be transferred to the usrapp folder of your project. In our case it is:
~/Documents/Staubli/SRS/Staubli BPS/Controller1/usr/usrapp
2.2.3 Changing the cartesian origin of the robot
The Cartesian origin of Stäubli robots is different from the Cartesian origin of robot models used in the Photoneo Bin Picking Studio.
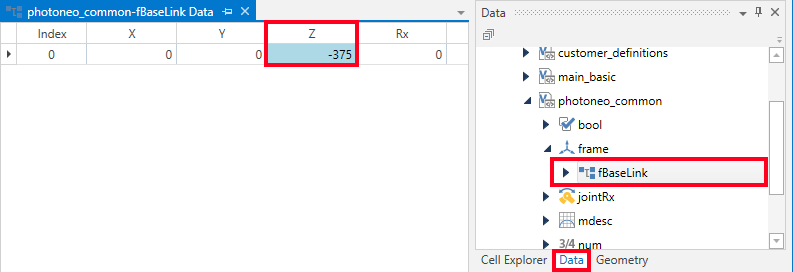
In order to ensure successful calibration, an additional frame with a predefined offset in the Z-axis must be created.
Switch to the Data tab, expand the photoneo_common **-> **frame, and double click on the fBaseLink to open it.
2.2.4 Socket configuration
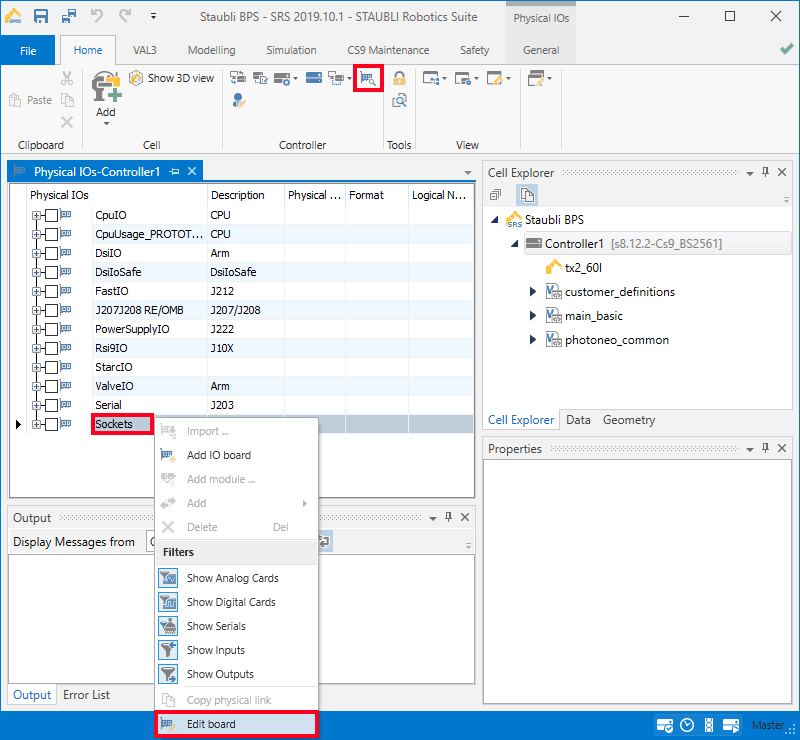
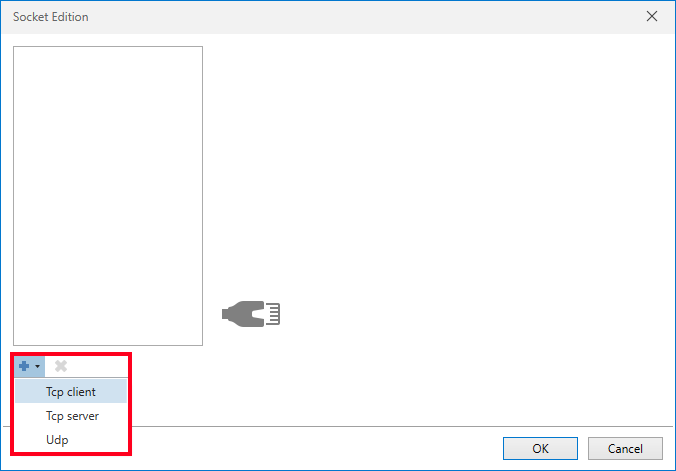
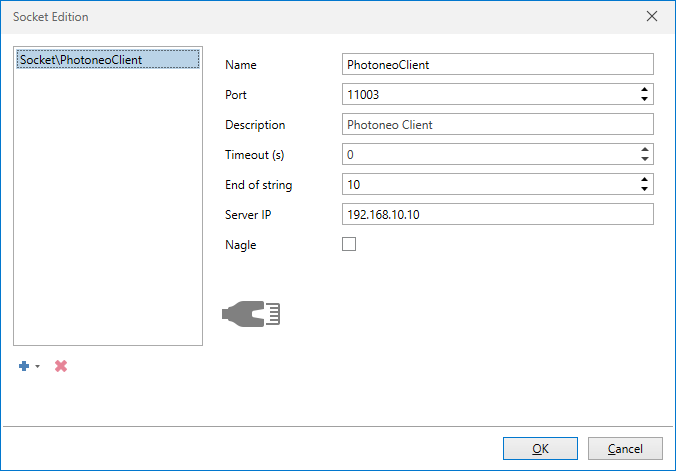
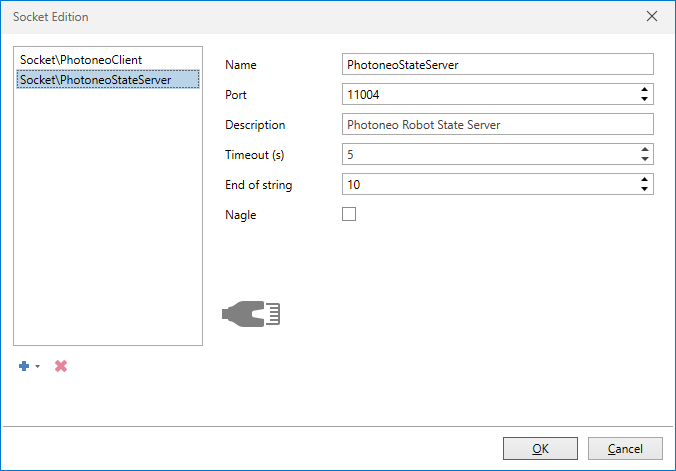
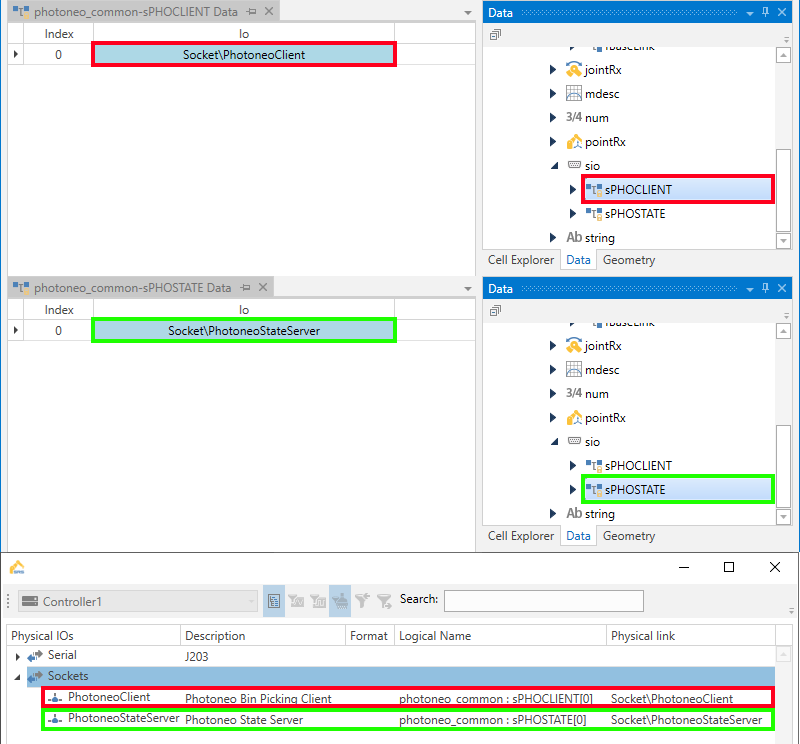
In order to ensure proper communication with the Vision Controller, two sockets (one server and one client) need to be configured.
Parameter |
Tcp client |
Tcp server |
|---|---|---|
Name |
PhotoneoClient |
PhotoneoStateServer |
Port |
11003 |
11004 |
Description |
Photoneo Client |
Photoneo Robot State Server |
Timeout (s) |
0 |
5 |
End of string |
10 |
10 |
Server IP |
IP address of the Vision controller (Robot interface) |
— |
Nagle |
Unchecked |
Unchecked |
2.2.5 Transfering the files
2.2.6 Loading the example program
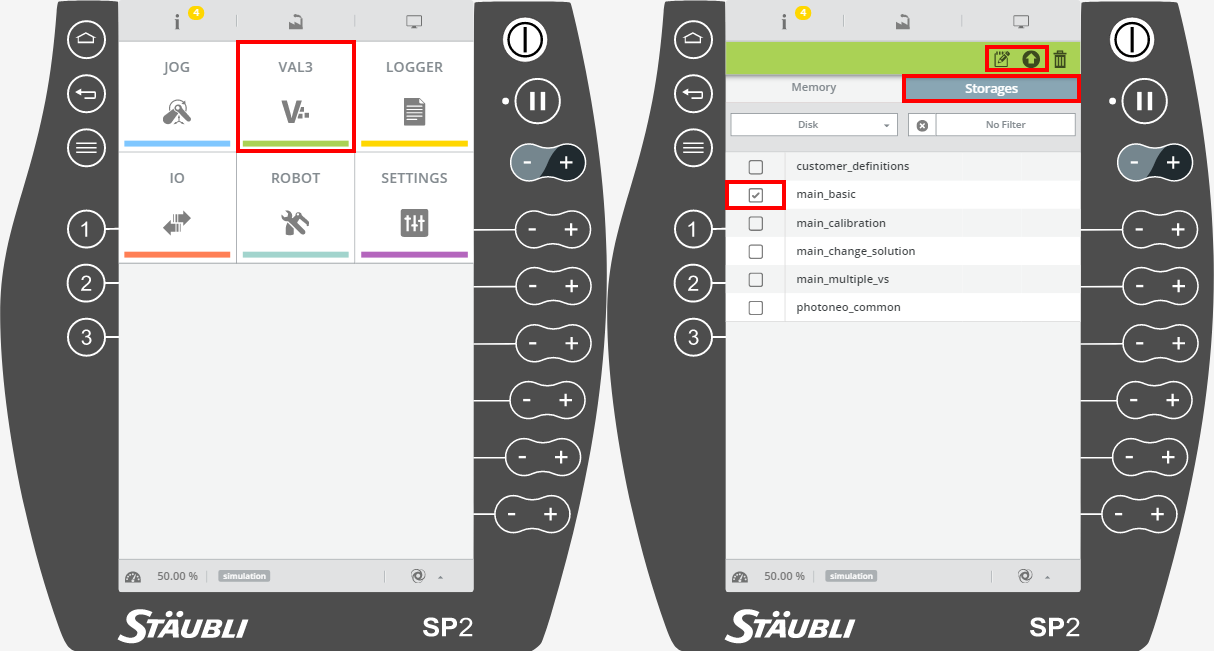
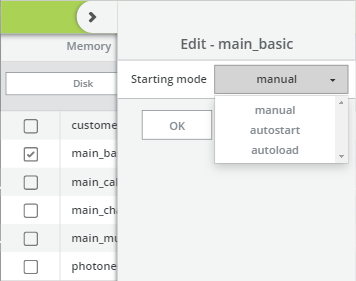
Once the project applications were transferred to the robot controller the main program needs to be loaded using the pendant.
3 Robot module
The Robot module is designed to be easily integrated into existing applications written in RAPID language.
3.1 Robotic API
Note: It is strongly recommended to read the Photoneo robotic API prior to this section.
3.1.1 Connection procedures
Warning: These procedures are contained in the photoneo_common API section and must not be edited!
Connection procedure |
Description / Usage |
|---|---|
Connect to Action Request Server start() |
Description
Starts background task which establishes a new connection to the Action Request Server.
Usage
The procedure should be called only once at the beginning of the program.
|
Wait for connection to Action Request Server wait_for_server() |
Description
Blocks the execution of the program until a valid connection to the Action Request Server is established.
Usage
This command is usually executed right after the procedure Connect to Action Request Server.
|
3.1.2 Communication procedures
Note: Please read Action Requests for detailed documentation of these procedures.
Warning: These procedures are contained in the photoneo_common API section and must not be edited!
Bin picking requests
Request |
Input variables |
Output variables |
|---|---|---|
Initialization request initialize_request(num x_nVisionSystemID,joint x_jStartPose,joint x_jEndPose) |
||
|
|
|
Scan request scan_request(num x_nVisionSystemID) |
|
Note: The response is received by the procedure Wait for scan completion. |
Trajectory request trajectory_request(num x_nVisionSystemID) |
|
Note: The response is received by the procedure Receive trajectory. |
Pick-failed request pick_failed(num x_nVisionSystemID) |
|
|
Calibration requests
Request |
Input variables |
Output variables |
|---|---|---|
Add calibration point request calib_add_point_request() |
— |
|
Solution requests
Request |
Input variables |
Output variables |
|---|---|---|
Change solution request change_solution_request(num x_nSolutionID) |
|
|
Start solution request start_solution_request(num x_nSolutionID) |
|
|
Stop solution request stop_solution_request() |
— |
|
Get running solution request get_running_solution_request() |
— |
|
Get available solutions request get_available_solutions_request() |
— |
|
Response receiving procedures
Response receiving procedures |
Input variables |
Output variables |
|---|---|---|
Wait for scan completion wait_for_scan_completition() |
— |
|
Receive trajectory trajectory_receive() |
— |
|
3.1.3 Bin picking procedures
Note: These procedures are contained in the customer_definitions API section and should be implemented (edited) by the user according to his requirements.
Bin picking procedure |
Description / Usage |
|---|---|
Gripper attach gripper_attach() |
Description
A user-defined procedure. Typically it is the attach procedure used when the picked object is grasped in the Grasp waypoint.
Usage
It is automatically executed when the waypoint of the grasping method is configured to execute the Attach procedure when it is reached.
|
Gripper detach gripper_detach() |
Description
A user-defined procedure. Typically it is the detach procedure used when the picked object is placed during the placing routine defined by the robot operator.
Usage
It is automatically executed when the waypoint of the grasping method is configured to execute the Detach procedure when it is reached.
Note: Typically this procedure is not configured to be executed automatically in a waypoint as it should be called during placing which is implemented by the robot operator. |
Gripper user-defined 1 gripper_user_1() |
Description
A user-defined procedure.
Usage
It is automatically executed when the waypoint of the grasping method is configured to execute the User 1 procedure when it is reached.
|
Gripper user-defined 2 gripper_user_2() |
Description
A user-defined procedure.
Usage
It is automatically executed when the waypoint of the grasping method is configured to execute the User 2 procedure when it is reached.
|
Gripper user-defined 3 gripper_user_3() |
Description
A user-defined procedure.
Usage
It is automatically executed when the waypoint of the grasping method is configured to execute the User 3 procedure when it is reached.
|
Execute bin picking routine pick_part() |
Description
Pre-defined procedure for execution of the bin picking routine. This procedure must not be edited directly - to adapt the execution settings please read Bin picking routine execution settings.
Usage
It should be executed after the bin picking trajectory has been received. The robot must be in the start pose when the procedure is executed. At the end of the procedure, the robot will be in the end pose with the picked object attached to the gripper.
Warning: When using multiple start poses (different for multiple vision systems) be extra careful to be in the correct one before executing this procedure. |
3.1.4 Auxiliary procedures
Warning: These procedures are contained in the photoneo_common API section and must not be edited!
Auxiliary procedure |
Description / Usage |
|---|---|
Set communication timeout set_request_timeout(num x_nTimeout) |
Description
Sets a timeout for upcoming communication procedures. By default, the timeout is zero - no timeout.
Input parameters:
Usage
Whenever it is needed to set a particular timeout to a communication procedure
|
3.2 Example programs
The following section contains basic example programs. Each program is intended for a specific bin picking application and it shows the correct usage of the robotic API.
These templates also contain demonstrative error handling. Please note that it serves only as an example and it is up to the user to define suitable routines for dealing with error situations.
Every example program in its start() procedure does the following:
starts the background communication task and the state server - photoneo_common:start()
creates the main task (main program) - main()
creates a watchdog to monitor the main task - watchdog_main()
The start procedure of the Basic bin picking example:
call photoneo_common:start()

// Start PHOMAIN task
// Comment this code, when you can calibrate
if((taskStatus("PHOMAIN") == -1))
  taskCreate "PHOMAIN", 50, main()
endIf

// Start WATCHDOG task
if((taskStatus("WATCHDOG") == -1))
  taskCreate "WATCHDOG", 50, watchdog_main()
endIf
while(true)
  // Check PHOMAIN State
  if((taskStatus("PHOMAIN") == -1))
    popUpMsg("Main program is down! Restarting...")
    taskCreate "PHOMAIN", 50, main()
  endIf
  // Check Tasks State Every Second
  delay(1)
endWhile
3.2.1 Basic bin picking example
This program is the very basic example of simple binpicking application. It connects to Vision Controller, initializes one Vision System and in loop it requests scan, trajectory and executes the received trajectory.
Name: main_basic (located in folder example_programs)
//---------------------------------------------------------------
// Copyright (c) 2021 Photoneo s.r.o.
// All rights reserved
// Description: Photoneo Staubli Module v.1.6.0 - Main Module
//              Adopt this program to meet your requirements
//---------------------------------------------------------------
//                                         BIN PICKING
// This is a basic bin picking template. The main program loop is defined here. User is expected to reteach
// bin picking start and end positions, set IP Address and Port of Vision Controller and adopt placing part
// of the code to meet specific workcell and application requirements here.

// Clear error counter for err_handling procedure
l_nErrorCounter = 0

//  Wait for connection to the Vision Controller
call photoneo_common:wait_for_server()

// Send bin picking initialization request to the Vision Controller,
call photoneo_common:initialize_request(1, jStartPose, jEndPose)

// Move robot away from scanning area - reteach this position for your robot and workcell
movej(jHomePose, flange, mNomSpeed)
waitEndMove()

// When robot is away from scanning area, trigger first scan and localization
call photoneo_common:scan_request(1)

// Initial wait - this enables localization to find first parts
delay(5)

while true
  //==================== PHOTONEO BIN PICKING START ===========================
  // Wait until scanning is completed
  call photoneo_common:wait_for_scan_completition()

  // Check Error Status
  if(photoneo_common:nErrCode == photoneo_common:nOK)

    // Trigger trajectory planning
    call photoneo_common:trajectory_request(1)

    // While trajectory is being calculated, move robot to bin picking start position
    movej(jStartPose, flange, mNomSpeed)

    // Calculated trajectory is received here
    call photoneo_common:trajectory_receive()

    // If trajectory is valid pick part execute bin picking application
    call customer_definitions:pick_part()

  endIf
  // Check Error Status
  if(photoneo_common:nErrCode == photoneo_common:nOK)

    //=================== PHOTONEO BIN PICKING END ===========================

    // Clear error counter if result is ok
    l_nErrorCounter = 0

    //==================== PLACING START ==================================
    // Adopt code for placing operations
    movej(jHomePose, flange, mNomSpeed)
    waitEndMove()

    // Triger next scan and localization, trajectory for next cycle is calculated while object is being placed
    call photoneo_common:scan_request(1)

    // Implement placing procedure

    //==================== PLACING END ==================================

  else

    //                                         ERROR HANDLING
    // Several error situations might occur during bin picking procedure. Some of them are more serious some are less.
    // For example if no part is found or trajectory planning fails, program just tries to repeat the whole sequence. However if
    // communication failure is detected, program is halted immediately. It is possible to adopt this behavior here if needed

    // In case of communication failure, VAL3 program is terminated immediatelly
    if(photoneo_common:nErrCode == photoneo_common:nERR_COM_FAILURE or photoneo_common:nErrCode == photoneo_common:nERR_BAD_DATA or photoneo_common:nErrCode == photoneo_common:nERR_TIMEOUT)
      popUpMsg("Communication failure")
      movej(jHomePose, flange, mNomSpeed)
      waitEndMove()
      return

      //If bin picking service returned error response, reinitialize and trigger new scan (Adopt if needed)
    elseIf(photoneo_common:nErrCode == photoneo_common:nERR_SERVICE or photoneo_common:nErrCode == photoneo_common:nERR_NOT_INITIALIZED)
      popUpMsg("Service error from VC")
      movej(jHomePose, flange, mNomSpeed)
      waitEndMove()
      return

      //  If planning failed or no part was found, notify user and continue by next scan (Adopt if needed)
    elseIf(photoneo_common:nErrCode == photoneo_common:nERR_PLANNING_FAILED or photoneo_common:nErrCode == photoneo_common:nERR_NO_PART_FOUND)
      popUpMsg("No part found or planning failed")
      movej(jHomePose, flange, mNomSpeed)
      waitEndMove()
      call photoneo_common:scan_request(1)
    endIf

    l_nErrorCounter = l_nErrorCounter + 1
    if(l_nErrorCounter > 2)
      return
    endIf

  endIf
endWhile
3.2.2 Multiple Vision Systems example
This program is an extension of the basic bin picking example. Instead of one, it initializes two vision systems and switches between them in each cycle.
Name: main_multiple_vs (located in folder example_programs)
//---------------------------------------------------------------
// Copyright (c) 2021 Photoneo s.r.o.
// All rights reserved
// Description: Photoneo Staubli Module v.1.6.0 - Main Module with Multiple Vision Systems
//              Adopt this program to meet your requirements
//---------------------------------------------------------------
//                                         BIN PICKING
// This is a basic bin picking template. The main program loop is defined here. User is expected to reteach
// bin picking start and end positions, set IP Address and Port of Vision Controller and adopt placing part
// of the code to meet specific workcell and application requirements here.

// Clear error counter for err_handling procedure
l_nErrorCounter = 0

// Wait for connection to the Vision Controller
call photoneo_common:wait_for_server()

//Define Vision System IDs
l_nVS_ID1 = 1
l_nVS_ID2 = 2

// Send bin picking initialization request to the Vision Controller
call photoneo_common:initialize_request(l_nVS_ID1, jStartPose1, jEndPose1)

// Send bin picking initialization request to the Vision Controller
call photoneo_common:initialize_request(l_nVS_ID2, jStartPose2, jEndPose2)

// Move robot away from scanning area - reteach this position for your robot and workcell
movej(jHomePose, flange, mNomSpeed)
waitEndMove()

// Set Vision System ID
l_nVS_ID = l_nVS_ID1

// When robot is away from scanning area, trigger first scan and localization
call photoneo_common:scan_request(l_nVS_ID)

// Initial wait - this enables localization to find first parts
delay(5)

while true
  //==================== PHOTONEO BIN PICKING START ===========================
  // wait until scanning is completed
  call photoneo_common:wait_for_scan_completition()

  // Check Error Status
  if(photoneo_common:nErrCode == photoneo_common:nOK)

    // Trigger trajectory planning
    call photoneo_common:trajectory_request(l_nVS_ID)

    // While trajectory is being calculated, move robot to bin picking start position
    if(l_nVS_ID == l_nVS_ID1)
      movej(jStartPose1, flange, mNomSpeed)
    else
      movej(jStartPose2, flange, mNomSpeed)
    endIf

    // Calculated trajectory is received here
    call photoneo_common:trajectory_receive()

    // If trajectory is valid pick part execute bin picking application
    call customer_definitions:pick_part()

  endIf
  // Check Error Status
  if(photoneo_common:nErrCode == photoneo_common:nOK)

    //=================== PHOTONEO BIN PICKING END ===========================

    // Clear error counter if result is ok
    l_nErrorCounter = 0

    //==================== PLACING START ==================================
    // Adopt code for placing operations
    movej(jHomePose, flange, mNomSpeed)
    waitEndMove()

    // Switch Vision Systems IDs
    if(l_nVS_ID == l_nVS_ID1)
      l_nVS_ID = l_nVS_ID2
    else
      l_nVS_ID = l_nVS_ID1
    endIf

    // Triger next scan and localization, trajectory for next cycle is calculated while object is being placed
    call photoneo_common:scan_request(l_nVS_ID)

    // Implement placing procedures
    // Use Vision System ID to differentiate between placing procedures

    // ==================== PLACING END ==================================

  else

    //                                         ERROR HANDLING
    // Several error situations might occur during bin picking procedure. Some of them are more serious some are less.
    // For example if no part is found or trajectory planning fails, program just tries to repeat the whole sequence. However if
    // communication failure is detected, program is halted immediately. It is possible to adopt this behavior here if needed

    // In case of communication failure, VAL3 program is terminated immediatelly
    if(photoneo_common:nErrCode == photoneo_common:nERR_COM_FAILURE or photoneo_common:nErrCode == photoneo_common:nERR_BAD_DATA or photoneo_common:nErrCode == photoneo_common:nERR_TIMEOUT)
      popUpMsg("Communication failure")
      movej(jHomePose, flange, mNomSpeed)
      waitEndMove()
      return

      //If bin picking service returned error response, reinitialize and trigger new scan (Adopt if needed)
    elseIf(photoneo_common:nErrCode == photoneo_common:nERR_SERVICE or photoneo_common:nErrCode == photoneo_common:nERR_NOT_INITIALIZED)
      popUpMsg("Service error from VC")
      movej(jHomePose, flange, mNomSpeed)
      waitEndMove()
      return

      //  If planning failed or no part was found, notify user and continue by next scan (Adopt if needed)
    elseIf(photoneo_common:nErrCode == photoneo_common:nERR_PLANNING_FAILED or photoneo_common:nErrCode == photoneo_common:nERR_NO_PART_FOUND)
      popUpMsg("No part found or planning failed")
      movej(jHomePose, flange, mNomSpeed)
      waitEndMove()
      call photoneo_common:scan_request(l_nVS_ID)
    endIf

    l_nErrorCounter = l_nErrorCounter + 1
    if(l_nErrorCounter > 2)
      return
    endIf

  endIf
endWhile
3.2.3 Change solution example
A single robotic cell can take part in several production processes. Handling of multiple parts concurrently is done by using multiple vision systems in one solution. When completely changing the production process it is more suitable to have separate dedicated solutions that can be deployed directly from the robot.
This program is an extension of the basic bin picking example. After a defined number of bin picking cycles, it sends a request to change the deployed solution.
Name: main_change_solution (located in folder example_programs)
//---------------------------------------------------------------
// Copyright (c) 2021 Photoneo s.r.o.
// All rights reserved
// Description: Photoneo Staubli Module v.1.6.0 - Main Module with Solution Change
//              Adopt this program to meet your requirements
//---------------------------------------------------------------
//                                         BIN PICKING
// This is a basic bin picking template. The main program loop is defined here. User is expected to reteach
// bin picking start and end positions, set IP Address and Port of Vision Controller and adopt placing part
// of the code to meet specific workcell and application requirements here.

// Clear error counter for err_handling procedure
l_nErrorCounter = 0

//  Wait for connection to the Vision Controller
call photoneo_common:wait_for_server()

// Define Solution IDs
l_nSol_ID1 = 2
l_nSol_ID2 = 3

// Set Solution ID
l_nSol_ID = l_nSol_ID1

// Maximum count of picked parts to change solution
l_nMAX_PICKS = 10

// Initialize picked parts counter
l_nPickCounter = 0

// Send bin picking initialization request to the Vision Controller
if (l_nSol_ID==l_nSol_ID1)
  call photoneo_common:initialize_request(1, jStartPose1, jEndPose1)
else
  call photoneo_common:initialize_request(1, jStartPose2, jEndPose2)
endIf

// Move robot away from scanning area - reteach this position for your robot and workcell
movej(jHomePose, flange, mNomSpeed)
waitEndMove()

// When robot is away from scanning area, trigger first scan and localization
call photoneo_common:scan_request(1)

// Initial wait - this enables localization to find first parts
delay(5)

while true
  //==================== PHOTONEO BIN PICKING START ===========================
  // Wait until scanning is completed
  call photoneo_common:wait_for_scan_completition()

  // Check Error Status
  if(photoneo_common:nErrCode == photoneo_common:nOK)

    // Trigger trajectory planning
    call photoneo_common:trajectory_request(1)

    // While trajectory is being calculated, move robot to bin picking start position
    if(l_nSol_ID == l_nSol_ID1)
      movej(jStartPose1, flange, mNomSpeed)
    else
      movej(jStartPose2, flange, mNomSpeed)
    endIf

    // Calculated trajectory is received here
    call photoneo_common:trajectory_receive()

    // If trajectory is valid pick part execute bin picking application
    call customer_definitions:pick_part()

    // Increment picked parts counter
    l_nPickCounter = l_nPickCounter + 1

  endIf
  // Check Error Status
  if(photoneo_common:nErrCode == photoneo_common:nOK)

    //=================== PHOTONEO BIN PICKING END ===========================

    // Clear error counter if result is ok
    l_nErrorCounter = 0

    //==================== PLACING START ==================================
    // Adopt code for placing operations
    movej(jHomePose, flange, mNomSpeed)
    waitEndMove()

    if(l_nPickCounter < l_nMAX_PICKS)
      // Triger next scan and localization, trajectory for next cycle is calculated while object is being placed
      call photoneo_common:scan_request(1)

      // Implement place procedures
      // Use Vision System ID to differentiate between placing procedures
    else
      // Reset picked parts counter
      l_nPickCounter = 0

      // Implement place procedures
      // Use Vision System ID to differentiate between placing procedures

      // Change solution
      if(l_nSol_ID == l_nSol_ID1)
        l_nSol_ID = l_nSol_ID2
      else
        l_nSol_ID = l_nSol_ID1
      endIf
      call photoneo_common:change_solution_request(l_nSol_ID)

      // Reinitialization after solution change
      // Send bin picking initialization request to the Vision Controller
      if(l_nSol_ID == l_nSol_ID1)
        call photoneo_common:initialize_request(1,jStartPose1,jEndPose1)
      else
        call photoneo_common:initialize_request(1,jStartPose2,jEndPose2)
      endIf

      // Move robot away from scanning area - reteach this position for your robot and workcell
      movej(jHomePose,flange,mNomSpeed)
      waitEndMove()

      // When robot is away from scanning area, trigger first scan and localization
      call photoneo_common:scan_request(1)

      // Initial wait - this enables localization to find first parts
      delay(5)

    endIf

    // ==================== PLACING END ==================================

  else

    //                                         ERROR HANDLING
    // Several error situations might occur during bin picking procedure. Some of them are more serious some are less.
    // For example if no part is found or trajectory planning fails, program just tries to repeat the whole sequence. However if
    // communication failure is detected, program is halted immediately. It is possible to adopt this behavior here if needed

    // In case of communication failure, VAL3 program is terminated immediatelly
    if(photoneo_common:nErrCode==photoneo_common:nERR_COM_FAILURE or photoneo_common:nErrCode==photoneo_common:nERR_BAD_DATA or photoneo_common:nErrCode==photoneo_common:nERR_TIMEOUT)
      popUpMsg("Communication failure")
      movej(jHomePose,flange,mNomSpeed)
      waitEndMove()
      return

      //If bin picking service returned error response, reinitialize and trigger new scan (Adopt if needed)
    elseIf(photoneo_common:nErrCode==photoneo_common:nERR_SERVICE or photoneo_common:nErrCode==photoneo_common:nERR_NOT_INITIALIZED)
      popUpMsg("Service error from VC")
      movej(jHomePose,flange,mNomSpeed)
      waitEndMove()
      return

      //  If planning failed or no part was found, notify user and continue by next scan (Adopt if needed)
    elseIf(photoneo_common:nErrCode==photoneo_common:nERR_PLANNING_FAILED or photoneo_common:nErrCode==photoneo_common:nERR_NO_PART_FOUND)
      popUpMsg("No part found or planning failed")
      movej(jHomePose,flange,mNomSpeed)
      waitEndMove()
      call photoneo_common:scan_request(1)
    endIf

    l_nErrorCounter=l_nErrorCounter+1
    if(l_nErrorCounter>2)
      return
    endIf

  endIf
endWhile
3.2.4 Calibration example
This program is a template for semi-automatic calibration.
Before running the program:
teach the individual calibration poses
start the calibration in the Bin Picking Studio
Now you can start the program. It will move to individual calibration poses and send the** Add calibration point** request when it reaches them. Once all the calibration points are successfully added, the program ends. If you are satisfied with the calibration result, save it in the Bin Picking Studio.
Name: main_calibration (located in folder example_programs)
//----------------------------------------------------------------------
// Copyright (c) 2021 Photoneo s.r.o.
// All rights reserved
// Description: Photoneo Staubli Module v.1.6.0 -  Calibration Example
//              Reteach points and use as many as you need
//----------------------------------------------------------------------

//                                         CALIBRATION
// Reteach calibration positions and call add calibration point request after reaching each calibration pose
// It it recomended to run calibration in MANUAL mode step by step to have a proper control over the process.
// Always make sure that robot does not collide with workcell during transitions between specific waypoints

//  Wait for connection to the the Vision Controller
call photoneo_common:wait_for_server()

// Move to Home position
movej(jHomePose, flange, mNomSpeed)
waitEndMove()

// Starts adding points
movej(jCalib1, flange, mNomSpeed)
waitEndMove()
call photoneo_common:printLog("Calibration Point 1 reached", "CLIENT")
call photoneo_common:calib_add_point_request()

if(photoneo_common:nErrCode!=photoneo_common:nOK)
  call photoneo_common:printLog("Error while adding the calibration point","CLIENT")
  delay(5)
  return
endIf

movej(jCalib2, flange, mNomSpeed)
waitEndMove()
call photoneo_common:printLog("Calibration Point 2 reached", "CLIENT")
call photoneo_common:calib_add_point_request()

if(photoneo_common:nErrCode!=photoneo_common:nOK)
  call photoneo_common:printLog("Error while adding the calibration point","CLIENT")
  delay(5)
  return
endIf

movej(jCalib3, flange, mNomSpeed)
waitEndMove()
call photoneo_common:printLog("Calibration Point 3 reached", "CLIENT")
call photoneo_common:calib_add_point_request()

if(photoneo_common:nErrCode!=photoneo_common:nOK)
  call photoneo_common:printLog("Error while adding the calibration point","CLIENT")
  delay(5)
  return
endIf

movej(jCalib4, flange, mNomSpeed)
waitEndMove()
call photoneo_common:printLog("Calibration Point 4 reached", "CLIENT")
call photoneo_common:calib_add_point_request()

if(photoneo_common:nErrCode!=photoneo_common:nOK)
  call photoneo_common:printLog("Error while adding the calibration point","CLIENT")
  delay(5)
  return
endIf

movej(jCalib5, flange, mNomSpeed)
waitEndMove()
call photoneo_common:printLog("Calibration Point 5 reached", "CLIENT")
call photoneo_common:calib_add_point_request()

if(photoneo_common:nErrCode!=photoneo_common:nOK)
  call photoneo_common:printLog("Error while adding the calibration point","CLIENT")
  delay(5)
  return
endIf

movej(jCalib6, flange, mNomSpeed)
waitEndMove()
call photoneo_common:printLog("Calibration Point 6 reached", "CLIENT")
call photoneo_common:calib_add_point_request()

if(photoneo_common:nErrCode!=photoneo_common:nOK)
  call photoneo_common:printLog("Error while adding the calibration point","CLIENT")
  delay(5)
  return
endIf

movej(jCalib7, flange, mNomSpeed)
waitEndMove()
call photoneo_common:printLog("Calibration Point 7 reached", "CLIENT")
call photoneo_common:calib_add_point_request()

if(photoneo_common:nErrCode!=photoneo_common:nOK)
  call photoneo_common:printLog("Error while adding the calibration point","CLIENT")
  delay(5)
  return
endIf

movej(jCalib8, flange, mNomSpeed)
waitEndMove()
call photoneo_common:printLog("Calibration Point 8 reached", "CLIENT")
call photoneo_common:calib_add_point_request()

if(photoneo_common:nErrCode!=photoneo_common:nOK)
  call photoneo_common:printLog("Error while adding the calibration point","CLIENT")
  delay(5)
  return
endIf

movej(jCalib9, flange, mNomSpeed)
waitEndMove()
call photoneo_common:printLog("Calibration Point 9 reached", "CLIENT")
call photoneo_common:calib_add_point_request()

if(photoneo_common:nErrCode!=photoneo_common:nOK)
  call photoneo_common:printLog("Error while adding the calibration point","CLIENT")
  delay(5)
  return
endIf


// Move back to Home position
movej(jHomePose, flange, mNomSpeed)
waitEndMove()
3.3 Error handling
If an error occurs during the execution of the operation requested by the sent request the error is stored in the global variable photoneo_common:nErrCode. It is recommended to implement adequate error handling for your particular application after each synchronous request and response receiving procedure.
Error codes together with their description and troubleshooting can be found here.
The most important error codes are defined as constants in the application photoneo_common. These error codes are:
Error code |
RAPID constant |
|---|---|
No error (0) |
nOK := 0 |
Service error (1) |
nERR_SERVICE := 1 |
Communication error (3) |
nERR_COM_FAILURE := 3 |
Bad data (4) |
nERR_BAD_DATA := 4 |
Timeout (5) |
nERR_TIMEOUT := 5 |
Path planning failed (201) |
nERR_PLANNING_FAILED := 201 |
No object found (202) |
nERR_NO_PART_FOUND := 202 |
Vision system not initialized (203) |
nERR_NOT_INITIALIZED := 203 |
Empty scene (218) |
nERR_EMPTY_SCENE := 218 |
Wrong bin picking configuration (255) |
nERR_WRONG_BP_CONF := 255 |
Note: Example programs provide basic error handling.
4 Running the basic bin picking example program
4.1 Prerequisites
Before the Basic bin picking example can be run, the following requirements must be met:
A fully configured BPS solution with a single vision system must be prepared for deployment
The robot controller must be configured according to the chapter Robot controller setup of this integration guide
Bin Picking Studio network settings must be configured
Gripper procedures should be implemented (optional - if not implemented, the robot will not actually pick the object)
The placing procedure should be implemented
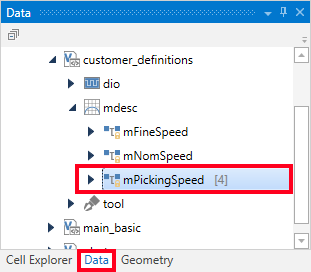
4.2 Bin picking routine execution settings

4.3 Reteach the robot poses
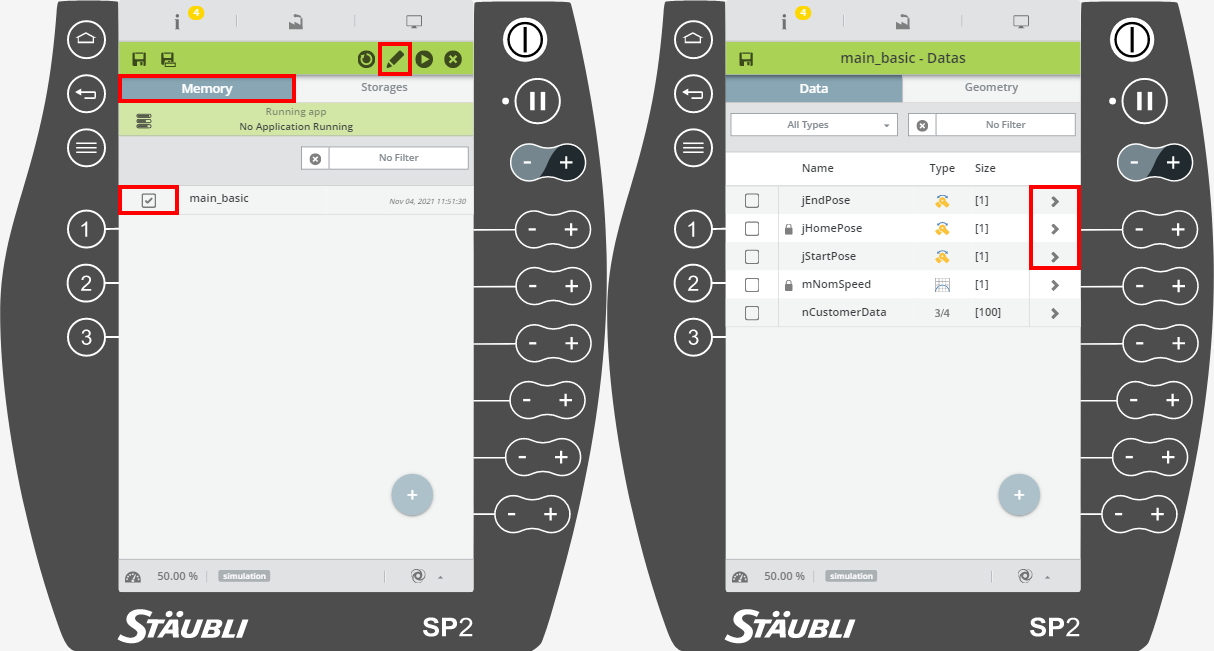
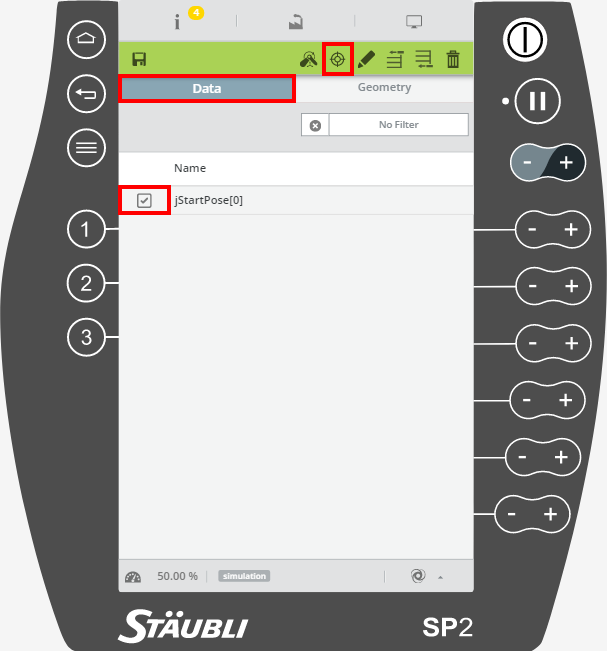
A crucial step of bin picking configuration is the teaching of home, start, and end poses. The home position of the robot should be taught in such a way that the robot is outside the scanning area. The start position should be taught in such a way that the robot gripper is approximately above the center of the bin. The end position can be similar to the start position or slightly shifted towards the placing area. Do not define the end pose too far from the bin as this might affect the path planning (increase total planning time, cause planning errors, etc.).
The Basic bin picking example program uses the following poses:
jHomePose - Home position
jStartPose - Start position
jEndPose - End position
4.4 Runtime
Deploy your BPS solution. The Action Request Client status on the Deployment page of the BPS should be ** DISCONNECTED ** (from the Action Request Server).
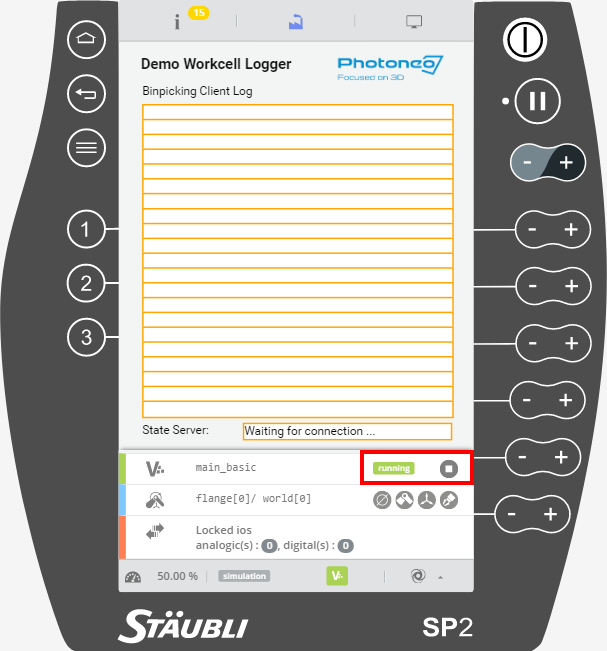
Select either the Manual mode or the Auto mode (reset safety if needed) and start the main program.
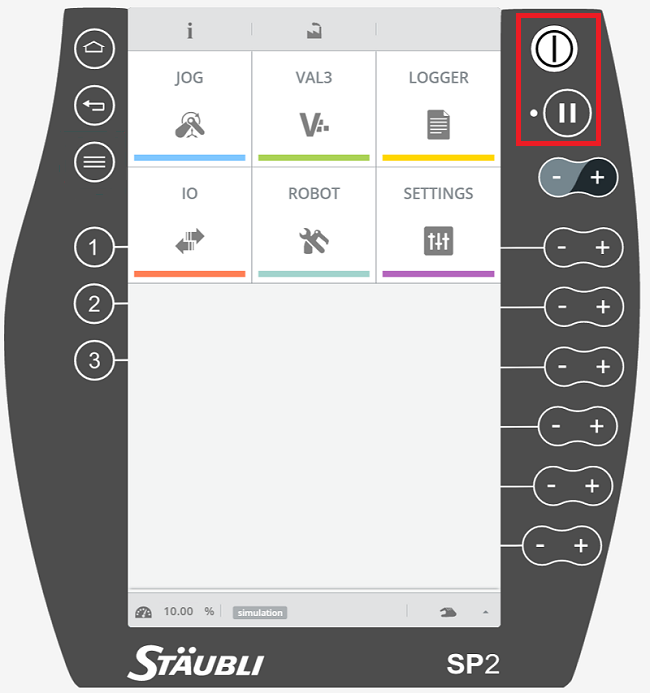
The robot should now start sending requests to the Vision Controller and execute bin picking movements.
NOTE: Ensure that you are ready to halt motion execution immediately. It is strongly recommended to reduce the speed to 10% of the maximum during initial bin picking tests.
5 Migration guide
This chapter will walk you through the process of updating your robot module to newer version. It also documents program flow, API and other changes to help you make all necessary modifications in your current program without encountering any problems.
5.1 BPS 1.1.x -> BPS 1.2.x
NOTE: Migration between these versions does require robot module update as described in chapter **:ref:`5.6 <integration_guide_for_robots_by_staubli_5.6_Robot_module_update>`** as well as update of the main program according to changes in API.
Changes in API calls as well as new calls are described in the table below:
API call |
Bin Picking Studio 1.1.x |
Bin Picking Studio 1.2.x |
Version compatibility |
|---|---|---|---|
initialize_request() |
Procedure does not take any parameters. Start & End poses which are sent during this request call are stored in variables photoneo_common:jStartPose & photoneo_common:jEndPose |
Procedure takes 3 required parameters: ‘x_nVisionSystemID’, ‘x_jStartPose’ & ‘x_jEndPose’. Global variables photoneo_common:jStartPose & photoneo_common:jEndPose have been removed. |
Changed. |
scan_request() |
Parameter ‘x_nVisionSystemID’ does not exist. |
Parameter ‘x_nVisionSystemID’ is required. |
Changed. |
trajectory_request() |
Parameter ‘x_nVisionSystemID’ does not exist. |
Parameter ‘x_nVisionSystemID’ is required. |
Changed. |
customer_request() |
Parameter ‘x_nVisionSystemID’ does not exist. |
Parameter ‘x_nVisionSystemID’ is required. |
Changed. |
pick_failed() |
Not available. |
Available. Lower preference of the object because it failed to be picked. It won’t be chosen to be picked in the next cycle. |
New. |
calib_start_request() |
Not available. |
Unsupported. For Photoneo internal use only. |
New. |
bin_localization_request() |
Not available. |
Unsupported. For Photoneo internal use only. |
New. |
change_solution_request() |
Not available. |
Unsupported. For Photoneo internal use only. |
New. |
set_request_timeout() |
Not available. |
Available. Sets timeout to a request. |
New. |
Changes in variables as well as new variables are described in the table below:
Variable |
Bin Picking Studio 1.1.x |
Bin Picking Studio 1.2.x |
Version compatibility |
|---|---|---|---|
photoneo_common:nToolInvID |
Not available. |
Available. ID of Tool point invariance used for currently picked object. |
New. |
photoneo_common:nGrippingPointID |
Not available. |
Available. ID of Gripping point used for currently picked object. |
New. |
photoneo_common:nGrippingPointInvID |
Not available. |
Available. ID of Gripping point invariance used for currently picked object. |
New. |
photoneo_common:bPickAllowed |
Not available. |
Available. Flag for checking whether bin picking execution is allowed. Used in customer_definitions:pick_part. |
New. |
PHO_WRONG_BP_CONF |
Not available. |
Available. Value = 255 Occurs when the bin picking configuration is incorrect. After receiving this error check the Bin Picking Studio console for more detailed information. |
New. |
Other changes are described in the table below:
Subject |
Bin Picking Studio 1.1.x |
Bin Picking Studio 1.2.x |
Version compatibility |
|---|---|---|---|
Default port numbers |
User has an option to configure these values. |
Action Request Server on Vision Controller: 11003 State server on Robot Controller: 11004 User is recommended to use these default values - it is not possible to configure port values in Bin Picking Studio by the user. If you need to use specific port value please contact support@photoneo.com to help you with configuring port in Bin Picking Studio. |
Changed. |
5.2 BPS 1.2.x -> BPS 1.3.x
NOTE: Users are advised to update robot module as described in chapter **:ref:`5.6 <integration_guide_for_robots_by_staubli_5.6_Robot_module_update>`** when migrating between these versions. The main program, however, does not require any changes.
Changes in API calls as well as new calls are described in the table below:
API call |
Bin Picking Studio 1.2.x |
Bin Picking Studio 1.3.x |
Version compatibility |
|---|---|---|---|
change_solution_request() |
Unsupported. For Photoneo internal use only. |
Supported. Request to change deployed solution. |
Unchanged. |
5.3 BPS 1.3.x -> BPS 1.4.x
NOTE: Migration between these versions does require robot module update as described in chapter **:ref:`5.6 <integration_guide_for_robots_by_staubli_5.6_Robot_module_update>`**. The main program, however, does not require any changes.
5.4 BPS 1.4.x -> BPS 1.5.x
NOTE: Migration between these versions does require robot module update as described in chapter **:ref:`5.6 <integration_guide_for_robots_by_staubli_5.6_Robot_module_update>`**. The main program, however, does not require any changes.
Changes in variables as well as new variables are described in the table below:
Variable |
Bin Picking Studio 1.4.x |
Bin Picking Studio 1.5.x |
Version compatibility |
|---|---|---|---|
[STRIKEOUT:photoneo_common:nERR_EMPTY_SCENE] |
Not available. |
Available.
Value = 218
Error indicating that the scene (bin) is empty. Response to failed trajectory request.
Note: The error code is not defined in the robot module (photoneo_common) as the other error codes.
Please check the value of variable photoneo_common:nErrCode using value 218 directly.
|
New. |
5.5 BPS 1.5.x -> BPS 1.6.x
NOTE: Migration between these versions does require robot module update as described in chapter **:ref:`5.6 <integration_guide_for_robots_by_staubli_5.6_Robot_module_update>`**. The main program, however, does not require any changes.
Please read the general Migration guide here. The table below summarizes changes specific to the Robot module for Stäubli.
Variable |
Bin Picking Studio 1.5.x |
Bin Picking Studio 1.6.x |
Version compatibility |
|---|---|---|---|
Error code [204] PART LOST |
Unused. |
Removed. |
Changed. |
Error code [205] COLLISION DETECT |
Unused. |
Removed. |
Changed. |
5.6 Robot module update
Please follow these steps to update your current robot module to newer version compatible with Bin Picking Studio version you are using:
Back up current application customer_definitions. It contains your custom settings as well as gripper action procedures
Remove old applications: photoneo_common and customer_definitions
Load new applications: photoneo_common and customer_definitions
Apply your modifications from old customer_definitions to new customer_definitions
Carefully read the API changes in the new version of the robot module and modify your current API calls in your main program accordingly (if necessary)