Integration Guide Hyundai Robotics BPS 1.11
This guide describes how to integrate HD Hyundai Robotics robots (Hi6 and Hi7 controllers) with Bin Picking Studio (BPS). It is based on the HD Hyundai Robotics manual “Bin Picking Studio Integration Guide (v1.11.0)”.
Note
This guide describes the Robot module for Bin Picking Studio 1.11. It uses an older version of the communication interface. The supported versions of all Robot modules are listed in the Robot module support matrix. For the general concept of the communication, see the Robot communication overview.
1. Overview
1.1 BPS Robot Module
The BPS Robot module makes the integration between Photoneo Bin Picking Studio and HD Hyundai Robotics (HDR) robots easy. It provides:
a dedicated user interface on the teach pendant (T/P) for real-time position streaming and data monitoring,
dedicated commands that make it easy to create operation programs.
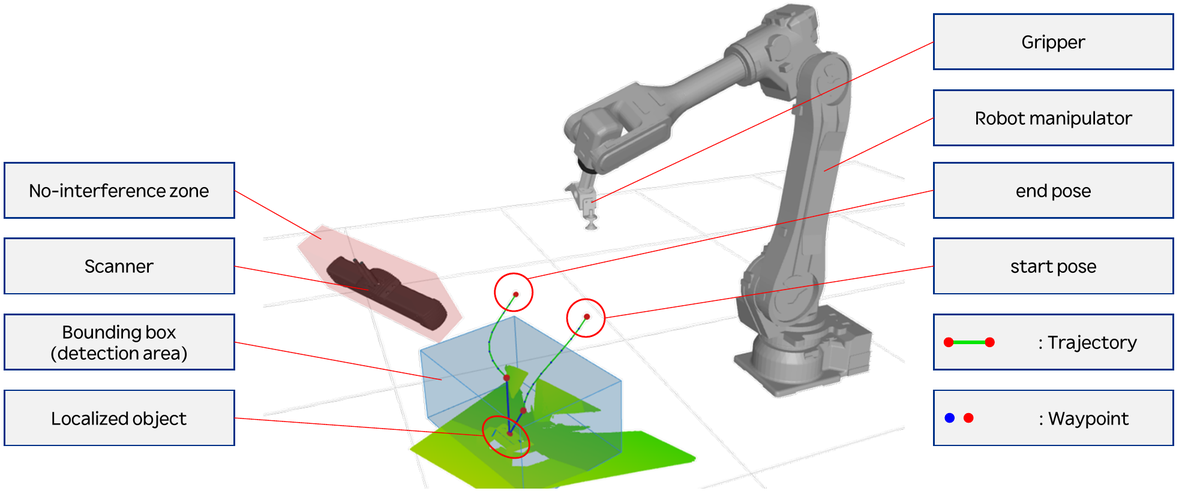
The figure below shows the terms used in this guide.
1.2 System Overview
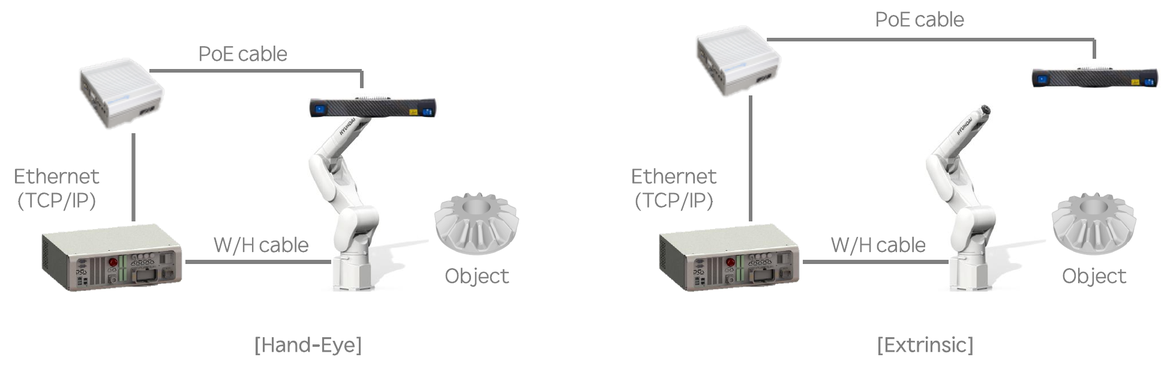
The system has these components:
Hardware: robot manipulator and robot controller, vision controller and scanner.
Installation type: Hand-Eye (scanner mounted on the robot) or Extrinsic (scanner mounted in the cell).
Communication between robot and vision: two Ethernet TCP/IP socket channels:
Action Server (BPS) - request-response method. The robot controller exchanges data with BPS once, when it is needed.
Robot State Server (robot) - streaming method. The robot controller sends the robot position data to BPS in real time.
1.3 Hardware Components
Item |
Description and requirements |
|---|---|
Robot manipulator |
The robot model must be registered in BPS. Unregistered models can be added after consultation. |
Robot controller |
Hi6-N, Hi6-T, Hi7-N or Hi7-T. Controller software V60.32-00 or higher. The dedicated BPS Robot module is required. |
3D scanner |
PhoXi, MotionCam, etc. |
Vision controller |
Software: PhoXi Control and Bin Picking Studio. |
Calibration board |
For Hand-Eye installation. |
Calibration ball |
For Extrinsic installation. |
1.4 Software Components
The software part of the Robot module has two parts: the BPS Robot module (plugin app) and the robot JOB programs.
BPS Robot module (plugin app)
The plugin app is required for the integration with Bin Picking Studio. It contains:
the Robot State Server setting UI,
the monitoring UI,
the HRScript (robot language) commands for BPS.
Item |
Description |
|---|---|
BPS State Server UI |
UI to set and run the Robot State Server. |
BPS monitoring UI |
UI to monitor the connection and the data transmission. |
The plugin app adds these BPS commands to HRScript:
Command |
Description |
|---|---|
|
Connect to the BPS Action Server. |
|
Disconnect from the BPS Action Server. |
|
Register the start and end pose for path planning. |
|
Trigger a new scan and localization. |
|
Receive the response of |
|
Get the path planning result. |
|
Notify BPS of a gripper grasp failure. |
|
Get the position data of the localized object. |
|
Get the status of the localization. |
|
Trigger a new scan without localization. |
|
Request localization with the last scan data. |
|
Change the bounding box. |
|
Add the current position as a calibration point. |
|
Start the automatic calibration. |
|
Stop the automatic calibration. |
|
Save the result of the automatic calibration. |
|
Change the deployed solution. |
|
Deploy a solution. |
|
Stop the currently deployed solution. |
|
Get the ID of the deployed solution. |
|
Check the connection. |
Robot JOB programs
The robot JOB programs required for the BPS integration are of two types:
module programs, which contain the functions,
operation sample programs.
JOB program name |
Function name |
Description |
|---|---|---|
|
|
Declares and sets the global parameters for BPS. |
|
|
Performs the bin picking operation based on the path planning data. |
|
|
Performs the gripper operation based on the gripper command codes. |
JOB program name |
Description |
|---|---|
|
Semi-automatic calibration sample program for bin picking. |
|
Basic sample program for bin picking. |
|
Sample program for an operation with multiple gripping point IDs. |
|
Sample program for multiple vision systems. |
|
Main program of the multiple solution example. |
|
Sub-program of the multiple solution example. |
Note
On the controller, the JOB files have a number prefix: 0100_bps_sample_calib.job, 0110_bps_sample_basic.job, 0120_bps_sample_gripping_id.job, 0130_bps_sample_multi_vs.job, 0140_bps_sample_multi_sol_main.job, 0141_bps_sample_multi_sol_sub.job, 9000_bps_module_operation.job and 9001_bps_module_gripper_cmds.job (see 2.2 Robot Module Upload). The multiple gripping point sample is the file 0120_bps_sample_gripping_id.job.
2. Robot Controller Setup
2.1 Network Setup
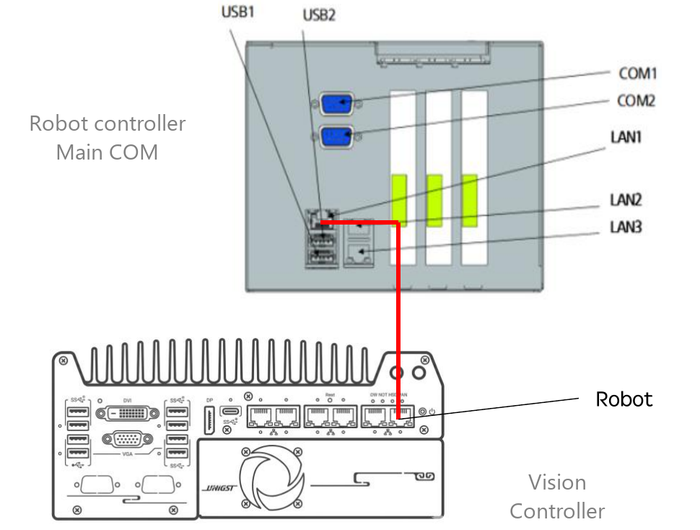
Ethernet cable connection
Connect a LAN port of the robot controller (LAN1 or LAN2) to the LAN port “Robot” of the vision controller with an Ethernet cable.
Robot controller IP setting
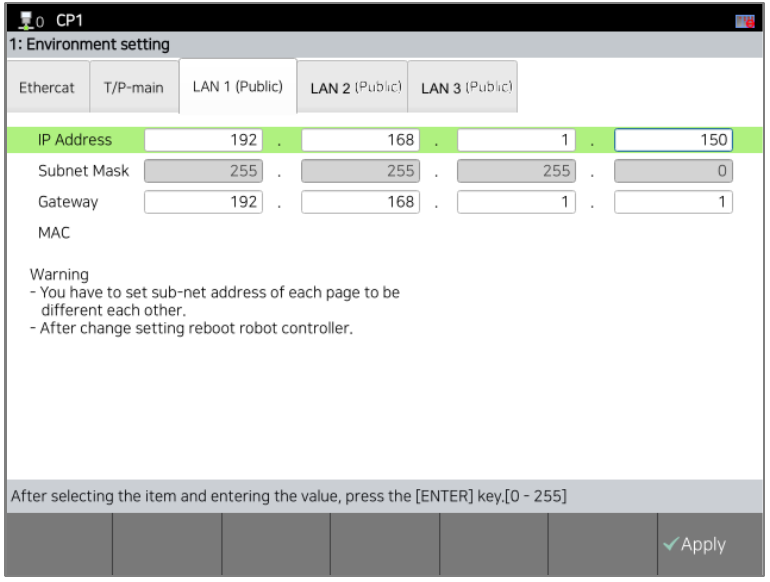
On the T/P, go to [System] > [2: Control parameter] > [9: Network] > [1: Environment setting].
Click the tab of the LAN port that is connected with the cable ([LAN# (Public)]).
Enter the IP address and the subnet mask. Click [Apply] to save the settings.
Reboot the robot controller to apply the settings. You can also reboot later, after you upload the Robot module (see 2.2 Robot Module Upload).
Note
In a typical local network, the first three numbers of the IP address are the same on the vision controller and on the robot controller. Only the last number is different. For example, vision controller 192.168.1.1 and robot controller 192.168.1.150, both with subnet mask 255.255.255.0.
2.2 Robot Module Upload
Prepare the Robot module files
Copy the bps folder that you received from HD Hyundai Robotics or Photoneo to a USB drive formatted with FAT32.
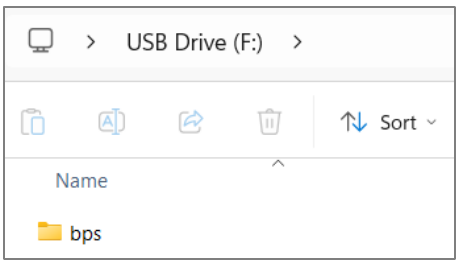
Upload the module to the controller
Insert the USB drive into the T/P.
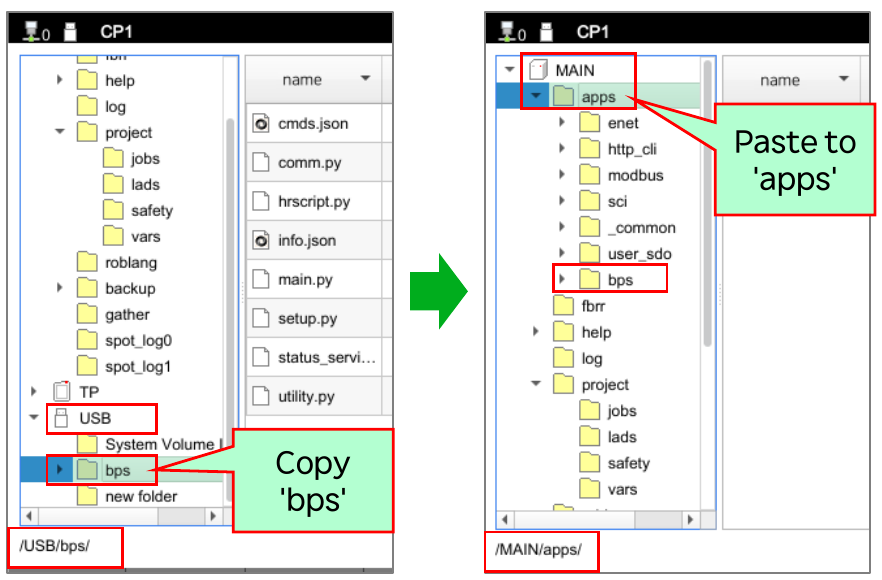
On the T/P, go to [Service] > [5: File manager].
Copy the
bpsfolder from the USB drive and paste it to/MAIN/apps/on the controller.
Move the robot JOB programs
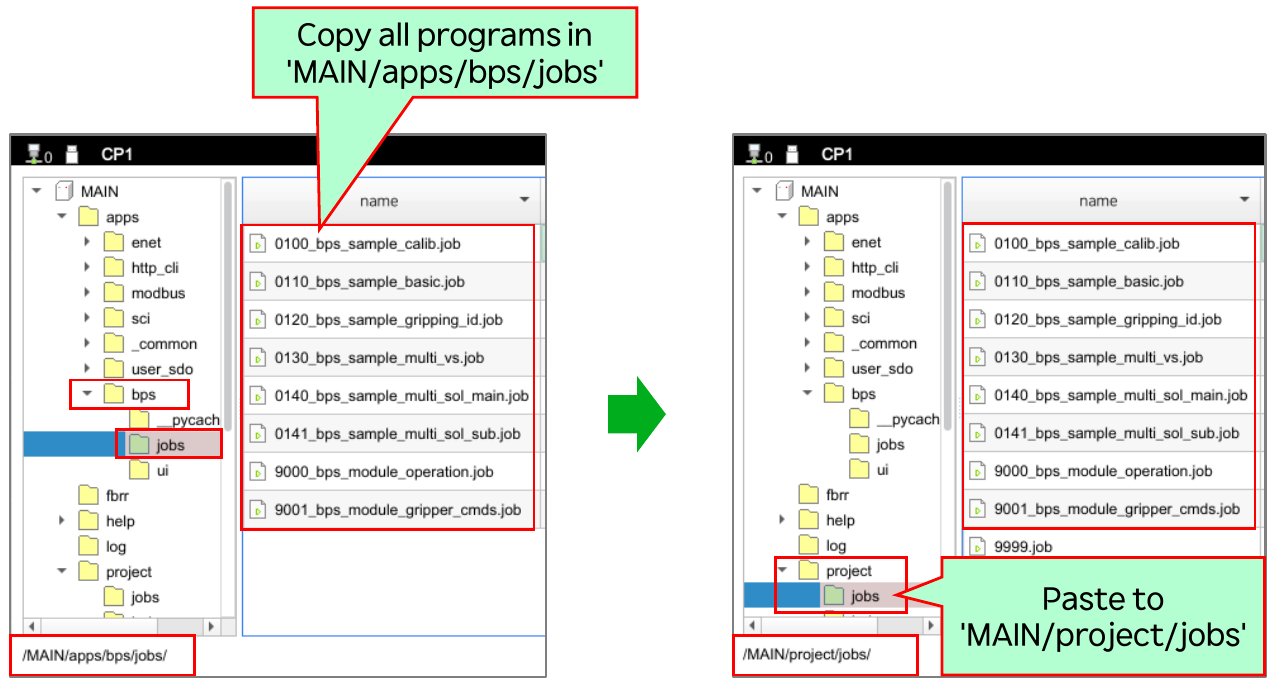
Go to
/MAIN/apps/bps/jobs.Copy all JOB programs.
Paste them to
/MAIN/project/jobs/.Reboot the robot controller.
Warning
You must reboot the robot controller. The plugin app works correctly only after the reboot.
2.3 Robot State Server Setup
Robot State Server parameter setting
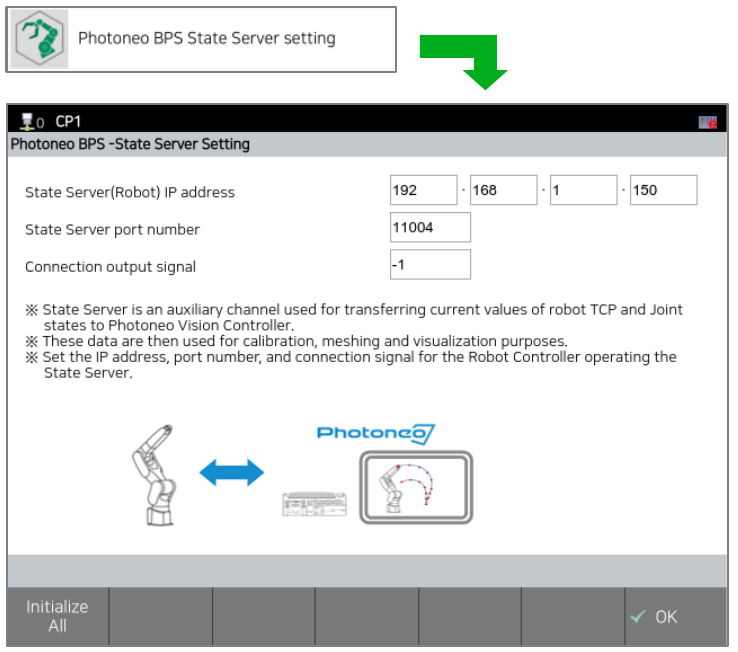
On the T/P, go to [System] > [4: Application parameter] > [Photoneo BPS State Server setting].
Enter the State Server(Robot) IP address. This is the IP address of the robot controller LAN port that is connected to the vision controller.
Enter the State Server port number. The default value is
11004.Optional: if your process needs a signal that shows the vision connection, assign a digital output (DO) number in Connection output signal.
Click [OK].
Robot State Server connection monitoring
Split the T/P screen to create a monitoring window.
Click [panel layout] and then [Select].
Select [Photoneo BPS monitoring].
Check the parameters and the connection status.
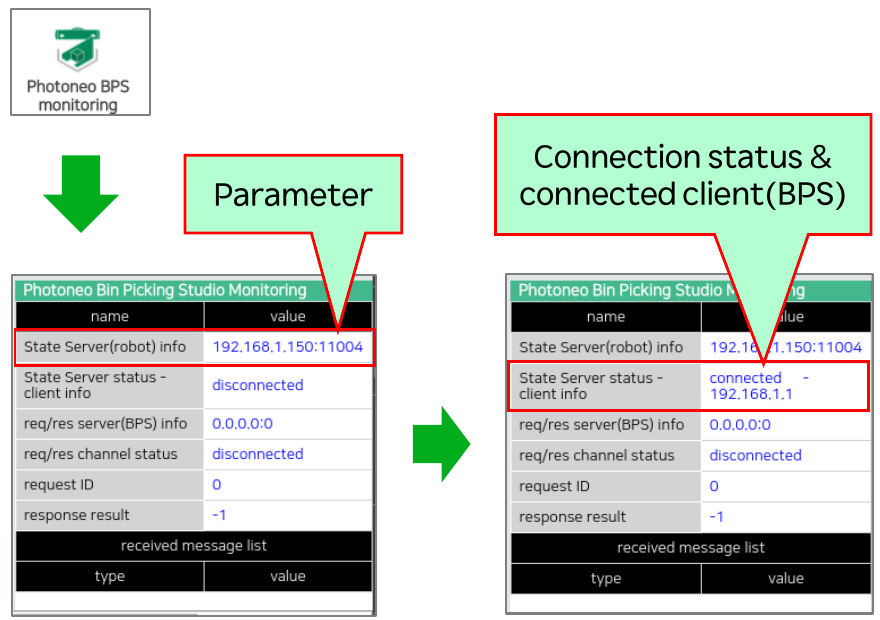
3. Operation Program Creation
Note
All flowcharts and samples in this chapter are for reference only. Modify them for your application and factory conditions.
In the flowcharts, a blue box is a BPS function, a green box is a BPS command and a white box is a part that you define. In the flowcharts and in some texts of the manual, the trajectory function is shown as bps_run_traj. The function name in the JOB programs is bps_traj_run.
3.1 Function Editing
Global parameter setting
Set the user parameters in the function bps_set_param (program bps_module_operation.job). Edit lines 23 to 27 (user setting).
12#---------------------------------------------------------------
13def bps_set_param
14
15global vision_id, sol_id, bbox_id, mode
16global start_pos, end_pos
17global res={Res:-1}
18global Robot={Tool_no:0,Spd:[10,10],Accu:[1,1]}
19global BPS_cur={traject_no:0,traject_size:0,waypoint_no:0,step_speed:0}
20global BPS_info=[]
21
22#***** User setting *****
23Robot.Tool_no=1
24Robot.Spd[0]=100 # CNT
25Robot.Spd[1]=20 # FINE
26Robot.Accu[0]=5 # CNT
27Robot.Accu[1]=1 # FINE
28#**************************
29end
Line |
Description |
|---|---|
15 |
Declares the variables for vision system ID, solution ID, bounding box ID and vision type. |
16 |
Declares the start and end pose variables. |
17 |
Declares the return variable. |
18 |
Declares the robot data variable. |
19 |
Declares the bin picking monitoring variable. |
20 |
Declares the bin picking data list variable. |
23 |
User setting: robot tool number for bin picking. |
24 |
User setting: step speed (%) for trajectory (CNT) motion. |
25 |
User setting: step speed (%) for trajectory (FINE) motion (pick approach). |
26 |
User setting: accuracy level for trajectory (CNT) motion. |
27 |
User setting: accuracy level for trajectory (FINE) motion (pick approach). |
Gripper operation
Define the gripper operation for each gripper command in the functions bps_grip_cmd# (program bps_module_gripper_cmds.job). The function bps_traj_run calls these functions during the trajectory, based on the gripper commands in the path planning data. You can also call them from your own programs.
12#---------------------------------------------------------------
13def bps_grip_cmd1
14
15#<< Input the operation of Gripper Command #1 >>
16
17end
23#---------------------------------------------------------------
24def bps_grip_cmd2
25
26#<< Input the operation of Gripper Command #2 >>
27
28end
Line 15: define the operation of gripper command 1 (Attach). Example: gripper open DO off, grip DO on, check the grip sensor DI.
Line 26: define the operation of gripper command 2 (Detach). Example: grip DO off, gripper open DO on, check the open sensor DI.
If necessary, define the gripper commands 3, 4 and 5 in the same way.
3.2 Calibration Program
Do the semi-automatic calibration during the initial setup.
Use the TCP (0,0,0,0,0,0,”tool”).
Record 9 different poses. The vision system must detect the calibration ball or board in each pose. Example: inside the field of view (FOV) of the scanner - 4 upper corners, the center and 4 lower corners.
Each pose must have distinct and varied joint angles.
At each point, wait until the robot is stable and then send
add_calib(9 times).
For more information about calibration, see Calibration.
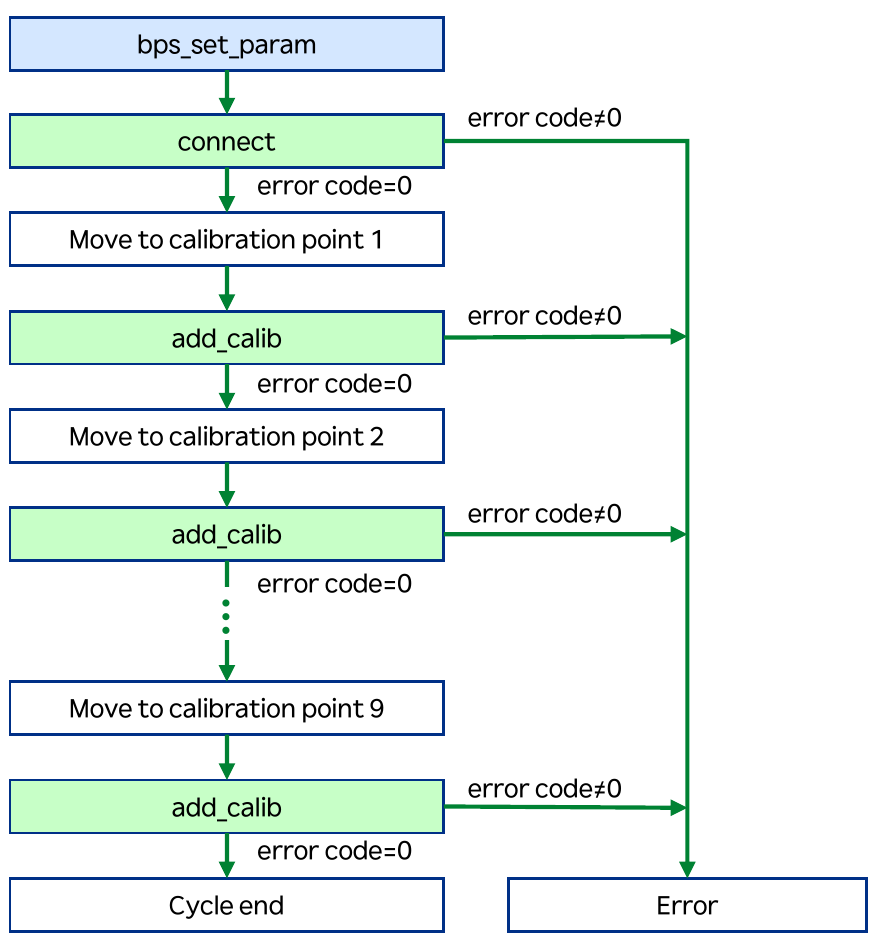
Calibration program example
 8#Set parameters
 9call bps_set_param
10var time=2.0
11
12#Connect to server
13res=bps.connect("192.168.1.1",11003,10)
14if res.Res!=0 then *Error
15
16#<< Record the Calibration Point #1(T0) >>
17
18delay time
19res=bps.add_calib()
20if res.Res!=0 then *Error
21
22#<< Record the Calibration Point #2(T0) >>
23
24delay time
25res=bps.add_calib()
26if res.Res!=0 then *Error
Lines 28 to 63 (omitted here) repeat lines 16 to 21 for the calibration points 3 to 8.
64#<< Record the Calibration Point #9(T0) >>
65
66delay time
67res=bps.add_calib()
68if res.Res!=0 then *Error
69
70#---------------------------------------------------------------
71*Exit
72bps.close()
73end
74
75*Error
76print("Error code: "+str(res.Res))
77stop
78goto *Exit
Line |
Description |
|---|---|
9 |
Sets the required global variables. |
10 |
User setting: stabilization time (s) after each movement. |
13 |
Connects to the Action Server. User setting: server IP address, port and timeout. |
14 |
If an error occurs (result code is not 0), jumps to the error branch. |
16, 22, 64 |
User setting: record the calibration pose (step) 1, 2 … 9. |
18, 24, 66 |
Waits for the stabilization time. |
19, 25, 67 |
Adds the current position as a calibration point. |
20, 26, 68 |
If an error occurs, jumps to the error branch. |
71 - 73 |
End branch: disconnects the action client. |
75 - 78 |
Error branch: shows the error code on the T/P and goes to the end. |
3.3 Basic Bin Picking Operation Program
This is the most basic structure. It shows a repeated bin picking cycle for one model of workpiece.
Set the variables and send
init(set the start and end poses).First cycle: scan at the home position and get the path data.
Call
bps_traj_runto do the bin picking motion (from the start pose to the end pose).At the end pose, request the next scan.
Do the placing operation.
Check the result, get the new path data and repeat.
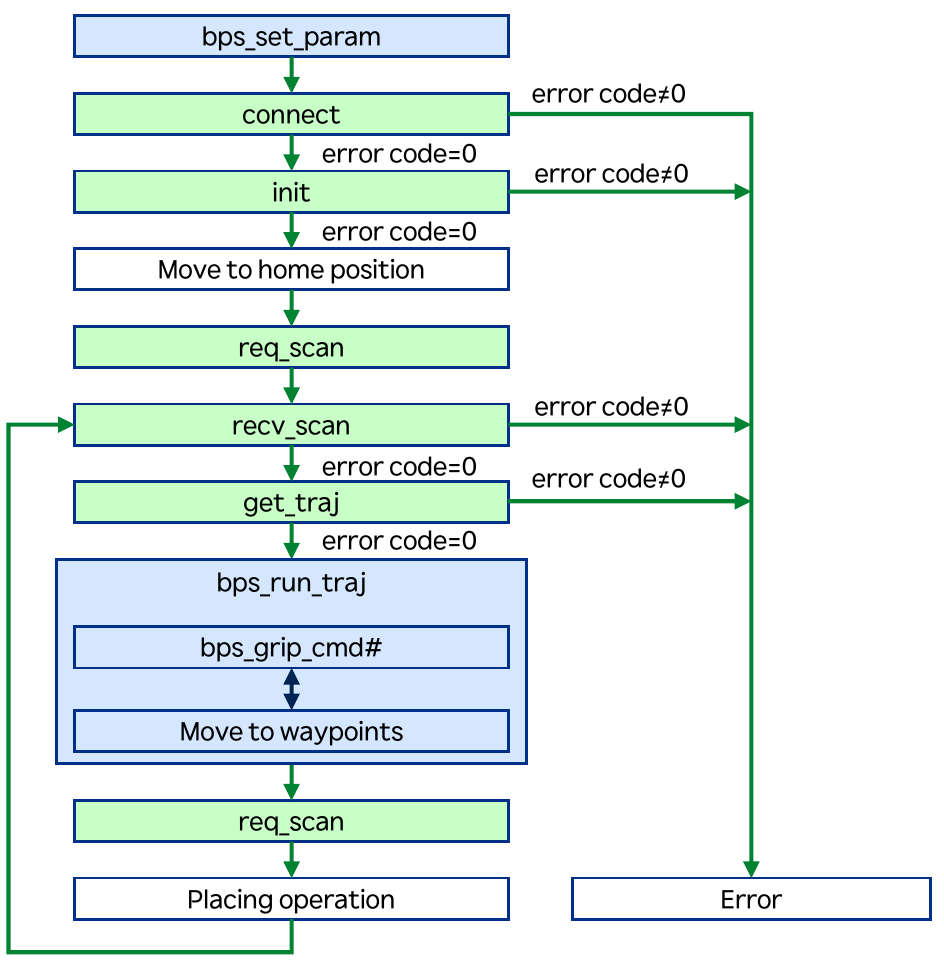
Basic bin picking program example
 7#Set parameters
 8call bps_set_param
 9vision_id=1
10mode="static"
11start_pos=Pose(0,0,0,0,0,0,"joint")
12end_pos=Pose(0,0,0,0,0,0,"joint")
13
14#Connect to server
15res=bps.connect("192.168.1.1",11003,10)
16if res.Res!=0 then *Error
17
18#Initialization
19res=bps.init(vision_id,start_pos,end_pos)
20if res.Res!=0 then *Error
21
22*Home
23#<< Record the home position step >>
24
25#1st Scan request
26bps.req_scan(vision_id,mode)
27
28*Loop
29#Receive Scan
30res=bps.recv_scan()
31if res.Res!=0 then *Error
32
33#Traject
34res=bps.get_traj(vision_id)
35if res.Res!=0 then *Error
36var traj=res
37
38#Trajectory operation
39call bps_traj_run, Robot,traj
40res.Res=result()
41if res.Res!=0 then *Error
42
43#----- Place -----
44#2nd or later Scan request
45bps.req_scan(vision_id,mode)
46
47#<< Input placing sequence >>
48
49
50goto *Loop
51
52#---------------------------------------------------------------
53*Exit
54bps.close()
55end
56
57*Error
58print("Error code: "+str(res.Res))
59stop
60goto *Exit
Line |
Description |
|---|---|
8 |
Sets the required global variables. |
9 |
User setting: vision system ID. |
10 |
User setting: vision type ( |
11 |
User setting: start pose for path planning (outside the FOV for Extrinsic). |
12 |
User setting: end pose for path planning (outside the FOV for Extrinsic). |
15 - 16 |
Connects to the Action Server (user setting: server IP address, port and timeout). On error, jumps to the error branch. |
19 - 20 |
Registers the start and end pose for path planning. On error, jumps to the error branch. |
23 |
User setting: record the home position as a step (outside the FOV for Extrinsic). |
26 |
Requests a scan (first cycle: at the home position). |
28 |
Start of the loop. |
30 - 31 |
Checks the result of the previous scan. On error, jumps to the error branch. |
34 - 36 |
Gets the path planning data and stores it in a user variable. On error, jumps to the error branch. |
39 |
Runs the path planning motion. The parameters are the |
40 - 41 |
Stores the result of the function. On error, jumps to the error branch. |
45 |
Requests the next scan (after the first cycle: at the end position). For Hand-Eye, wait until the robot is fully stopped before the scan. |
47 |
User setting: insert or call a program that places the object. |
50 |
Jumps back to the loop to repeat the bin picking cycle. |
53 - 55 |
End branch: disconnects the action client. |
57 - 60 |
Error branch: shows the error code on the T/P and goes to the end. |
3.4 Advanced: Multi Gripping Point
This example shows a bin picking cycle for a model that has more than one gripping point.
The operation is the same as the basic operation up to
bps_traj_run.After the bin picking motion, the program checks the gripping point ID.
The program places the object based on the gripping point.
Note
Depending on your process, you can skip req_scan and return to the home position.
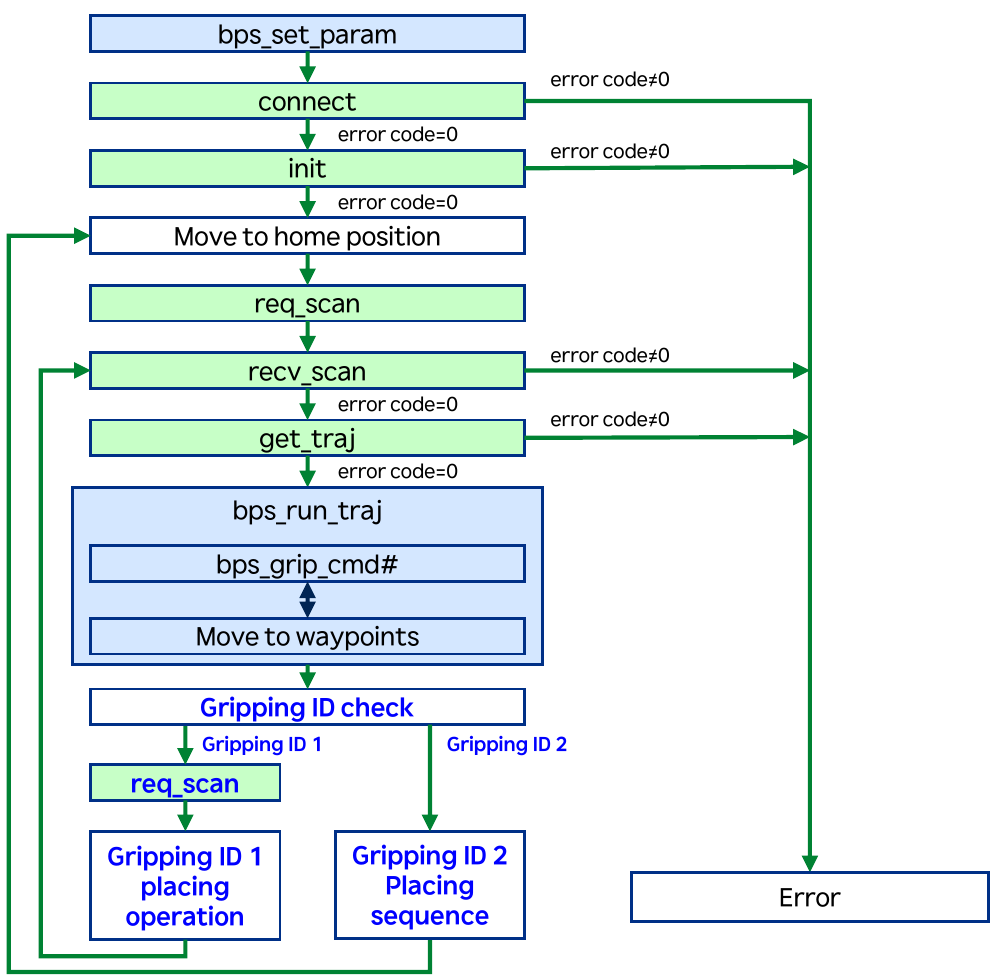
Multi gripping point program example
Lines 7 to 41 are the same as in the basic example (bps_sample_gripping_id.job). The additional lines are:
43#----- Place -----
44var grip_id=BPS_info[1]
45switch grip_id
46case 1
47  #2nd or later Scan request
48  bps.req_scan(vision_id,mode)
49
50  #<< Insert placing sequence for Gripping ID #1 >>
51
52  goto *Loop
53case 2
54
55  #<< Insert placing sequence for Gripping ID #2 >>
56
57  break
58default
59  print("Gripper ID error")
60  stop
61end_switch
62goto *Home
63
64#---------------------------------------------------------------
65*Exit
66bps.close()
67end
68
69*Error
The error branch is the same as in the basic example.
Line |
Description |
|---|---|
44 |
Stores the gripping point ID in a user variable. |
45 |
Selects the placing program based on the gripping point ID. |
46 - 48 |
Case 1 (gripping point ID 1): requests the next scan (at the end position; for Hand-Eye, wait until the robot is fully stopped). |
50 |
User setting: insert or call a program that places the object for gripping point ID 1. Example: normal placing. |
52 |
Jumps back to the loop to repeat the bin picking cycle. |
53 - 57 |
Case 2 (gripping point ID 2): user setting: insert or call a program that places the object for gripping point ID 2 (example: drop it into the bin box). Then leave the |
58 - 61 |
Other cases: shows a gripping point ID error on the T/P and stops. |
62 |
Goes to the home position. |
65 - 67 |
End branch: disconnects the action client. |
3.5 Advanced: Multi Vision System
In this example, more than one workpiece model is registered, each as a separate vision system ID. When the bin picking of one model (bin) is complete, the program switches to the next model.
Set the global parameters, connect to BPS and set the vision system ID.
Send
init(set the start and end poses).Scan and check the condition for a vision system ID change (for example, error 202, no object found).
If there is no change, get the path data.
Call
bps_traj_runto do the bin picking motion (from the start pose to the end pose).
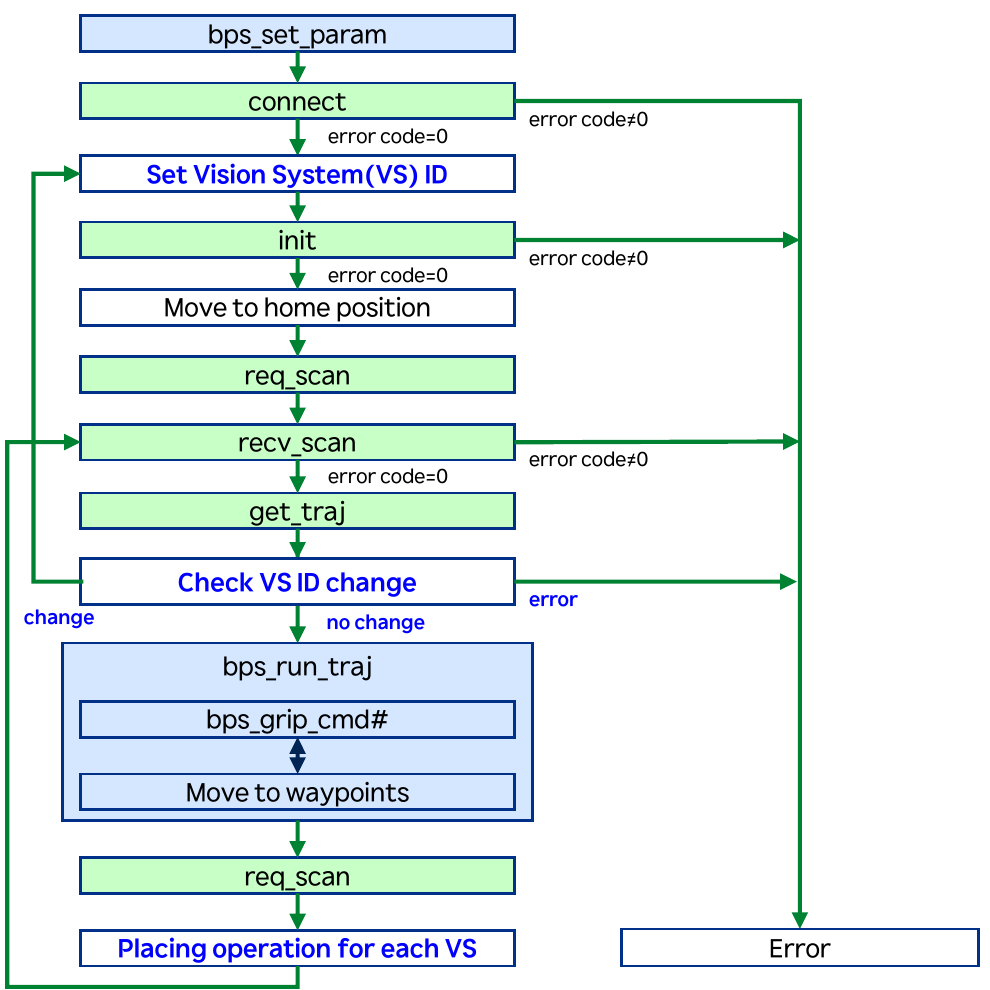
Multi vision system program example
 7#Set parameters
 8call bps_set_param
 9
10#Connect to server
11res=bps.connect("192.168.1.1",11003,10)
12if res.Res!=0 then *Error
13
14#----- Set Vision System -----
15*Set_vs
16mode="static"
17vision_id=fb1.diw1
18start_pos=Pose(0,0,0,0,0,0,"joint")
19end_pos=Pose(0,0,0,0,0,0,"joint")
20
21#Initialization
22res=bps.init(vision_id,start_pos,end_pos)
23if res.Res!=0 then *Error
24
25*Home
26#<< Record the home position step >>
27
28#1st Scan request
29bps.req_scan(vision_id,mode)
30
31*Loop
32#Receive Scan
33res=bps.recv_scan()
34if res.Res!=0 then *Error
35
36#Traject
37res=bps.get_traj(vision_id)
38if res.Res==202 then *Set_vs
39if res.Res!=0 then *Error
40var traj=res
41
42#Trajectory operation
43call bps_traj_run, Robot,traj
44res.Res=result()
45if res.Res!=0 then *Error
46
47#----- Place -----
48#2nd or later Scan request
49bps.req_scan(vision_id,mode)
50
51#<< Insert placing sequence based on Vision ID >>
52
53goto *Loop
54
55#---------------------------------------------------------------
56*Exit
57bps.close()
58end
59
60*Error
61print("Error code: "+str(res.Res))
62stop
63goto *Exit
The differences from the basic example are:
Line |
Description |
|---|---|
15 |
Branch point for the vision system (VS) setting. |
16 |
User setting: vision type ( |
17 |
User setting: vision system ID. In this example, the ID comes from fieldbus data from a higher-level controller ( |
18 - 19 |
User setting: start and end pose for path planning (outside the FOV for Extrinsic). |
38 |
If the condition for a vision system ID change is met (example: error 202, no object found), jumps to the VS setting. |
51 |
User setting: insert or call a program that places the object based on the vision system ID. |
3.6 Advanced: Multi Solution
This example shows a bin picking operation with more than one BPS solution.
Prepare a main program and one sub-program for each solution. The sub-programs can reuse the basic and advanced examples above.
Main program: set the parameters and connect to BPS.
Main program: check the solution status, then deploy or change the solution.
Sub-program: run the bin picking cycle until an error occurs.
When the sub-program ends, the main program checks the condition for a solution change (for example, error 202, no object found).
If the condition is true, the main program changes the solution with
change_sol. If not, the main program handles the error.
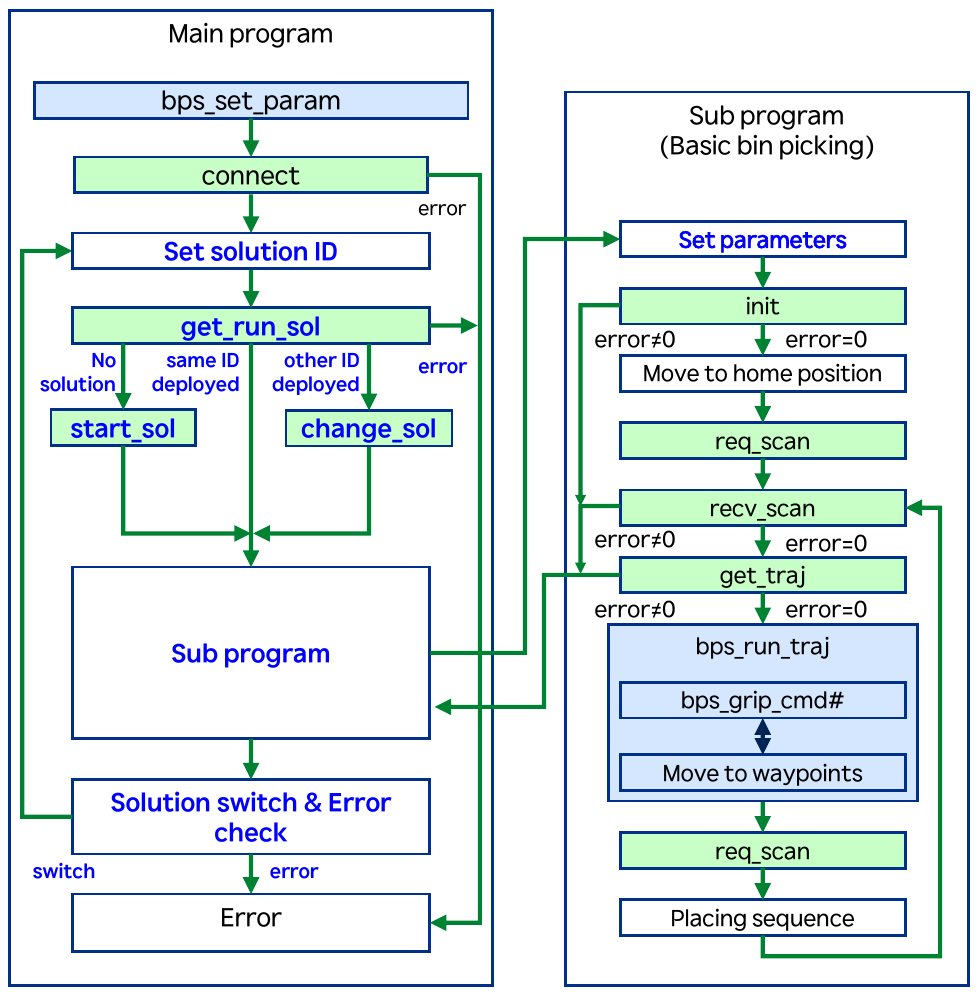
Main program example
 7#Set parameters
 8call bps_set_param
 9var code, cur_sol
10
11#connect to server
12res=bps.connect("192.168.1.1",11003,10)
13if res.Res!=0 then *Error
14
15*Set_sol
16sol_id=fb1.diw0
17
18#Get current runnind solution
19res=bps.get_run_sol()
20code=res.Res
21
22switch code
23case 453
24  res=bps.start_sol(sol_id)
25  if res.Res!=0 then *Error
26  break
27
28case 0
29  cur_sol=res.info
30  if cur_sol!=sol_id
31    res=bps.change_sol(sol_id)
32    if res.Res!=0 then *Error
33  endif
34  break
35
36default
37  goto *Error
38end_switch
39
40#<< Call sub program for each solution ID >>
41call 141
42
43#Condition check
44if res.Res==202 then *Set_sol
45if res.Res!=0 then *Error
46
47#---------------------------------------------------------------
The end and error branches are the same as in the basic example.
Line |
Description |
|---|---|
9 |
Declares the user variables. |
12 - 13 |
Connects to the Action Server (user setting: server IP address, port and timeout). On error, jumps to the error branch. |
15 |
Branch point for the solution ID setting. |
16 |
User setting: solution ID. In this example, the ID comes from fieldbus data from a higher-level controller ( |
19 - 20 |
Gets the currently deployed solution and stores the result code. |
22 |
Selects the case based on the result code. |
23 - 26 |
No solution is deployed (error 453): deploys the selected solution. On error, jumps to the error branch. |
28 - 34 |
A solution is deployed: stores its ID. If it is different from the target solution, changes the solution. On error, jumps to the error branch. |
36 - 38 |
Other cases (error): jumps to the error branch. |
40 - 41 |
User setting: call the sub-program for the solution ID (here JOB 141, |
44 |
If the condition for a solution change is met (example: error 202, no object found), jumps to the solution ID setting. |
45 |
On other errors, jumps to the error branch. |
Sub-program example
 7#Set parameters
 8vision_id=1
 9mode="static"
10start_pos=Pose(0,0,0,0,0,0,"joint")
11end_pos=Pose(0,0,0,0,0,0,"joint")
12
13#Initialization
14res=bps.init(vision_id,start_pos,end_pos)
15if res.Res!=0 then *Exit
16
17*Home
18#<< Record the home position step >>
19
20#1st Scan request
21bps.req_scan(vision_id,mode)
22
23*Loop
24#Receive Scan
25res=bps.recv_scan()
26if res.Res!=0 then *Exit
27
28#Traject
29res=bps.get_traj(vision_id)
30if res.Res!=0 then *Exit
31var traj=res
32
33#Trajectory operation
34call bps_traj_run, Robot,traj
35res.Res=result()
36if res.Res!=0 then *Exit
37
38#----- Place -----
39#2nd or later Scan request
40bps.req_scan(vision_id,mode)
41
42#<< Insert placing sequence >>
43
44goto *Loop
45
46#---------------------------------------------------------------
47*Exit
48end
The sub-program is the basic example with these differences:
Lines 7 to 11 set the parameters for this bin picking sub-program (vision system ID, vision type, start and end pose).
Line 12: there is no
connect. The main program opens the connection.On error, the sub-program jumps to
*Exit(lines 15, 26, 30 and 36). It has no error handling, because the main program handles the errors.Lines 47 to 48: the sub-program ends without closing the connection.
4. Robot Module
This chapter describes the BPS commands and functions of the Robot module. For the meaning of each request on the BPS side, see Action requests.
4.1 General Information
Command format
Use this syntax to call a BPS command in a robot JOB program and store the result:
ReturnVariable = bps.Command(Arg1, Arg2, ...)
Item |
Description |
|---|---|
|
Variable that stores the return values of the command. You define the name and the scope (local or global). Declare the variable before you use it, to avoid errors. |
|
BPS command. See sections 4.2 to 4.6. |
|
Input parameters of the command. The number of parameters depends on the command. See sections 4.2 to 4.6. |
Command input on the T/P
Click [cmd.input] on the T/P. This creates an assignment statement.
Enter the return variable on the left side.
Put the cursor on the right side, then select [functions] > [bps].
Select the command and press Enter.
Edit the parameters and press Enter.
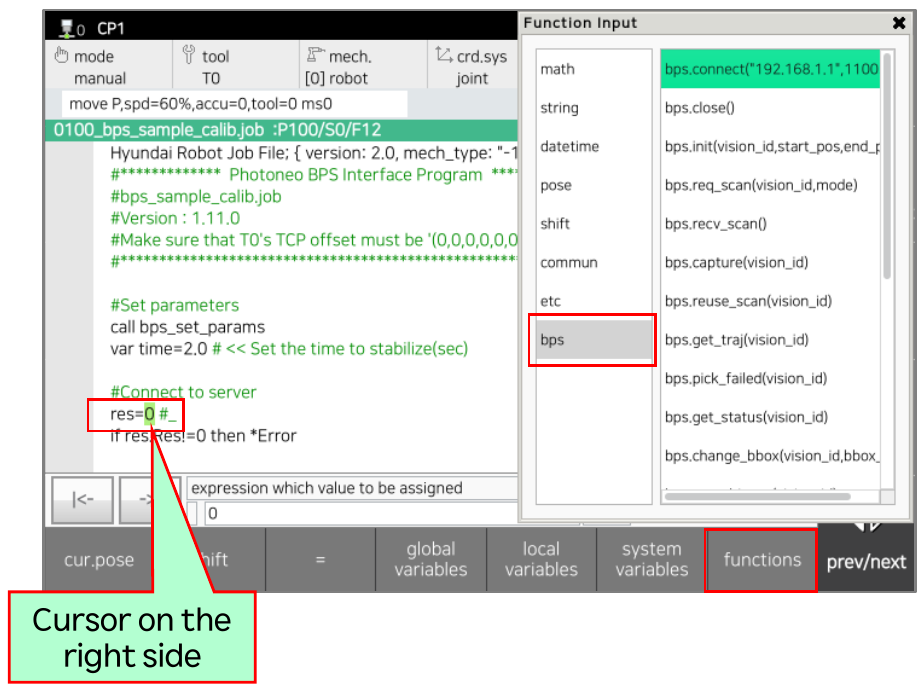
Function format
Use the call command to call a function of the module program. Use result() to get the return value.
call Function Arg1, Arg2, ...
ReturnVariable = result()
Item |
Description |
|---|---|
|
Name of the function in the module program. |
|
Input parameters of the function. The number of parameters depends on the function. See section 4.7. |
|
Variable that stores the return value of the function. You define the name and the scope (local or global). Declare the variable before you use it, to avoid errors. |
Return variable format
The return values of a BPS command are stored in an object variable:
ReturnVariable = {"Res" : ResultCode, "msgs" : MessageList, "info" : InfoData, "pose" : Position }
To read a key, use ReturnVariable.KeyName. Examples: err_code = res.Res, print(res.info).
Item |
Key |
Description |
|---|---|---|
ResultCode |
|
Result of the command. See the result codes below. |
MessageList |
|
BPS response messages, stored as an array. See “Message format” below. |
InfoData |
|
Optional key (only some commands). Stores the “info” messages: more than one value is stored as an array ( |
Position |
|
Optional key (only some commands). Stores the value of the “pose” message. |
Result codes
Code |
Meaning |
|---|---|
0 |
Completed normally. |
-1 |
In process. |
-2 |
Timeout. |
-3 |
Connection lost. |
-4 |
Processing error. |
-5 |
Parameter error. |
-6 |
Received byte error. |
> 0 |
Error code from BPS. See Error codes. Examples used in this guide: 202 No object found, 453 Deployment is not running. |
Message format
A BPS response contains one or more messages. Each message is stored as an object in the msgs key (array) of the return variable:
ReturnVariable.msgs = [Message1, Message2, Message3, ... ]
Message# = {"Type": type code, "data": Value }
Type code |
Data type |
Contents |
Description of |
|---|---|---|---|
0 |
Array |
Trajectory waypoint list, trajectory (CNT) |
Two-dimensional array with the waypoints of the trajectory: |
1 |
Array |
Trajectory waypoint list, trajectory (FINE) |
Same as type 0. |
2 |
Integer |
Gripper command code |
Gripper command value (1, 2, 3, 4 or 5). |
3 |
Integer |
Error code |
Error code value (0: OK). |
4 |
Array / Numeric |
Info data |
Info data. One value is stored as a number, more values as an array. |
5 |
Array |
Object pose |
Object position data: |
The key Type (Integer) stores the message type code (0, 1, 2, 3, 4 or 5). The key data stores the data for this type.
4.2 Setting Commands
4.2.1 connect
Connects to the request-response server (BPS Action Server). The timeout applies to the connection and to all requests (-1: no timeout).
Syntax: ReturnVariable = bps.connect(t, n1, n2)
Argument |
Type |
Contents |
Description |
|---|---|---|---|
|
String |
Server IP address |
IP address of the server (BPS Action Server). |
|
Integer |
Server port number |
Port number of the server. |
|
Integer |
Timeout (s) |
Connection and response timeout. |
Key |
Type |
Contents |
Description |
|---|---|---|---|
|
Integer |
Execution result |
Result of the command (0: completed). |
4.2.2 close
Closes the current request-response client socket.
Syntax: ReturnVariable = bps.close()
Key |
Type |
Contents |
Description |
|---|---|---|---|
|
Integer |
Execution result |
Result of the command (0: completed). |
4.3 Bin Picking Operation Commands
All commands in this section return these keys (some commands return more keys, see the command):
Key |
Type |
Contents |
Description |
|---|---|---|---|
|
Integer |
Execution result |
Result of the command (0: completed). |
|
Array |
Response message list |
List of the received messages. |
4.3.1 init
Requests the initialization of path planning in the vision system and sets the start and end poses (waypoints) for path planning. For robots with external axes, get_traj uses the external axis values of the start pose. See Initialization request.
Syntax: ReturnVariable = bps.init(n, p1, p2)
Argument |
Type |
Contents |
Description |
|---|---|---|---|
|
Integer |
Vision system ID |
BPS vision system ID. |
|
Pose |
Start pose |
Start position of path planning (crd: joint). |
|
Pose |
End pose |
End position of path planning (crd: joint). |
Return variable: Res, msgs.
4.3.2 req_scan
Triggers a new scan and starts the localization. Run init once before you use this command. For Hand-Eye vision systems, use this command only when the robot is fully stopped. See Scan request.
Syntax: ReturnVariable = bps.req_scan(n, t)
Argument |
Type |
Contents |
Description |
|---|---|---|---|
|
Integer |
Vision system ID |
BPS vision system ID. |
|
String |
Installation type |
Vision installation type: Extrinsic ( |
Return variable: Res, msgs.
4.3.3 recv_scan
Receives the result of the last scan request. Use this command as the next command after req_scan.
Syntax: ReturnVariable = bps.recv_scan()
Return variable: Res, msgs.
4.3.4 capture
Triggers a new scan without localization (for multiple scans). See Trigger scan request.
Syntax: ReturnVariable = bps.capture(n)
Argument: n (Integer) - BPS vision system ID.
Return variable: Res, msgs.
4.3.5 reuse_scan
Requests a localization with the last received scan data. See Localize on the last scan request.
Syntax: ReturnVariable = bps.reuse_scan(n)
Argument: n (Integer) - BPS vision system ID.
Return variable: Res, msgs.
4.3.6 get_traj
Gets a collision-free path to pick a localized object and extract it from the scene (bin, rack, etc.). Use this command after the scan. Use the return variable as a parameter of bps_traj_run. The trajectory info data is stored in the info key. See Trajectory request and Info data.
Syntax: ReturnVariable = bps.get_traj(n)
Argument: n (Integer) - BPS vision system ID.
Key |
Type |
Contents |
Description |
|---|---|---|---|
|
Integer |
Execution result |
Result of the command (0: completed). |
|
Array |
Received info data list |
Trajectory info data: |
|
Array |
Response message list |
List of the received messages. |
4.3.7 pick_failed
Notifies BPS that the pick failed, based on the gripper feedback. You can add this command to the grasp function bps_grip_cmd1. See Pick-failed request.
Syntax: ReturnVariable = bps.pick_failed(n)
Argument: n (Integer) - BPS vision system ID.
Return variable: Res, msgs.
4.3.8 get_status
Gets the current status of a vision system during localization. Use this command after the scan. See Get vision system status request.
Syntax: ReturnVariable = bps.get_status(n)
Argument: n (Integer) - BPS vision system ID.
Key |
Type |
Contents |
Description |
|---|---|---|---|
|
Integer |
Execution result |
Result of the command (0: completed). |
|
Array |
Status info list |
Current state of the localization: |
|
Array |
Response message list |
List of the received messages. |
4.3.9 change_bbox
Changes the bounding box for the localization of the vision system. See Change bounding box request.
Syntax: ReturnVariable = bps.change_bbox(n1, n2)
Argument |
Type |
Contents |
Description |
|---|---|---|---|
|
Integer |
Vision system ID |
BPS vision system ID. |
|
Integer |
Bounding box ID |
ID of the target bounding box. |
Return variable: Res, msgs.
4.3.10 get_obj_pos
Gets the raw Cartesian pose of the localized object. Use this command after the scan. See Object pose request.
Note
This is the raw position of the object. It does not depend on the grip pose.
Syntax: ReturnVariable = bps.get_obj_pos(n)
Argument: n (Integer) - BPS vision system ID.
Key |
Type |
Contents |
Description |
|---|---|---|---|
|
Integer |
Execution result |
Result of the command (0: completed). |
|
Array |
Response message list |
List of the received messages. |
|
Array |
Object position data |
Position of the localized object: |
4.4 Calibration Commands
4.4.1 add_calib
Adds the current robot position as a new calibration point. Use this command only when the robot is fully stopped. See Add calibration point request.
Syntax: ReturnVariable = bps.add_calib()
Return variable: Res (Integer, execution result, 0: completed), msgs (Array, list of the received messages).
4.4.2 start_calib
Starts the automatic calibration. See Start automatic calibration request.
Syntax: ReturnVariable = bps.start_calib(n1, n2)
Argument |
Type |
Contents |
Description |
|---|---|---|---|
|
Integer |
Solution ID |
BPS solution ID. |
|
Integer |
Vision system ID |
BPS vision system ID. |
Return variable: Res, msgs.
4.4.3 save_calib
Saves and returns the result of the automatic calibration. Use this command after start_calib. See Save automatic calibration result request.
Syntax: ReturnVariable = bps.save_calib(n1, n2)
Argument |
Type |
Contents |
Description |
|---|---|---|---|
|
Integer |
Solution ID |
BPS solution ID. |
|
Integer |
Vision system ID |
BPS vision system ID. |
Key |
Type |
Contents |
Description |
|---|---|---|---|
|
Integer |
Execution result |
Result of the command (0: completed). |
|
Integer |
Calibration accuracy |
Calibration accuracy (error). |
|
Array |
Response message list |
List of the received messages. |
|
Array |
Camera position |
Calibrated camera position: |
4.4.4 stop_calib
Stops the automatic calibration. Use this command after start_calib. See Stop automatic calibration request.
Syntax: ReturnVariable = bps.stop_calib()
Return variable: Res, msgs.
4.5 Solution Commands
All solution commands return Res (Integer, execution result, 0: completed) and msgs (Array, list of the received messages). get_run_sol also returns info.
4.5.1 change_sol
Changes the deployed solution. Use this command only when a solution is deployed. See Change solution request.
Syntax: ReturnVariable = bps.change_sol(n)
Argument: n (Integer) - ID of the solution to deploy.
4.5.2 start_sol
Deploys a solution. See Start solution request.
Syntax: ReturnVariable = bps.start_sol(n)
Argument: n (Integer) - ID of the solution to deploy.
4.5.3 stop_sol
Stops the currently deployed solution. See Stop solution request.
Syntax: ReturnVariable = bps.stop_sol()
4.5.4 get_run_sol
Gets the ID of the deployed solution. See Get running solution request.
Syntax: ReturnVariable = bps.get_run_sol()
Key |
Type |
Contents |
Description |
|---|---|---|---|
|
Integer |
Execution result |
Result of the command (0: completed). |
|
Integer |
Deployed solution ID |
ID of the deployed solution. |
|
Array |
Response message list |
List of the received messages. |
4.6 Additional Commands
4.6.1 comm_check
Checks if the communication with the vision system is still active. You can use it for a simple connection check. See Communication check request.
Syntax: ReturnVariable = bps.comm_check()
Return variable: Res (Integer, execution result, 0: completed), msgs (Array, list of the received messages).
4.7 Functions
4.7.1 bps_set_param
Declares and sets the global variables required for the Bin Picking Studio integration.
Syntax: call bps_set_param
Name |
Key |
Type |
Contents |
|---|---|---|---|
|
Integer |
Vision system ID for the sample programs. |
|
|
Integer |
Solution ID for the sample programs. |
|
|
Integer |
Bounding box ID for the sample programs. |
|
|
String |
Vision installation type for the sample programs: |
|
|
Pose |
Start pose of path planning for the sample programs (joint coordinates only): |
|
|
Pose |
End pose of path planning for the sample programs (joint coordinates only): |
|
|
|
Object / Integer |
Stores the command return values in the sample programs. The key structure depends on the command. |
Name |
Key |
Type |
Contents |
|---|---|---|---|
|
|
Object / Integer |
Robot tool number. |
|
|
Object / Array |
Step speed (%) for each trajectory type (CNT/FINE): |
|
|
Object / Array |
Accuracy level for each trajectory type (CNT/FINE): |
|
|
Object / Integer |
Index of the current trajectory while |
|
|
Object / Integer |
Number of waypoints in the current trajectory while |
|
|
Object / Integer |
Number of the current waypoint while |
|
|
Object / Integer |
Step speed of the current trajectory while |
|
Array |
Information about the object that the robot currently handles in |
4.7.2 bps_grip_cmd#
Runs the operation for the gripper command. Define the operation of each function in the program bps_module_gripper_cmds.job before you use it (see section 3.1).
call bps_grip_cmd1  # Attach
call bps_grip_cmd2  # Detach
call bps_grip_cmd3  # User1
call bps_grip_cmd4  # User2
call bps_grip_cmd5  # User3
4.7.3 bps_traj_run
Runs the bin picking motion based on the robot parameters and the path planning (trajectory) data. To run the trajectory waypoint by waypoint, add a stop command inside the move loop.
Syntax:
call bps_traj_run, Robot,obj
UserVariable = result()
UserVariable is the variable for the function result.
Argument |
Type |
Contents |
Description |
|---|---|---|---|
|
Object |
Robot data |
Use the |
|
Object |
Path planning data |
Use the result variable of |
Name |
Type |
Contents |
Description |
|---|---|---|---|
|
Integer |
Execution result |
Result of the function. 0: completed, -5: parameter error. |