Integration Guide ABB (IRC5) LS
Note: It is strongly recommended to read the Robot communication overview prior to this integration guide.
Note 2: It is strongly recommended to use the latest version of the integration guide included in the latest available version of the robot module. To download the robot module, please visit the official Photoneo website.
Contents
1 Prerequisites
The Robot module is compatible with RobotWareOS versions 5.13 and higher.
In addition to compatible system version, the following conditions must also be met:
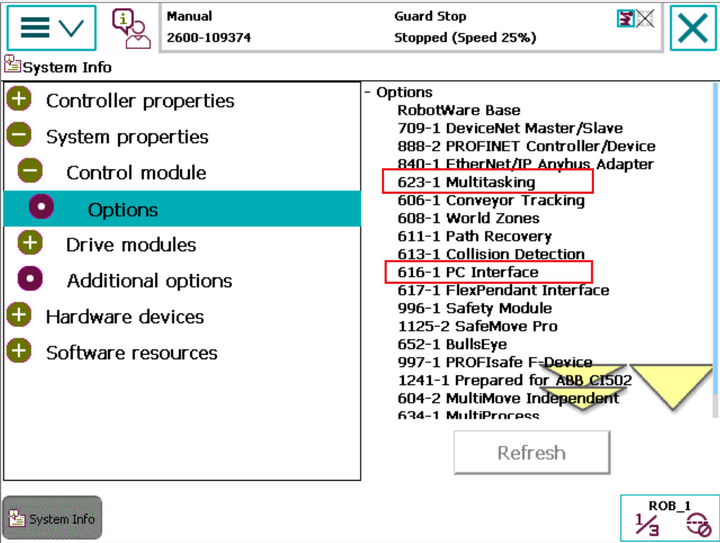
(616-1) PC Interface Module available
(623-1) Multitasking Module available
2 Robot controller setup
This guide was originally written using the RobotWare v.6.06, however, it should be compatible with older versions with minor changes.
2.1 Controller configuration
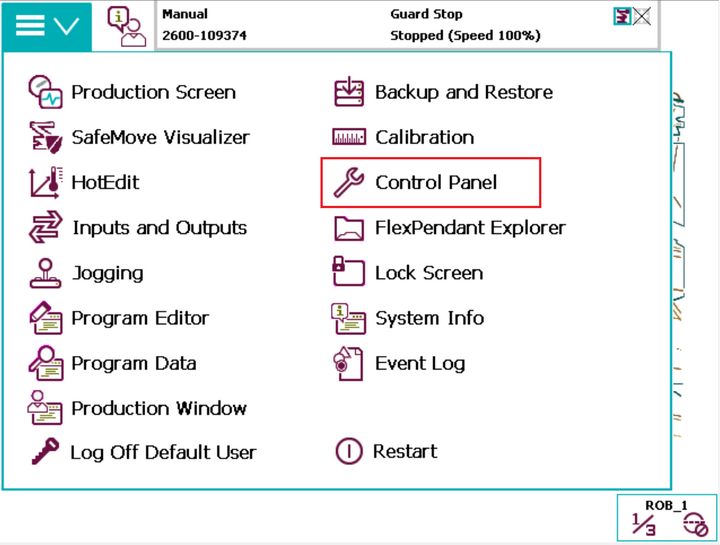
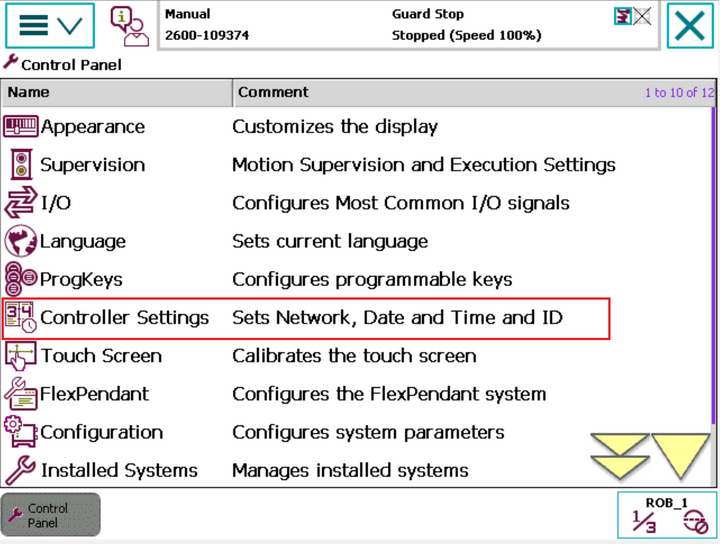
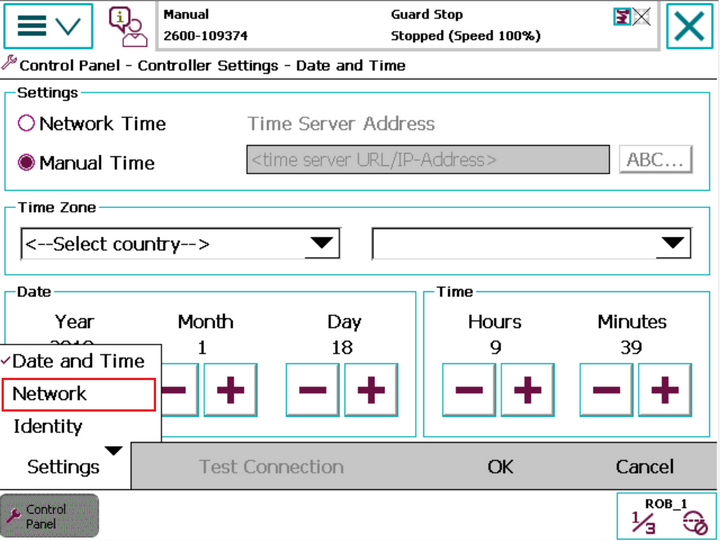
2.1.1 Network configuration
Note: The network configuration procedure described below only works with RobotWareOS v.6 or higher. If you have an older version of RobotWareOS and need to change an IP address, please contact local ABB support.
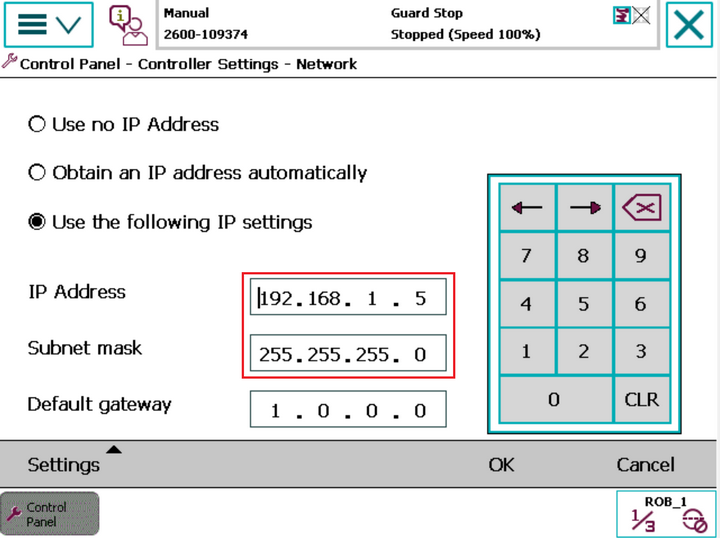
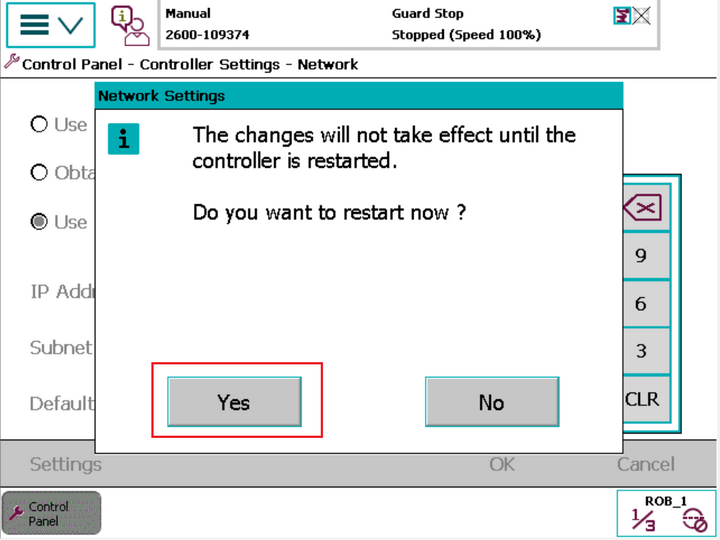
2.2 Robot module installation
2.2.1 Loading the Robot module files
The Robot module files need to be transferred to the robot controller - you can use either a USB stick or transfer via the Robot Studio (more convenient method described below).
Set your local PC network settings to DHCP and link it with the IRC5 controller using an Ethernet cable. Use the Service Port of the robot controller. Then launch the Robot Studio.
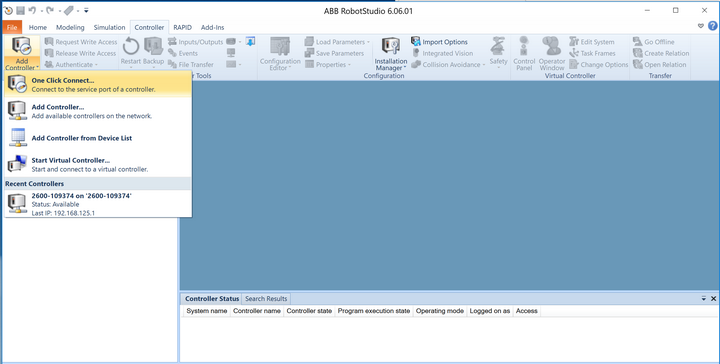
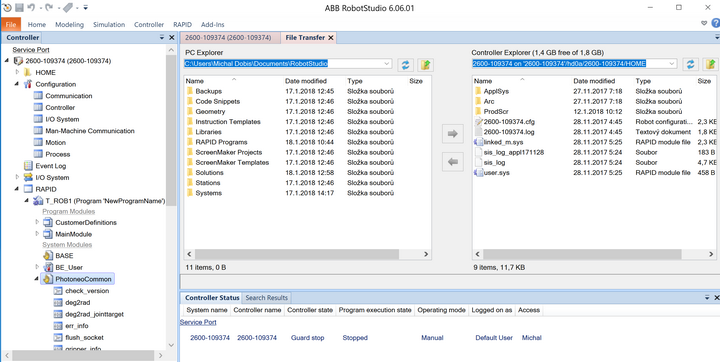
PhotoneoLocator.sys
Besides that Photoneo provides an example locator program and a semi-automatic calibration example program located in folder example_programs:
LocatorExample.mod
Calibration.mod
The system module (and optionally the example program if you wish to use it) need to be transferred to the HOME:/Photoneo/ folder created within the Robot Controller file system using the File Transfer tool.
2.2.2 Automatic loading of modules
Now we need to configure the ABB system to automatically load PhotoneoLocator.sys during the boot.
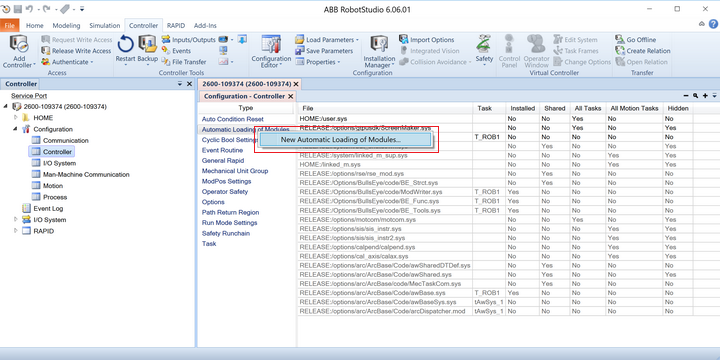
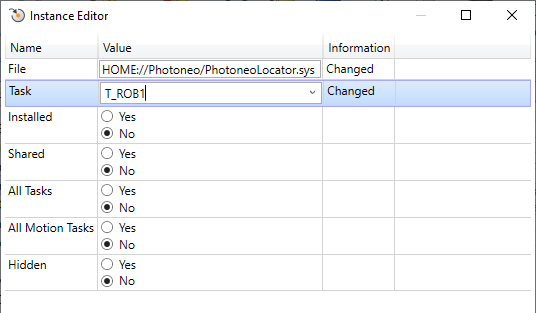
2.2.3 Loading the example program
We are now ready to manually load the example program to the T_ROB1 task. You can load the example program from your PC or directly from the robot controller.
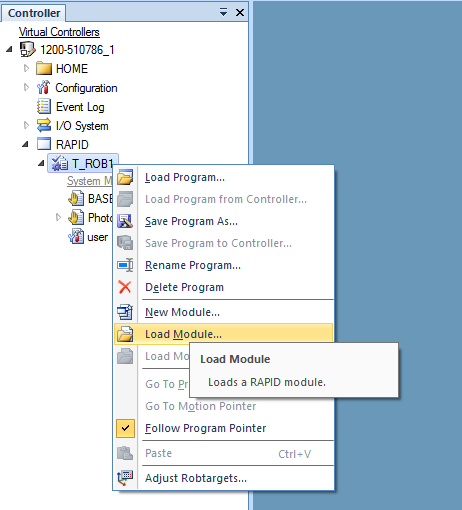
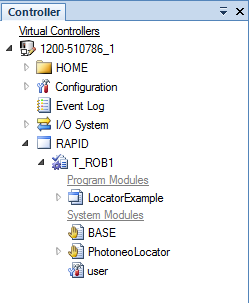
3 Robot module
The Robot module is designed to be easily integrated into existing applications written in the RAPID language.
3.1 Robotic API
Note: It is strongly recommended to read the Photoneo robotic API prior to this section.
This section describes available API calls provided by the Robot module. These procedures are intended for high-level control of the locator application.
3.1.1 Connection procedures
Warning: These procedures are contained in the PhotoneoLocator.sys API section and must not be edited!
Connection procedure |
Description / Usage |
|---|---|
Connect to Action Request Server
num pho_wait_for_server(string server_ip,\num port_number,\num wait_time) |
Description
Function to establish a new connection to the Action Request Server.
Input parameters:
Return value:
Usage
The procedure should be called only once at the beginning of the program. Only after the connection has been established is it possible to send requests.
pho_wait_for_server("192.168.1.6", \wait_time:=20);
|
3.1.2 Communication procedures
Note: Please read Action requests for detailed documentation of these procedures.
Warning: These procedures are contained in the PhotoneoLocator.sys API section and must not be edited!
Locator requests
Request |
Input variables |
Output variables |
|---|---|---|
Scan request
pho_request_scan(num vision_system_id,\robtarget pose) |
vision_system_id - vision system ID
|
Note: The response is received by the procedure Wait for scan completion. |
Get objects request
Variant A - Get a specific number of object poses
num pho_request_get_objects(num vision_system_id,num num_of_req_objects,INOUT robtarget results{*},INOUT num num_of_results) |
vision_system_id - vision system ID
|
num RETURN_VALUE - error code [return value]
|
Get objects request
Variant B - Get a single object pose
num pho_request_get_single_object(num vision_system_id,INOUT robtarget result) |
vision_system_id - vision system ID
|
num RETURN_VALUE - error code [return value]
|
Get objects request
Variant C - Get all object poses
num pho_request_get_all_objects(num vision_system_id,INOUT robtarget results{*},INOUT num num_of_results) |
vision_system_id - vision system ID
|
num RETURN_VALUE - error code [return value]
|
Calibration requests
Request |
Input variables |
Output variables |
|---|---|---|
Add calibration point request
num pho_request_calib_add_point(robtarget pose) |
|
|
Solution requests
Request |
Input variables |
Output variables |
|---|---|---|
Change solution request
num pho_request_change_solution(num solution_id) |
|
|
Start solution request
num pho_request_solution_start(num solution_id) |
|
|
Stop solution request
num pho_request_solution_stop() |
— |
|
Get running solution request
num pho_request_get_running_sol() |
— |
num RETURN_VALUE - error code [return value]
|
Response receiving procedures
Response receiving procedures |
Input variables |
Output variables |
|---|---|---|
Wait for scan completion
num pho_wait_for_scan_completion(\num wait_time) |
|
|
3.2 Example programs
The following section contains the Main program example and the calibration template which show the correct usage of the robotic API.
Both programs contain basic error handling.
3.2.1 Main program example
moves to a home pose where it requests the first scan
moves to the start pose above the tray in which it requests all object poses
if no error occurred, it picks all reported objects in a loop:
the robot goes to an approach pose above the object
then it moves in a linear path towards the object and picks it (gripper command needs to be implemented here)
after picking, it moves in a linear path to a deapproach pose above the object
finally, the placing procedure is executed (needs to be implemented)
when all objects are picked, in the start pose it requests all newly reported objects again
if this call is successful, it goes to the picking loop described above
if this call fails, it goes to the home pose and where the next scan is requested
Name: LocatorExample.mod(located in folder example_programs)
MODULE LocatorExample
TASK PERS tooldata tool1:=[TRUE,[[0,0,270],[1,0,0,0]],[2,[0,0,10],[1,0,0,0],0,0,0]];

! Copyright (c) 2022 Photoneo s.r.o.
! All rights reserved
! Description: Locator example with requesting all objects at once
! RobotWare version 5.x-6.x

PROC main()

    VAR num result;
    VAR robtarget targets{100};
    VAR num num_of_targets;
    VAR robtarget home_pose;
    VAR robtarget start_pose;
    VAR num i;
    CONST string server_ip:="192.168.1.2";

    ! RETEACH home and start position for your application
    home_pose := [[-3.05,-494.83,548.52],[0.00666596,-0.340414,-0.940058,-0.0190967],[-2,-3,1,1],[9E+09,9E+09,9E+09,9E+09,9E+09,9E+09]];
    start_pose := [[-3.05,-494.83,548.52],[0.00666596,-0.340414,-0.940058,-0.0190967],[-2,-3,1,1],[9E+09,9E+09,9E+09,9E+09,9E+09,9E+09]];
    FOR i FROM 1 TO 100 STEP 1 DO
        targets{i} := home_pose;
    ENDFOR

    ! Connect to the the Vision Controller, adapt Vision Controller IP address here if needed
    TPWrite "Establishing connection to the Vision Controller...";
    IF pho_wait_for_server(server_ip, \wait_time:=20) <> 0 THEN
        TPWrite "Unable to connect to vision controller " + server_ip;
        EXIT;
    ELSE
        TPWrite "Connected to the Vision Controller "+server_ip;
    ENDIF

    ! Move robot away from scanning area - reteach this position for your robot and workcell
    MoveJ home_pose, v500, z30, tool1;

    ! When robot is away from scanning area, trigger first scan and localization
    pho_request_scan 1;

    WHILE true DO

        !==================== PHOTONEO LOCATOR START ===========================
        ! Wait until scanning is completed
        result := pho_wait_for_scan_completion();

        ! Handle errors if occured
    IF (result = 500) THEN
          ErrLog 4800, "Invalid vision system", "Scan request called with invalid vision system ID" , "Check the ID of the vision system in the Locator Studio", " ", " ";
            EXIT;
        ELSEIF (result <> 0) THEN
            ErrLog 4800, "Locator error", "Something is wrong :-(" , "Scan request returned an error","Error code : "+NumToStr(result,0), " ";
            EXIT;
        ENDIF

        ! Get localized object and pick them, while the result is succeded or localization is in running state (502, 504)
        WHILE result = 0 OR result = 502 OR result = 504 DO
            MoveJ start_pose, v100, z30, tool1;
            WaitTime 2;
            result := pho_request_get_all_objects(1, targets, num_of_targets);

            ! Handle errors if occured
            IF (result = 500) THEN
            ErrLog 4800, "Invalid vision system", "Get object request called with invalid vision system ID" , "Check the ID of the vision system in the Locator Studio", " ", " ";
                EXIT;
            ELSEIF (result = 502 OR result = 504) THEN
                !TPWrite "Locator did not find any object yet, but localization is still running";
            ELSEIF (result = 503) THEN
                TPWrite "Locator did not find any object";
            ELSEIF (result = 505) THEN
                TPWrite "Locator found objects, but are rejected by constraints";
            ELSEIF (result <> 0) THEN
                ErrLog 4800, "Locator error", "Something is wrong :-(" , "Get object pose request returned an error", "Error code : "+NumToStr(result,0), " ";
                EXIT;
            ELSE
                TPWrite "Localized " + NumToStr(num_of_targets, 0) + " objects";
                ! While error code is 0, move to robot to pick object
                FOR i FROM 1 TO num_of_targets STEP 1 DO
            MoveJ Offs(targets{i}, 0,0,50),v100, fine, tool1;
                    MoveL targets{i}, v100, fine, tool1;
                    ! Add gripper command here
            MoveL Offs(targets{i}, 0,0,50),v100, fine, tool1;
                    ! Add placing here
                    MoveJ start_pose, v100, z30, tool1;
                ENDFOR
            ENDIF
        ENDWHILE

        MoveJ home_pose, v500, z30, tool1;
        ! When robot is away from scanning area, trigger next scan and localization
        pho_request_scan 1;

    ENDWHILE
ENDPROC

ENDMODULE
3.2.2 Calibration example
This program is a template for semi-automatic calibration.
Before running the program:
teach the individual calibration poses
start the calibration in the Locator Studio
Now you can start the program. It will move to individual calibration poses and send the Add calibration point request when it reaches them. Once all the calibration points are successfully added, the program ends. If you are satisfied with the calibration result, save it in the Locator Studio.
Name: Calibration.mod(located in folder example_programs)
MODULE Calibration

! Copyright (c) 2022 Photoneo s.r.o.
! All rights reserved
! Description: Locator calibration example
! RobotWare version 5.x-6.x

!                                         CALIBRATION
! Reteach calibration positions and call add calibration point request after reaching each calibration pose
! It is recomended to run calibration in MANUAL mode step by step to have a proper control over the process
! Always make sure that robot does not collide with workcell during transitions between specific waypoints

PROC main()
    VAR num status;
    VAR robtarget calibtarget;

    CONST string server_ip:="192.168.1.2";
    ! Connect to the the Vision Controller, adapt Vision Controller IP address here if needed
    status:=pho_wait_for_server(server_ip, \wait_time:=20);
    MoveJ [[471.73,65.89,746.24],[0.000670178,-0.999932,0.00946903,-0.00673324],[0,-1,2,0],[9E+09,9E+09,9E+09,9E+09,9E+09,9E+09]], v100, fine, tool0;

    ! 1. calibration waypoint
    MoveJ [[816.05,236.85,591.81],[0.00575068,-0.999205,0.0383996,0.00900692],[0,0,2,0],[9E+09,9E+09,9E+09,9E+09,9E+09,9E+09]], v100, fine, tool0;
    calibtarget:=CRobT(\Tool:=tool1 \WObj:=wobj0);
    status:=pho_request_calib_add_point(calibtarget);
    IF status <> 0 THEN
        ErrLog 4800, "CALIBRATION ERROR ", "An error occurred while adding point. Terminating program. ", " ", " ", " ";
        EXIT;
    ENDIF

    ! 2. calibration waypoint
    MoveJ [[792.97,207.99,486.40],[0.23328,0.876564,0.3813,0.178397],[0,-1,2,0],[9E+09,9E+09,9E+09,9E+09,9E+09,9E+09]], v100, fine, tool0;
    calibtarget:=CRobT(\Tool:=tool1 \WObj:=wobj0);
    status:=pho_request_calib_add_point(CRobT(\Tool:=tool1 \WObj:=wobj0));
    IF status <> 0 THEN
        ErrLog 4800, "CALIBRATION ERROR ", "An error occurred while adding point. Terminating program. ", " ", " ", " ";
        EXIT;
    ENDIF

    ! 3. calibration waypoint
    MoveJ [[792.98,-4.14,486.37],[0.226246,-0.887877,-0.366304,0.162199],[-1,0,1,0],[9E+09,9E+09,9E+09,9E+09,9E+09,9E+09]], v100, fine, tool0;
    calibtarget:=CRobT(\Tool:=tool1 \WObj:=wobj0);
    status:=pho_request_calib_add_point(CRobT(\Tool:=tool1 \WObj:=wobj0));
    IF status <> 0 THEN
        ErrLog 4800, "CALIBRATION ERROR ", "An error occurred while adding point. Terminating program. ", " ", " ", " ";
        EXIT;
    ENDIF

    ! 4. calibration waypoint
    MoveJ [[1057.54,91.90,501.87],[0.130825,0.906861,0.400493,-0.00967634],[0,-1,1,0],[9E+09,9E+09,9E+09,9E+09,9E+09,9E+09]], v100, fine, tool0;
    calibtarget:=CRobT(\Tool:=tool1 \WObj:=wobj0);
    status:=pho_request_calib_add_point(CRobT(\Tool:=tool1 \WObj:=wobj0));
    IF status <> 0 THEN
        ErrLog 4800, "CALIBRATION ERROR ", "An error occurred while adding point. Terminating program. ", " ", " ", " ";
        EXIT;
    ENDIF

    ! 5. calibration waypoint
    MoveJ [[528.27,253.23,499.76],[0.0499036,-0.924626,0.341423,-0.161266],[0,-2,3,0],[9E+09,9E+09,9E+09,9E+09,9E+09,9E+09]], v100, fine, tool0;
    status:=pho_request_calib_add_point(CRobT(\Tool:=tool1 \WObj:=wobj0));
    IF status <> 0 THEN
        ErrLog 4800, "CALIBRATION ERROR ", "An error occurred while adding point. Terminating program. ", " ", " ", " ";
        EXIT;
    ENDIF

    ! 6. calibration waypoint
    MoveJ [[969.79,632.28,521.28],[0.0108505,-0.84888,0.528057,-0.0210013],[0,-1,3,0],[9E+09,9E+09,9E+09,9E+09,9E+09,9E+09]], v100, fine, tool0;
    status:=pho_request_calib_add_point(CRobT(\Tool:=tool1 \WObj:=wobj0));
    IF status <> 0 THEN
        ErrLog 4800, "CALIBRATION ERROR ", "An error occurred while adding point. Terminating program. ", " ", " ", " ";
        EXIT;
    ENDIF

    ! 7. calibration waypoint
    MoveJ [[1008.73,-31.40,565.58],[0.0288533,0.76709,0.639097,-0.0479073],[-1,-1,1,0],[9E+09,9E+09,9E+09,9E+09,9E+09,9E+09]], v100, fine, tool0;
    status:=pho_request_calib_add_point(CRobT(\Tool:=tool1 \WObj:=wobj0));
    IF status <> 0 THEN
        ErrLog 4800, "CALIBRATION ERROR ", "An error occurred while adding point. Terminating program. ", " ", " ", " ";
        EXIT;
    ENDIF

    ! 8. calibration waypoint
    MoveJ [[713.66,268.32,557.40],[0.276765,-0.902461,0.311008,0.110633],[0,0,2,0],[9E+09,9E+09,9E+09,9E+09,9E+09,9E+09]], v100, fine, tool0;
    status:=pho_request_calib_add_point(CRobT(\Tool:=tool1 \WObj:=wobj0));
    IF status <> 0 THEN
        ErrLog 4800, "CALIBRATION ERROR ", "An error occurred while adding point. Terminating program. ", " ", " ", " ";
        EXIT;
    ENDIF

    ! 9. calibration waypoint
    MoveJ [[1008.46,279.81,474.29],[0.488493,-0.742103,0.458484,0.0212219],[0,-1,3,1],[9E+09,9E+09,9E+09,9E+09,9E+09,9E+09]], v100, fine, tool0;
    status:=pho_request_calib_add_point(CRobT(\Tool:=tool1 \WObj:=wobj0));
    IF status <> 0 THEN
        ErrLog 4800, "CALIBRATION ERROR ", "An error occurred while adding point. Terminating program. ", " ", " ", " ";
        EXIT;
    ENDIF

    MoveJ [[471.73,65.91,746.24],[0.00067122,-0.999932,0.00945002,-0.00673499],[0,-1,2,0],[9E+09,9E+09,9E+09,9E+09,9E+09,9E+09]], v100, fine, tool0;
    EXIT;
ENDPROC

ENDMODULE
3.3 Error handling
Every action request is a function that returns a value - an error code. On success, 0 is returned. Any other value means an error occurred during the execution of the requested action.
It is recommended to implement adequate error handling for your particular application after each synchronous action request and response-receiving procedure.
Error codes together with their description and troubleshooting can be found here.
Note: Example programs provide basic error handling.
4 Running the Main program example
4.1 Prerequisites
Before the Main program example can be run, the following requirements must be met:
A fully configured solution with a single vision system must be prepared for deployment
The robot controller must be configured according to the chapter Robot controller setup of this integration guide
Locator Studio network settings must be configured
Gripper procedures should be implemented (optional - if not implemented, the robot will not actually pick the object)
The placing procedure should be implemented
4.2 Reteach the robot poses
The Main program example uses the following poses:
home_pose - scan acquisition is requested in this pose via scan request. For extrinsic vision systems, it is a pose in which the robot does not occlude the scanning area. For hand-eye vision systems, it is a pose in which the scanner on the robot has an optimal view of the scene.
start_pose - a pose from which the robot moves to a pose above the reported object pose (an approach pose)
Besides these two poses, the placing procedure needs to be implemented.
4.3 Runtime
Deploy your solution. The Action Request Client status on the Deployment page should be ** DISCONNECTED ** (from the Action Request Server).


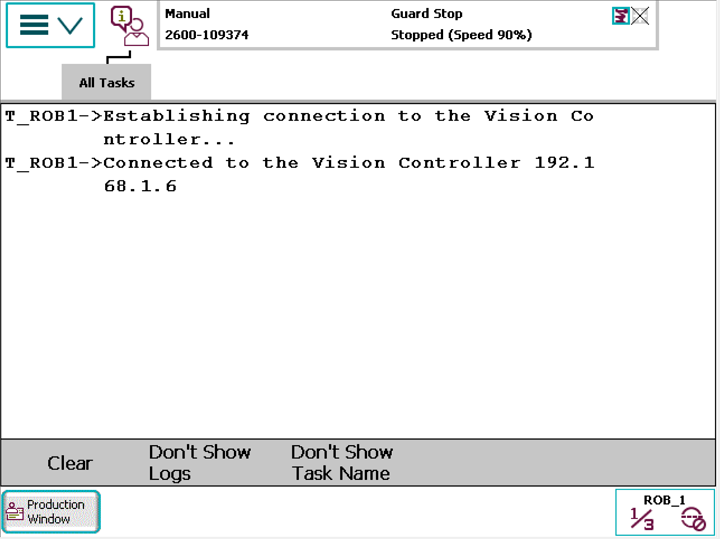
The Action Request Client status on the Deployment page will change to the ** CONNECTED ** state.
The robot should now start sending requests to the Vision Controller and execute movements.
NOTE: Ensure that you are ready to halt motion execution immediately. It is strongly recommended to reduce the speed to 10% of the maximum during initial tests.