Robot communication overview
This page contains a general description of Robot communication.
Contents
1 Architecture
1.1 Robot interface and Robot module
Communication between the vision controller and the robot controller is realized through the Robot interface on the vision controller and the Robot module running on the robot controller.

1.2 TCP/IP based
TCP/IP protocol is utilized for communication between the vision controller and the robot controller. Some robot controllers do not include network communication out-of-the-box but as an additional option. Section Prerequisites of the Robot integration guides lists all requirements for complete installation of the Robot module.
Note: No other communication protocols are currently supported.
1.3 Communication channels
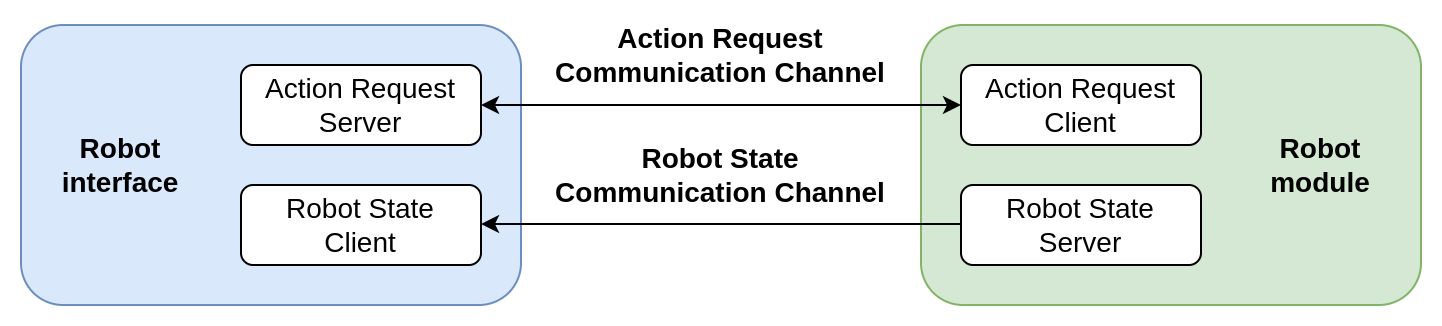
Communication between the vision controller and the robot controller is divided into two communication channels which are intended for different purposes. On each side of a communication channel, there’s a TCP server and a TCP client. These channels are:
Action Request Communication Channel The vision controller creates a TCP server and the Robot module acts as a TCP client. The server is referred to as the Action Request Server and the client is referred to as the Action Request Client. Through this channel, the Action Request Client sends action requests to the Action Request Server. The vision controller executes the received action request and sends a response back to the robotic controller.
Robot State Communication Channel Note: Only available for the Bin Picking Studio The Robot module creates a TCP server and the vision controller acts as a TCP client. The server is referred to as the Robot State Server and the client is referred to as the Robot State Client. Through this channel, the Robot State Server sends robot state data to the Robot State Client. The robot state data are used:
during the teaching of a gripping point
during the calibration of a vision system
during the deployment for hand-eye vision systems
for real-time visualization of the robot’s movement
1.4 Serial and parallel program execution
The implementation of the communication in the Robot module can slightly differ between different robot brands. On some brands, the communication runs in a single (main) task, on others, it is extracted to run in a separate task with which the main task interacts.
Execution of motion commands and communication with the vision controller runs in a single main task.
Part of the program responsible for communication with the vision controller runs in a separate task. The main task (executing motion commands, etc.) runs on the Teach Pendant, synchronizes with the background task via flags, and exchanges data with it via registers.
2 General principles
2.1 Persistence
The part of the Robot interface whose network parameters were changed on the Network page of the Studio is restarted when the changes are applied by pressing the Save button.
2.2 Automatic brand recognition
The brand of the connected robot is determined automatically when a new connection is established which enables proper communication with the robotic controller.
Bin Picking Studio
2.3 Full operator control
Bin Picking Studio
The robot programmer is responsible for implementing the gripper commands and configuration of the bin picking routine parameters (motion speed, acceleration, accuracy, etc…).
In order to provide adequate feedback, the implementation of the Robot module always enables the robot programmer/operator to track the current robot program execution directly on the teach pendant. Motions are never executed by background tasks and out of the programmer/operator scope.
Extreme caution is necessary, especially during initial commissioning. Users must always make sure that the movement speed and acceleration are set appropriately and should be prepared to halt robot program execution immediately if necessary.
2.4 Easy to integrate
Robot modules have been developed to be easily integrated into existing robotic applications written in standard robotic languages. From a robot programming point of view, the Robot module is a set of jobs/routines/programs that are available for the robot programmer/operator to be called when needed.
3 Brand support and Robot module contents
3.1 Supported robot brands
Bin Picking Studio
Bin Picking Studio is compatible with a wide range of industrial manipulators produced by different manufacturers. In the current version following robot brands are supported:
Mitsubishi
RobCo
Locator Studio
Photoneo offers Robot modules for Locator Studio for the following robotic brands:
Doosan
Hyundai Robotics
Kassow Robots
KUKA KRC
Mitsubishi
Robco
Yaskawa
However, for the LS it is possible to write your own Action Request Client (TCP/IP client) on any compatible robotic controller or system (PLC). Specification of the Communication protocol is available upon request.
3.2 Robot module contents
The Robot module consists of:
Photoneo robotic API A set of procedures (jobs/routines/programs) written in the native programming language(s) of the particular robotic brand. These procedures are used for easy interfacing with the Studio.
Example programs Several simple exemplary robotic programs with different approaches in standard applications.
Integration guide A guide that covers the configuration of the robotic controller for use with the Studio, installation of the Robot module, API documentation, and instructions for usage.
The Robot module is a ZIP archive and can be downloaded from the official Photoneo website.